Willy Wonka Cake
I’m going to show you how to make chocolate river Willy Wonka Cake.

HOW TO MAKE WILLY WONKA CUPCAKE CAKE
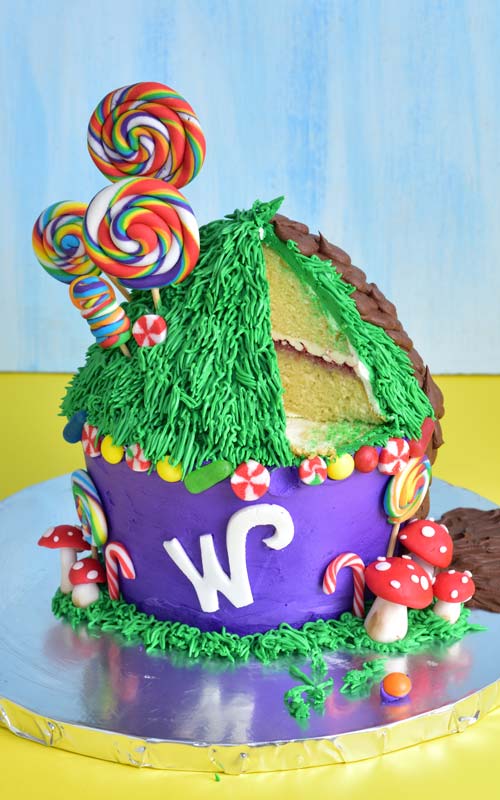
For this Willy Wonka cake I used my basic sponge cake but you can use a pound cake, chocolate cake, carrot cake. To fill and decorated the cake I used Swiss buttercream and all my decorations are made out of marshmallow fondant.
BAKE THE CAKE
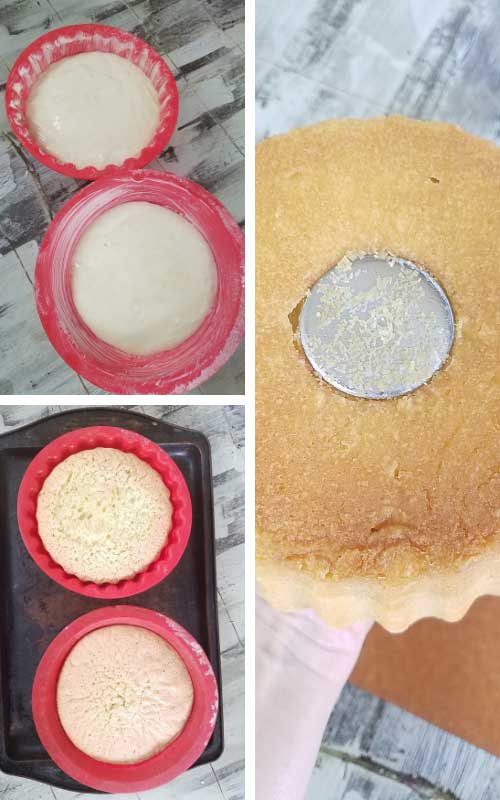
To bake the cakes I used my Giant Silicone Cupcake Molds. When using a giant cupcake pan it is best to use a heating core to ensures even baking.
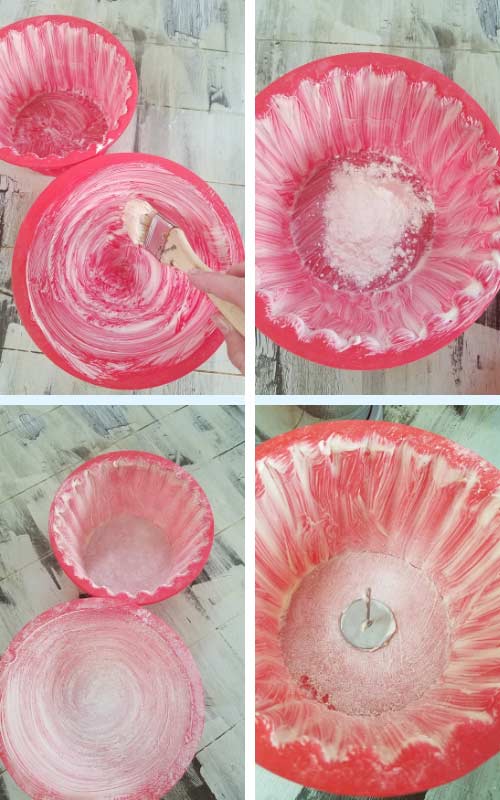
As I don’t have a heating core I always use a flower nail instead. Even for large 12-inch round cakes. I coated the nail it with butter and flour.
CAKE FILLING
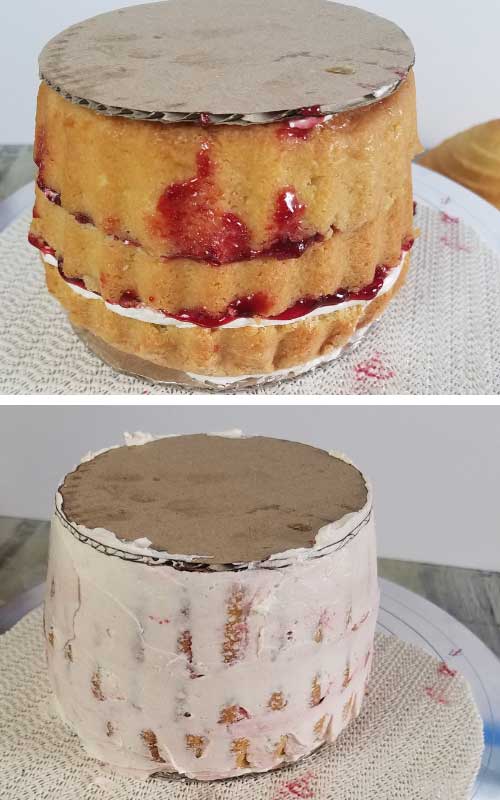
Also, I torted both, top and bottom cake layers. A
I love a generous dose of jam in the cake. To fill the cake I used raspberry jam and Vanilla Swiss Buttercream.
Use a spatula to crumbcoat the cake and chill until firm, about an hour or so.
ICE THE CAKE
To ice the outside of the cake I also used Swiss Buttercream. Are you wondering how I achieved bright purple and green colors? Follow my How to Color Swiss Buttercream tutorial.
- It’s easier to ice the bottom of the cupcake cake when you turn it upside down. Having narrow end up and wide end down. Be sure to use a round cardboard cake board on the bottom and top.
- Then chill it and turn it again so the wide part is up and narrow is down, just like it should be. You can watch how I did it the video below.
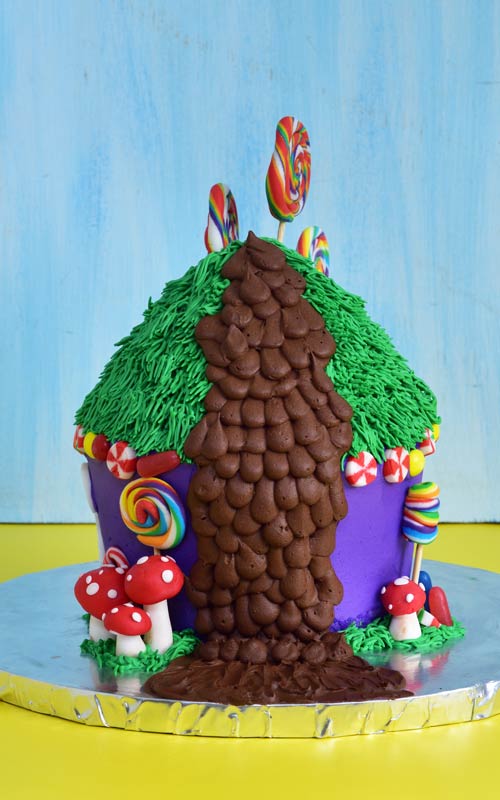
- Then proceed to crumbcoat the top of the giant cupcake. Chill for 30 minutes and then with a Grass Piping Tip make the grass with green buttercream. Make sure to leave a section without piped grass for a chocolate river. Chill the cake until ready to add rest of the decorations.

PREPARE COLORED FONDANT
To make all the rainbow lollipops, candy canes and mushrooms I used fondant. I used a a small batch of homemade marshmallow fondant. I let it rest in the fridge for an hour before using.
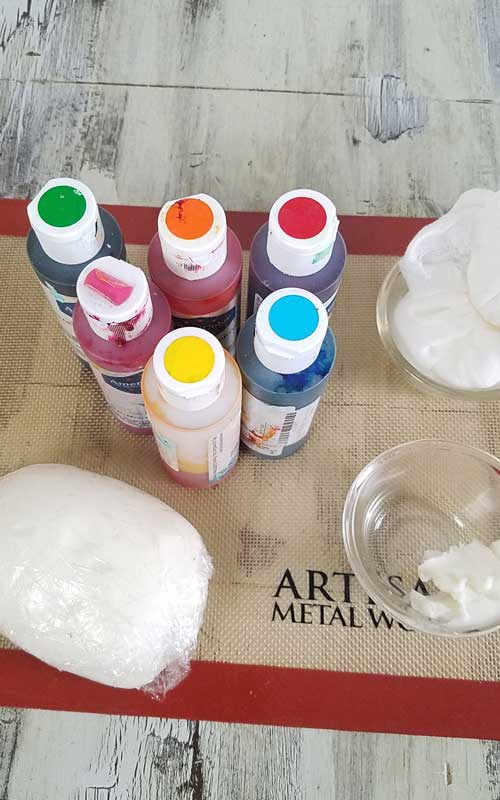
Then I cut the fondant it in half. I kept one half white and divided other into 6 equal portions. I colored each with a get food color.
- Few things to remember when coloring fondant:
- Wear gloves
- Have Crisco and cornstarch on hand
- Use a silicone mat
- Kitchen towel to dry your hands after washing
- It’s best to wear gloves when coloring fondant. If you get color on you hands don’t panic. Try using Barbasol Shaving Cream to wash your hands. It usually does the trick for me.
- To color fondant I first make a well in the center. I add few drops of color in the well. While kneading in the food color I also add about pea size of crisco and knead it in with the gel color. If for some reason fondant becomes too sticky I knead in little bit of cornstarch.
- Test if fondant is thoroughly colored by cutting it in half. Check if color is even on cut sections. Knead little more as needed.
- Be sure to wrap each colored fondant ball into plastic wrap to prevent from drying out.

QUICK GUMPASTE WITH TYLOSE
Tylose is great for making quick gumpaste. Knead 1/2tsp of Tylose Powder into about 1/4 cup of fondant. Use immediately. Cover remaining quick gumpaste while working to prevent it from drying out.
Fondant treated with Tylose powder dries significantly faster than fondant. It also dries hard.

GUMPASTE/FONDANT DECORATIONS
All the decorations need some time to dry, 2 – 3 hours. They can be made ahead of time. Store them in an airtight container until ready to use.

Make candies, rainbow lollipops and candy canes. Watch the video tutorial below to see how I made them. Lollipops are so fun to make.

MUSHROOMS
Make variety of mushroom sizes. It is best to make mushrooms in steps.
- Shape the cap using red quick gumpaste. Press a small flat white piece on an underside. Using a fondant ball tool make a hole for the tip of the white stem. With a tootphick make the gills lines. Let dry.
- Shape the white stem. Insert a toothpick and let dry.
- Using edible glue attach stem and the cap. Keep the mushrooms upright. Let dry.
- Attach small white dots onto the cap. Use a little bit of water for the glue.
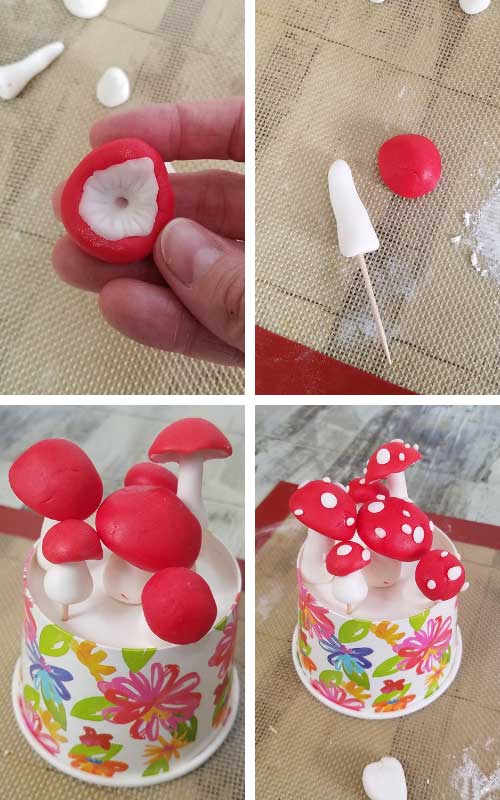
- Remove the toothpick.
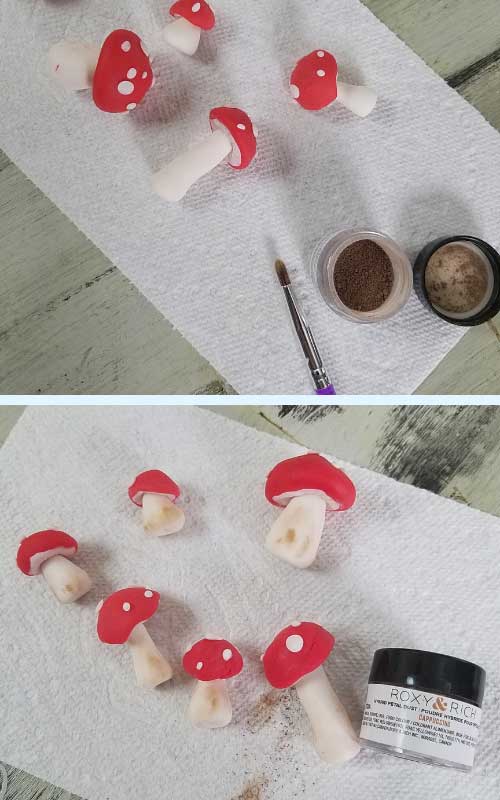
- Using dry food paint brush and edible petal dust shade the bottom of the stems.
WILLY WONKA CAKE ASSEMBLY
Use fondant decorations and/or store bought candies to decorate the cake.
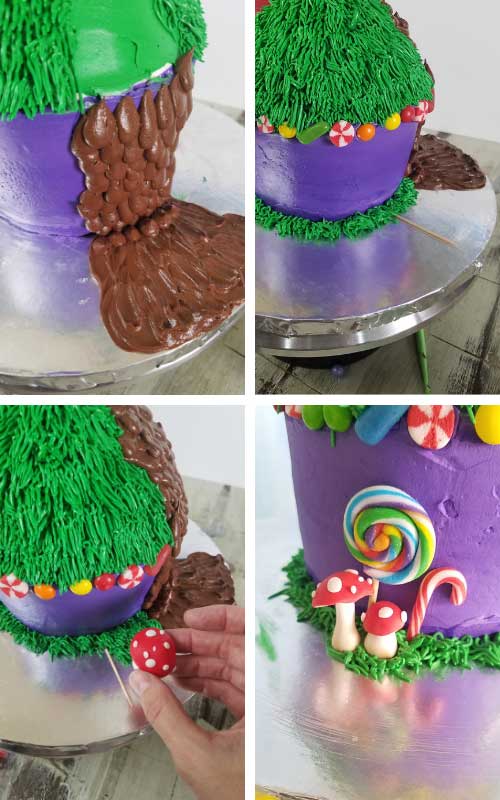
We can’t have a Willy Wonka cake without a chocolate river, can we?! With Chocolate Swiss Buttercream and a Round Piping tip pipe the chocolate river. Start at the bottom of the purple cake layer and continue all the way up the grass cake tier.

Use green Swiss Buttercream and pipe the grass layer all around the bottom base. Attach mushrooms, round lollipops and candy canes.
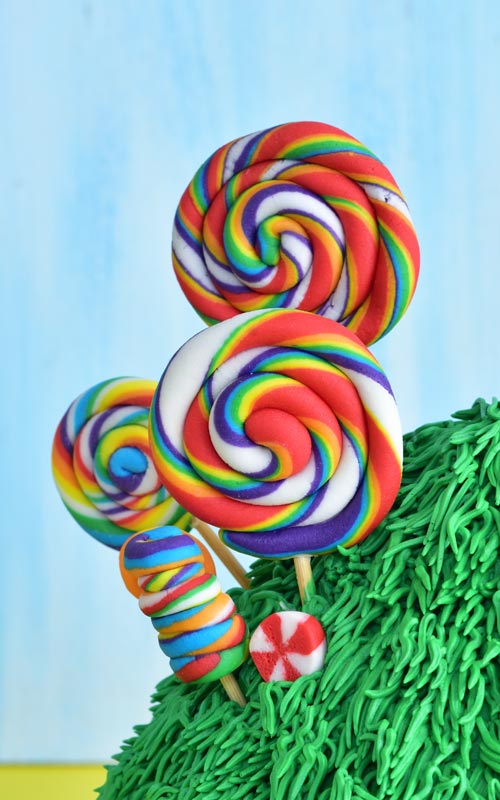
Insert fondant swirl and spiral rainbow lollipops into the cake.

MORE POP CULTURE TREATS
- Wonka Bar Cookie With a Golden Ticket (via SweetAmbs)
- Vans Shoe Cake
- Dino Eye Cookies
TO MAKE WILLY WONKA CAKE YOU NEED
- Cake Recipe : Sponge Cake, Walnut Sponge Cake, Vanilla Pound Cake,
- Swiss Buttercream
- Small Batch Marshmallow Fondant
- TOOLS
- Giant Cupcake Cake Pan
- Heating Core or a Flower Nail (buttered and floured)
- Food Colors
- Grass Piping Tip
- Large Round Piping Tip 1A
- Tylose Powder
- Crisco, Cornstarch
- Lolipopsticks or Bamboo Skewers, Cutting Pliers
- Food Paint Brush
- Exacto Knife – to cut out W logo from white fondant, see the video for the reference
- Water or Edible Glue (dissolve tylose or little bit of quick gumpaste in a small amount of water)
- Cappuccino Petal Dust
- Candies (optional)
- Tootphick
- Fondant Tools
- Small silicone rolling pin
- Silicone Mat
- Cake Boards
This post contains Amazon affiliate links that earn me a small commission, at no cost to you. I only recommend products that I use and love. Learn more about my affiliate policy here.

Hi, I’m Hani
Welcome!
Thank you for visiting Haniela’s. On my blog, you’ll find delicious sweet & savory recipes made with simple ingredients. Why not start a new adventure? Discover a world of cookie decorating with my step-by-step tutorials.

Hi, I’m Hani
Welcome!
Thank you for visiting Haniela’s. On my blog, you’ll find delicious sweet & savory recipes made with simple ingredients. Why not start a new adventure? Discover a world of cookie decorating with my step-by-step tutorials.


Such a colorful cake! Lots of techniques to this one! Any child would love it!