Decorated Ballerina Tutu Cookies Step-by-Step
These ballerina tutu cookies are the perfect sweet treat for celebrating the little ballerina in your life! Soft, elegant, with delicate textures and subtle sparkle. Wonderful for dance recitals or birthday parties.
BALLERINA COOKIES STEP-BY-STEP
In this cookie decorating tutorial, I’m going to show you how to decorate ballerina tutu cookies in two ways. The first one is more complicated, and the second one is a bit more straightforward. You can choose whichever one you prefer, depending on the amount of time you can dedicate to the project and your skill level.

THINGS YOU NEED
- Get all the tools and supplies in Haniela’s Amazon Shop
- Ballerina Tutu Cookie Cutter
- Gold Edible Luster Dust or Gold Luster Dust Spray Pump
- Gel Food Coloring: ivory, pink
- Flower Nail
- Parchment Squares
- Tipless Piping Bags
- Scribe Tool
- Edible marker – yellow or brown
- Template optional
This post contains Amazon affiliate links that earn me a small commission, at no cost to you. I only recommend products that I use and love. Learn more about my affiliate policy here.
COOKIES AND ROYAL ICING
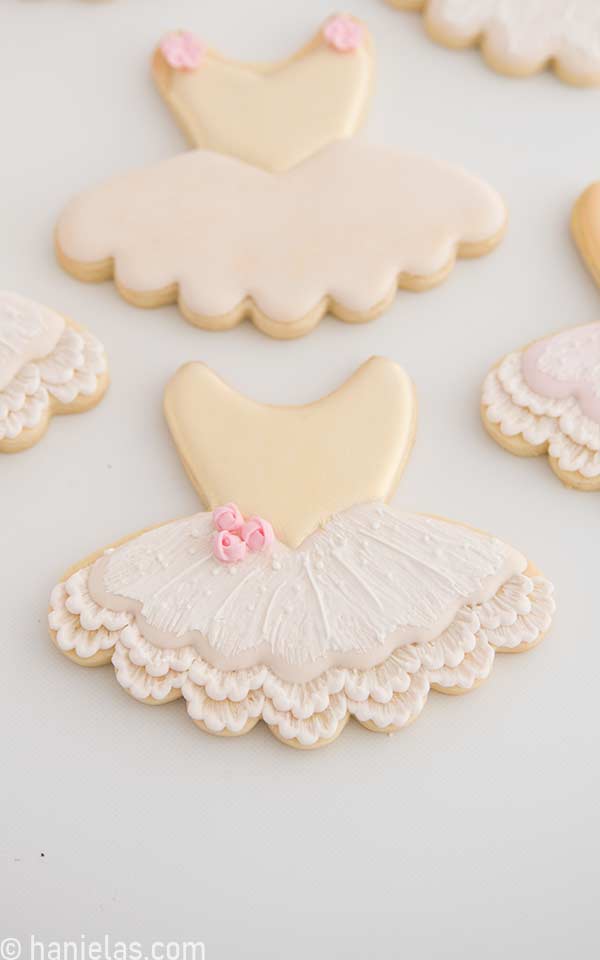
I used a beautifully shaped tutu cutter to make the sugar cookies, along with pastel ivory and pink.

ROYAL ICING COLORS AND CONSISTENCIES
- Ivory/Pink Icing: piping consistency (brush embroidery), 15-second consistency (bodice and tutu skirt)
- Pink Icing: stiff consistency ( piped flowers)
TEMPLATE
Let’s start with the template, though it’s not necessary; it can help you get your bearings on a cookie, especially if you’re struggling with this first step. Trace the ballerina tutu shape onto the cardstock, cut out it out. Use an exacto knife to make slits in the cardstock, then use these slits to trace the guides on the cookie with an edible marker, as seen in the pictures.

Here I changed the neckline on the bodice, and I added teh sleeves (steps 1-2).

TWO BODICE STYLES
The icing I’m using to decorate both tutu bodices is about 15-second consistency royal icing. If you’d like to enhance the bodices with gold luster dust, you have a couple of options. You can wait for the icing to dry, then apply edible gold luster dust as paint (we’ll talk more about that later). Or, for a soft gold sheen, use gold luster dust in a spray pump and lightly mist it directly onto the wet icing, immediately after flooding.


BRUSH EMBROIDERY
- Now let’s talk about brush embroidery. This popular technique is widely used in both cookie and cake decorating. Before we begin, prepare a small glass of room-temperature water and a fine liner paintbrush. Be sure to use a paintbrush designated for food use only. I like using the Wilton paintbrush set – check the tools section for a full list of supplies and where to find them.
- We use water to lightly dampen the brush, but it shouldn’t be soaking wet. After dipping the brush in water, blot it gently on a paper towel to remove any excess moisture before creating the brush embroidery design.

- As you can see, the bottom edge of my cookie has a beautiful scalloped outline.
- I’m following that shape with piping-consistency royal icing, creating a small back-and-forth wave, think soft zigzag.
- Be sure to pipe the line thick enough so you can gently brush some of the icing away with your paintbrush.
- If the line is too thin, the border will weaken, and you’ll lose that lovely dimension.
- I prefer working in sections rather than piping one continuous line.
- Royal icing crusts quickly, and decorating one section at a time gives you enough time to brush and shape the design without the rest drying out in the meantime.
- What you want to do is use your damn paintbrush and pull some of the freshly piped icing inwards.
- And then you have to repeat this until you reach the other side of the cookie.
- Repeat the process to make the second layer.


TUTU SKIRT
- Flood the remaining area of the cookie using 15-second consistency royal icing.
- Outline the section first, following the curve of the bottom edge, then fill it in.
- Use a scribe tool to gently spread and smooth the icing for an even finish.

Or if you’d like to simplify things, you can skip brush embroidery and flood the whole tutu skirt with 15-second consistency royal icing. Allow to dry.

TEXTURIZE TUTU SKIRT WITH ICING
I wanted to create a sheer layer of fabric that sits atop the base of the tutu skirt. To achieve that look, we’ll add a textured layer over the smooth icing. This step is optional, and so if you prefer a simpler design, you can skip ahead.
Before you move on to this step, make sure the first layer of icing is dry. To create the texture, add picing consistency icing across the surface using a coarse and lightly damp paintbrush. The coarse bristles will naturally add texture. If your icing is slightly thicker, lightly dampen the brush to help it glide smoothly. Once you have an even layer, pipe additional details to give the skirt more character and dimension.
Use piping-consistency icing for the decorative lines. For the tiny dots, use about 20-second consistency icing. Pipe the dots in a graduated pattern – larger dots near the base of the bodice and gradually smaller as you move toward the bottom of the tutu.


PAINT WITH GOLD LUSTER DUST
If you don’t have gold luster dust in a spray pump to apply directly onto freshly iced cookies, you can use it in dry form to create edible metallic paint. Simply mix edible gold luster dust with a small amount of clear alcohol until it reaches a paint-like consistency. I recommend using high-proof clear alcohol such as Everclear or vodka.

Before painting the icing with edible luster paint, make sure it is completely dry. Allow the cookies to dry for at least 8–12 hours before applying the gold luster dust paint.
When painting, avoid oversaturating your brush with edible metallic paint. Apply a light coat and, if needed, add a second coat once. I also created a pink version of the ballerina tutu cookie—you can see how it looks in steps three and four.

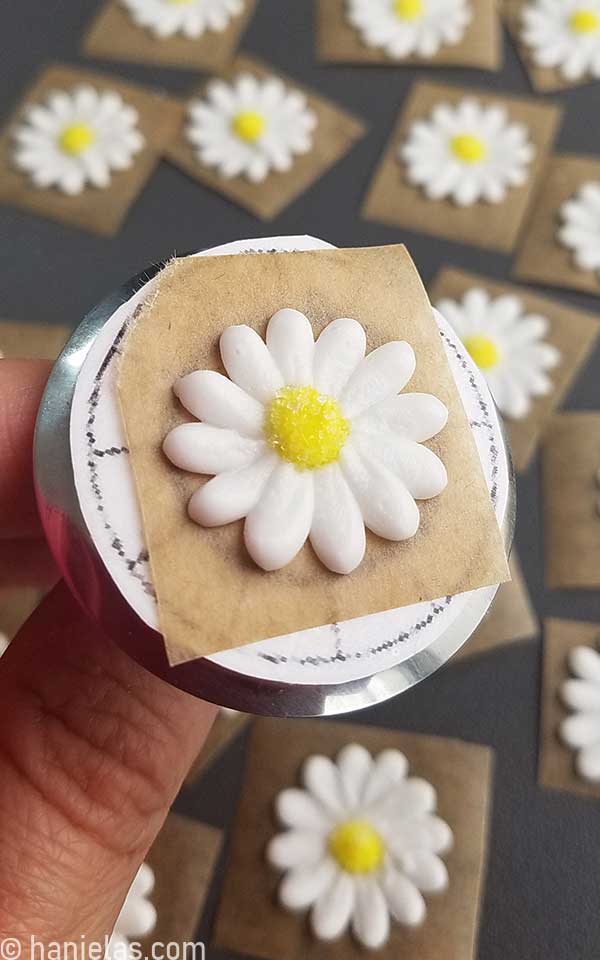
ROYAL ICING FLOWERS
If you’d like, you can embellish your ballerina tutu cookies with delicate edible flowers. To make them, you’ll need a flower nail, small parchment squares, thick-consistency royal icing, and a piping bag fitted with a small petal tip (such as tip 101S). This tiny petal tip is perfect for piping miniature roses or daisy-style flowers.

- Take a moment to examine the petal tip.
- Even though it’s small, one end is slightly narrower, and the opposite end is wider.
- Keep this in mind while piping.
- Attach a small square of parchment to the flower nail using a dab of icing, then gently press it flat.

- To pipe a three-petal rose, start by piping a small mound of icing in the center.
- Pipe the first petal around it, holding the tip so the narrow end faces outward and the wider end is closer to the flower nail.
- Continue piping, a total of 3 petals, overlapping each previous petal by about one-third to one-half to create a natural, layered bloom.

Clean up the bottom edge with a two-in-1 decorating tool or a small palette knife, and then allow flowers to dry for 8 hours.

- The second flower we’re going to make is a simple 5-petal daisy.
- Hold the piping bag at a 45° angle, with the narrow end of the piping tip facing out and the wide end facing the center of your flower nail.
- Squeeze the piping bag clockwise, letting the icing fan out as you turn the flower nail counterclockwise.
- Slightly turn the bag towards the middle to change the direction of the pull to finish the petal. Stop squeezing and slowly pull away.
- Repeat with the remaining 4 petals to make a total of 5 petals.

EMBELLISH COOKIES WITH FLOWERS
- And the very last step is to embellish the cookies with beautiful pre-made flowers.
- You can attach these to the cookie with some royal icing.
- Use tweezers to handle these dainty flowers.
- Allow icing to dry for about 30 minutes, and then you are ready to package these beautiful ballerina tutu cookies.


Do you want to stay updated about free cookie decorating tutorials, live events, classes, and products? Sign up for Hani’s Cookie Decorating Newsletter.
MORE BALLET-INSPIRED IDEAS

COOKIE DECORATING TOOLBOX
- Beginner’s Guide To Cookie Decorating
- Ultimate Guide to Cut-Out Cookies (tips, tricks, troubleshooting)
- Royal Icing Recipe
- Small Batch Royal Icing Recipe
- Cookie Icing Recipes (includes vegan royal icing, glaze, fondant)
- Guide To Royal Icing Consistencies with Visual Help(what is stiff, flood icing, etc.)
- How To Freeze Royal Icing
- How To Make Royal Icing Transfers
- Royal Icing FAQ ( for example: how to make black icing, color bleeding, storage, and more)
- How To Make a Cookie Cutter Template
- Ultimate Guide To Cookie Decorating Tools

Hi, I’m Hani
Welcome!
Thank you for visiting Haniela’s. On my blog, you’ll find delicious sweet & savory recipes made with simple ingredients. Why not start a new adventure? Discover a world of cookie decorating with my step-by-step tutorials.

Hi, I’m Hani
Welcome!
Thank you for visiting Haniela’s. On my blog, you’ll find delicious sweet & savory recipes made with simple ingredients. Why not start a new adventure? Discover a world of cookie decorating with my step-by-step tutorials.

Haniela, these cookies are gorgeous, the stenciling is so perfect. I bet the dancers were thrilled.
Katena 🙂
after looking at your latest collection of cookies, inspires me to want to make some too esp. stenciling..now just have to find time..:D