Simple Shamrock Cookies for Saint Patrick’s Day
Celebrate St. Patrick’s Day with these simple and easy-to-make shamrock cookies that anyone can decorate! No special tools are needed. In fact, I used basic sandwich bags to pipe icing onto cookies.

SHAMROCK COOKIES FOR SAINT PATRICK’S DAY
While I decorated these in 2014, this timeless design is still popular today. It’ is easy, approachable, and perfect for parties, classroom treats, or any St. Patrick’s Day celebration.
SAINT PATRICK’S DAY SHARMOCK FUN FACTS
- Shamrock comes from the Irish ‘seamrog’, which translates as “young clover”, and it was considered a sacred plant.
- It’s been associated with Ireland for centuries. Also, Saint Patrick, a Christian missionary, used clover to explain the Holy Trinity of Christianity.
- Four-leaf clover is a rare variation of 3-leaf clover. Its rarity in nature earned him the name lucky shamrock, and it’s regarded as a symbol of good luck. It brings good fortune to those who find it.
- Good luck finding one, though. It is estimated that this unique leaf mutation appears in 1 in 5000 common clovers.
THINGS YOU NEED
- Get all the tools and supplies in Haniela’s Amazon Shop
- Shamrock Cookie Cutter
- Gel Food Coloring: ivory, red, yellow, orange
- Tipless Piping Bags or sandwich bags
- Scribe Tool
This post contains Amazon affiliate links that earn me a small commission, at no cost to you. I only recommend products that I use and love. Learn more about my affiliate policy here.
ROYAL ICING COLORS AND CONSISTENCIES
I used royal icing to decorate cookies. You can use royal icing, vegan icing (using aquafaba), or glaze icing to decorate. And you only need one royal icing consistency and one green gel food coloring to create these beautiful, festive cookies.
- Dark Green Icing: 15-second consistency
- Light Green Icing: 15-second consistency
SHAMROCK SHAPE
- Start by piping the middle stem. Pipe it slightly thicker on the bottom half of the cookie (steps 1-2).
- Shamrock shape in this design consists of 3 heart-shaped leaves.
- Create a heart outline and fill it with 15-second consistency icing (steps 3-
- Repeat with the remaining 2 leaves on the sides.
- Let the icing dry.
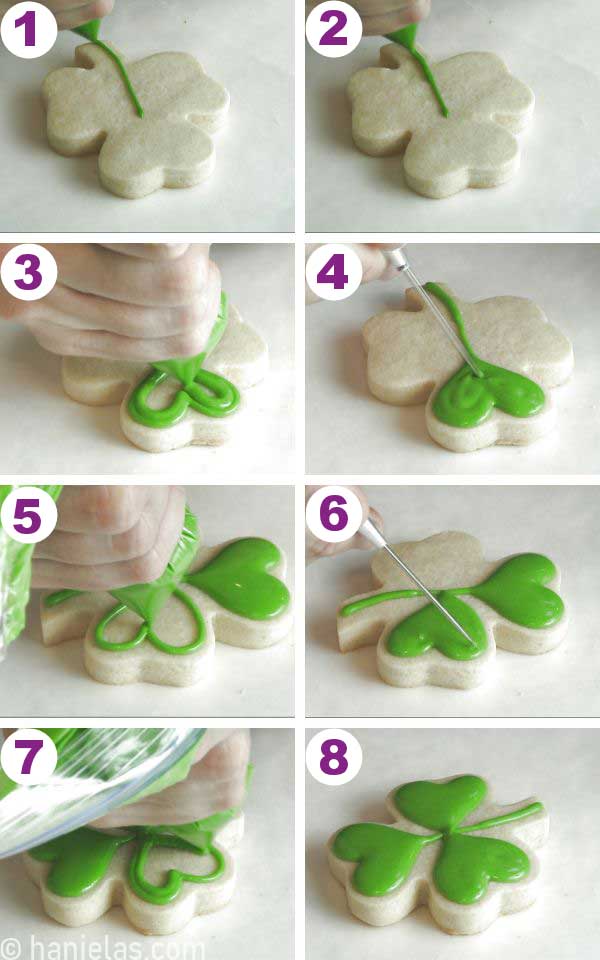
WET-ON-WET DETAILS
- To elevate the look of the leaves, use a wet-on-wet royal icing technique by piping delicate veins onto the leaf base while the icing is still wet.
- The second design begins the same way as the first, following the identical base steps before adding additional details.
- Use light green (15-second consistency) to pipe the curved or straight middle vein (steps 3).
- Then pipe veins on each half of the heart-shaped leaf (steps 4-8).

SUCCESS PIPING TIPS WITH SANDWICH BAG
- I used standard sandwich bags – Great Value brand from Walmart. You can, of course, use standard tipless piping bags.
- To cut a sandwich bag, press the seam down the middle and cut a small opening with scrissors. Cut straight across, don’t angle the cut, and make it small at first. You can always make it bigger if needed.
- Hold the sandwich bag in the palm of your hand, so the seam is facing the palm of your hand.
- When piping thin leaf veins onto the wet base, focus on controlling the pressure you apply to the sandwich bag. Steady, gentle pressure will help you control the flow of icing and keep the lines clean and delicate.
SIMPLE SHAMROCK COOKIES VIDEO TUTORIAL
Do you want to stay updated about free cookie decorating tutorials, live events, classes, and products? Sign up for Hani’s Cookie Decorating Newsletter.
MORE FLORAL COOKIES
COOKIE DECORATING TOOLBOX
- Beginner’s Guide To Cookie Decorating
- Ultimate Guide to Cut-Out Cookies (tips, tricks, troubleshooting)
- Royal Icing Recipe
- Small Batch Royal Icing Recipe
- Cookie Icing Recipes (includes vegan royal icing, glaze, fondant)
- Guide To Royal Icing Consistencies with Visual Help(what is stiff, flood icing, etc.)
- How To Freeze Royal Icing
- How To Make Royal Icing Transfers
- Royal Icing FAQ ( for example: how to make black icing, color bleeding, storage, and more)
- How To Make a Cookie Cutter Template
- Ultimate Guide To Cookie Decorating Tools

Hi, I’m Hani
Welcome!
Thank you for visiting Haniela’s. On my blog, you’ll find delicious sweet & savory recipes made with simple ingredients. Why not start a new adventure? Discover a world of cookie decorating with my step-by-step tutorials.

Hi, I’m Hani
Welcome!
Thank you for visiting Haniela’s. On my blog, you’ll find delicious sweet & savory recipes made with simple ingredients. Why not start a new adventure? Discover a world of cookie decorating with my step-by-step tutorials.