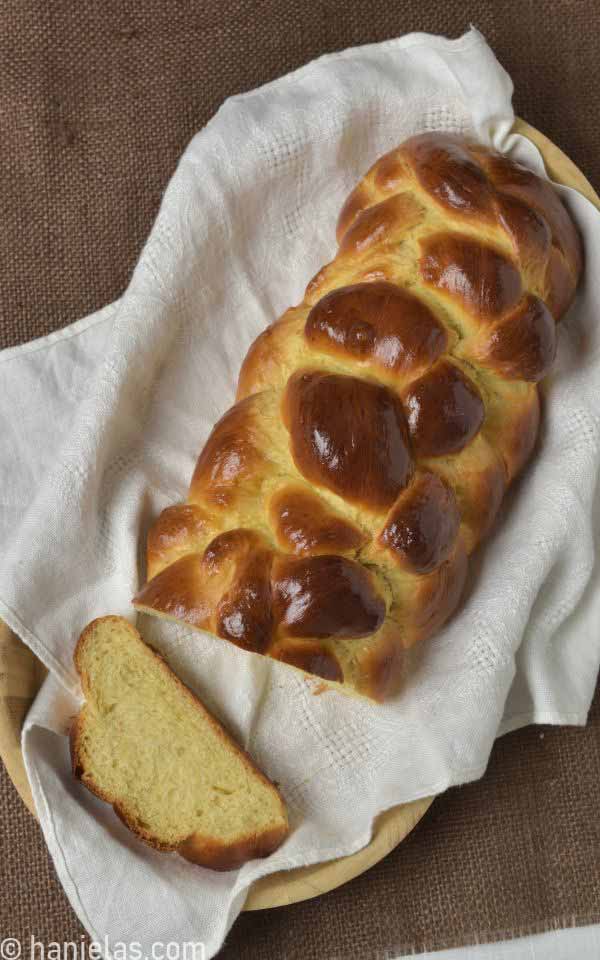
Rum Raisin Challah Bread Recipe |Rich and Buttery and Freezer-Friendly|
Growing up, challah was always part of our Sunday morning breakfast. And every time I bake it, those childhood memories come rushing back to life. If you love the richness of brioche and the beautiful structure of classic challah, this Rum Raisin Challah Bread is truly the best of both worlds.

WHY I LOVE THIS CHALLAH BREAD RECIPE
- Two Delicious Versions in One Dough
- Make a classic plain challah or a Rum Raisin version using raisins soaked in rum for extra depth and warmth. Prefer non-alcoholic? Simply soak the raisins in hot water instead.
- Rich and Buttery
- This recipe gives you the best of two worlds: brioche velvety richness and a classic challah structure and appearance. This challah is light as a cloud, velvety soft, and irresistibly rich.
- It’s so versatile
- This dough isn’t just for challah. You can use it to make babka, Easter breads, or filled buns. Then, once baked, you can use it to make French Toast or Bread Pudding.
- Freezer-friendly
- I love that I can freeze it for later! The baked bread freezes beautifully, making it perfect for baking ahead. I like to slice it and freeze it in batches using freezer-safe paper. And when frozen like that, it keeps for 3 months. Take out as many slices as you need.
- So easy to customize
- Don’t be shy about experimenting with mix-ins. Add your favorite spices, dried fruits, or chocolate to create your own variation.
- Make Ahead
- Are you in a hurry? Prepare the dough and let it rise in the fridge overnight. Bake it the next day. I prefer working with cold dough, especially for shaping and braiding. It’s so much less finicky.
THINGS YOU NEED
- Kitchen Scale (my favorite), measuring cups/spoons
- Mixing Bowls
- Mixer to prepare the dough
- Baking Sheets
- Parchment
This post contains Amazon affiliate links that earn me a small commission, at no cost to you. I only recommend products that I use and love. Learn more about my affiliate policy here.
INGREDIENTS
It’s soft, velvety, and melts in your mouth. I enriched this dough with whole eggs and extra yolks for deep flavor and color. A blend of butter and oil gives the crumb incredible softness while keeping it beautifully moist with a uniform crumb throughout.
- All-Purpose Flour (King Arthur or other good quality flour), use bread for chewier bread, or a combination of all-purpose and bread flour
- Salt
- Whole egg and egg yolks
- Butter and oil (olive oil, vegetable, coconut)
- Honey
- Sugar (optional)
- Dry Active Yeast
- Water
- Vanilla Extract/Vanilla Bean Paste
- Raisins
- Dark Rum, or a combination of dark rum and hot water. Don’t want to use alcohol? Use hot water instead.

SOAK RAISINS
Raisins are dehydrated grapes, with a low (10-15%) water content and a concentrated amount of sugar, and when added to the dough without proper rehydration, they pull the moisture out from the dough thru a process called osmosis. That’s why we need to soak raisins first. It takes about 30 minutes to 1 hour for dry raisins to plump up and fully rehydrate. If you have the time, you can soak them longer for an even juicier result. This recipe calls for raisins soaked in dark rum; if you don’t have rum, try limoncello, caramel, orange, or coffee liquor instead. If you’re short on rum, use some rum and hot water. And if you are trying to avoid alcohol, use hot water, coffee, tea, fruit juice, or a vanilla-baking-emulsion-infused liquid. Before you knead the raisins into the dough, drain them well and pat them dry with a kitchen towel to prevent adding too much liquid.

YEAST SPONGE
Prepare a yeast sponge by whisking warm water, dry active yeast, a touch of honey, and a spoonful of flour. Allow it sit for 5-10 minutes, until it’s foamy.
- Water Temperature Tips
- I feel like this step often deters folks from making yeasted breads. The rule is simple: don’t use hot or cold water.
- Using hot water will kill the yeast. And if we use the latter, the yeast will stay dormant; it won’t activate properly.
- Use room temperature, lukewarm, or warm water. The ideal water temperature is 100°F to 110°F. Don’t worry, using room temperature water will not inhibit yeast activation; it will be a bit slower but steady.

BREAD DOUGH MIXING
Flour does matter. I use all-purpose King Arthur Flour for a velvety soft texture. For a chewier crumb, you can use high-protein bread flour or a combination of all-purpose and bread flour.
This dough can be prepared by hand or using a stand mixer fitted with a hook attachment. In a mixing bowl, combine the flour, salt (step 1), yeast sponge (step 2), and the remaining wet ingredients (step 3). Before kneading, give the mixture a thorough stir to combine everything into a sticky, shaggy dough. Make sure to break up any flour pockets in there, too.
When making challah, it’s important not to add too much flour to the dough. Too much flour can make the dough dry and the finished bake dense and heavy. This can easily happen when you start kneading right away, as the dough can appear very sticky and the temptation to add more flour is strong. To help avoid adding too much flour, I like to stabilize the dough right after combining the ingredients into a shaggy dough. Cover the bowl with a lightly damp kitchen towel, and let it rest for 10–15 minutes. This brief rest allows the flour to hydrate and absorb moisture. Proper hydration makes the dough easier to work with and reduces the temptation to add extra flour, which can lead to dense, heavy bread. Also, it allows the gluten to relax, preventing it from tearing during kneading.

KNEADING
I like to start the kneading slowly, giving the gluten time to properly develop. Rapid movements can shred the gluten strands. I prefer to knead at the lowest speed for 3-4 minutes, then increase the kneading speed to the manufacturer-recommended setting for an additional 10 minutes. Dough should pull away from the side of the bowl, but it shouldn’t form a ball around the kneading hook. It will be soft but not wet; if it appears too wet or sticky, add more flour by the tablespoon.

RUM RAISIN VERSION
In this recipe, I divide the dough to create two versions: a classic plain challah and a Rum Raisin variation made with raisins soaked in rum for extra depth and warmth. Gently knead the drained raisins into one half of the dough, then shape it into a ball. Transfer to a greased bowl, cover with lightly greased food wrap, and let it rise in a warm, draft-free spot.

FIRST PROOF/BULK FERMENATION
Let the dough proof in a warm, draft-free spot for 2-3 hours, until doubled in volume and nicely risen. Seasonal temperatures and humidity can dictate how quickly dough rises, so if it takes a little longer in winter, it’s normal. If you don’t have time to wait that long, cover it well and slide it into the fridge for a slow rise. It will be just fine there for 2-3 days. I find challah braiding much easier with cold dough.
This happened once: I prepared the dough, let it proof, and then when it was time to shape the challahs, I had to leave the house unexpectedly to run an errand. I was panicking because I didn’t want to waste the dough, so I wrapped it in a large plastic bag and put it in the fridge. I used it two days later with no problems. If anything, it was deliciously flavorful and really nice to work with, too.

CHALLAH BRAID
Invert the dough onto a lightly floured surface. Once you pull the risen dough out, look for a beautiful spiderweb texture made of thousands of little air bubbles (step 2). Yay! Divide the dough into 6 strands. Shape them into robes about 1 1/4 to 1 1/2 inches thick (step 4). Plaiting a 6-strand loaf can be so confusing, especially if you haven’t done it before. It’s perfectly fine to stick with a 3-strand braid or face the 6-strand braiding challenge. You know, you can do it!

CHALLAH BRAIDING TIPS
- Once you release the risen dough onto a work surface, divide it into approximately equal portions. You can use a scale, but if you don’t have one, flatten the dough into a rectangle and slice it up into approximately equal pieces.
- Ideally, you want to shape the dough into even strands with slightly tapered ends. This takes some practice. Give yourself some grace. I’m still learning myself. And even a slightly unevenly shaped challah still tastes incredibly comforting and delicious.
- Lightly dust the strands with flour before braiding, and give them a little roll to coat them. This is helpful if you need to re-braid, as it preserves the braid’s definition.
- Most importantly, try not to braid the strands too tightly, as it can cause them to split or tear as they rise and then expand in the oven as challah bakes.

FINAL PROOF AND EGG WASH
- Don’t skip the final proof before baking. Not letting the braided loaf proof properly, I believe, is one of the main pitfalls of challah making. You are looking for a well-risen, often more than doubled in size, pillowy soft loaf.
- Some folks brush the challah right after braiding. This helps achieve that signature dark brown skin and also mitigates skin/crust formation in the last stage of proofing.
- Loosely cover the loaf with well-oiled food wrap.
- And then apply egg wash again to a well-proofed loaf just before baking.
- Be gentle with the brushstrokes so you don’t accidentally deflate the dough. Switch to a smaller paintbrush for hard-to-reach nooks and crannies.
- Avoid drips and pooling around the base. If any, clean it up with a paper towel before baking.


BAKING TIPS
- My challah bread has burned on the bottom multiple times, and I fear it might happen to you, too. That’s why I highly recommend doubling on parchment or using a silicone baking mat to prevent the bread from burning on the bottom.
- For an even bake, I prefer to start at a higher temperature and then lower it. This helps the bread bake inside without becoming too dry and too brown on the outside. I start baking at 350°F (180°C) for the first 20 minutes, then reduce the heat to 330°F (165°C) and bake for an additional 20-25 minutes, until the internal temperature reaches 190°F (87-88°C). Remember, it will continue to bake for a little while after you take it out of the oven.
- And if the top is browning too much, use a foil dome to cover it.
- I hardly ever use a thermometer to check the internal temperature, so I look for visual and sound cues instead. The crust should be medium-dark brown, and the loaf should give a hollow sound when tapped on the bottom.

RUM RAISIN CHALLAH BREAD SUCCESS TIPS
This is super important for a consistent rise. Room-temperature ingredients blend more easily, ensuring proper emulsification and a cohesive dough.
Weak gluten network: This happens when you don’t knead the dough enough. Kneading helps establish a strong gluten network; failure to do so creates a weak structure and dough that can’t trap air and rise properly, making it heavy, dense, and even gummy. Knead the dough until it is smooth and flexible.
Too much flour – don’t add too much flour during mixing. Allow the wet, shaggy dough to rest to ensure proper flour hydration before kneading.
Flour can vary from brand to brand and can vary in dryness, meaning drier flour will absorb more liquid and vice versa. Air humidity can also affect how flour behaves, so pay attention to the dough consistency before adding more flour.
Reserve some flour when kneading to avoid adding too much. You can always add more flour.
Freshly kneaded dough should be soft and slightly tacky to the touch.
Underproofing: Test whether the dough is proofed.
Dust your finger or knuckle, and gently make a dent/depression in the dough.
If it springs back right away, you need to let it proof a little longer.
If it springs back about halfway, leaving a slight depression in the dough, it’s ready for the oven.
And if it doesn’t spring back, it is overproofed.
I start at 350°F (180°C), then lower the temperature to 330°F (165°C) and bake until golden brown. To prevent overbrowning, I loosely cover the challah with a foil dome.
Underproofing: Don’t rush the final proof.
Crusted Braided Loaf: Be sure to cover the loaf with a well-oiled food wrap to prevent crust from forming. In the oven, during the oven spring (the first 20 minutes of the bake), a crusted surface hinders proper oven spring, preventing the bread from expanding smoothly and causing the challah to split or burst.
Tight braid: When the strands of dough are tightly braided, they are very likely to split /tear during the second proof or in the oven. Don’t stretch or pull the strand while braiding the bread.
Dry dough: If the dough is too dry, it’s very likely to split during baking or proofing. Don’t add too much flour to the dough.
An oven temperature that is too high: If the oven is too hot, the bread can rise too quickly in a short time, causing it to expand rapidly and tear or split.
Oven Spring with Steam: Introduce steam during the first 20–25 minutes of baking. Steam delays the crust from setting too quickly, allowing the loaf to expand during oven spring without tearing or splitting.
Traditional steaming methods don’t work as well in this case, since the oven temperature isn’t high enough to generate rapid steam. Instead, lightly spray the inside of the oven or the loaf itself with room-temperature water just before placing it in the oven.
I know it’s tempting to slice into the freshly baked challah, but trust me, let it cool on a cooling rack before slicing or storing.
Cooled challah, when left exposed to air, will dry out fairly quickly. Wrap it well in food wrap and then foil, or store it in a plastic container. While you might be tempted to store it in a paper bag, paper can absorb moisture, which can make your challah dry out more quickly.
You can slice cooled challah and freeze it in batches, wrapped in freezer-safe paper, for up to 3 months.

TRY THESE RECIPES

Rum Raisin Challah Bread
Equipment
- mixing bowls
- Baking Sheets
- Kitchen Towel
- Pastry Brush
- Mixer with a hook attachment
- Parchment paper
Ingredients
Rum-Raisins
- 1/2 cup raisins This amount is sufficient for a single challah; use 1 cup of raisins when you desire the whole batch of dough with rum-raisins.
- dark rum For non alcoholic version use boiling water instead of alcohol
Yeast Sponge
- 1 cup warm water 236-250ml
- 5 1/4 tsp dry active yeast
- 1 tsp honey
- 1 tbsp all-purpose flour
Sweet Bread Dough
- 5 cups all-purpose flour 700 grams
- 1 tsp salt
- 2 whole eggs
- 3 egg yolks
- 1/2 cup honey 170 grams
- 2 tbsp sugar optional
- 1 tbsp Vanilla Extract or Vanilla Bean Paste
- 3 tbsp olive oil or vegetable oil 45 ml/40grams
- 3/4 cup unsalted butter 170 grams
Egg Wash
- 1 whole egg
Instructions
Rum-Raisins
- Soak raisins (1/2 cup) in rum or boiling hot water. Pour rum over the raisins to submerge them. Let it sit until plum and soft, about 30 minutes and up to 24 hours.
Yeast Sponge
- In a bowl, whisk warm water (1 cup), yeast (5 ½ teaspoons), honey (1 teaspoon), and flour (1 tablespoon). Set aside for 5-10 minutes, until foamy.
Bread Dough
- Sift all-purpose flour (4 ½ cups, 630 grams) into a mixing bowl, add salt, and stir to combine. Reserve 1/2 cup (70 grams) of flour. If the dough appears too sticky, add a little more while kneading. Some flours are moister than others.
- In a small bowl, whisk together eggs (2 whole eggs), egg yolks (3 egg yolks), honey (1/2 cup, 170 grams), sugar (2 tablespoons), Vanilla bean paste (1 tablespoon), oil (3 tablespoons,45ml/40grams), and soft butter chunks (3/4 cup, 170 grams), set aside.
- Once the yeast sponge is ready, pour it over the flour, then pour in the egg-butter mixture. Stir to combine with a wooden spoon. Cover the dough and let it rest for 15 minutes.
- Knead the dough using the hook attachment at the lowest speed for 3-4 minutes, then set the mixer to the knead speed and knead for an additional 10 minutes. Dough should be soft but not wet; if it appears too wet and sticky, add more flour by tablespoons.
- Once smooth, scrape the dough onto a lightly floured surface and knead by hand for a minute or two.
Add Rum-Raisins
- Divide the dough into two halves. Drain the raisins and knead them gently into one half of the dough. Shape both into a ball.Transfer the doughs into mixing bowls coated with some oil. Cover with a plastic wrap, and let rise in a warm, draft-free place for 2-3 hours.
Shape Challah
- Invert well-risen doughs onto a lightly floured work surface. The dough will be soft.
- Divide each dough into 6 equal portions. Shape each piece into a snake. Braid the bread.
2nd Rise
- Carefully transfer braided breads onto a baking sheet lined with parchment or a silicone baking mat. Brush braided bread with egg wash.Cover loosely with a well-oiled food wrap and let rise again for 1 to 1½ hours. Until well risen with a pillowy appearance. Gently press a finger into the risen dough. Watch what happens: if the indentation slowly springs back, leaving a slight depression in the dough, it's ready for the oven.
Bake
- Preheat oven to 350℉/180℃
- Brush each loaf again with egg wash, just before baking. Avoid drips.
- Bake at 350℉/180℃ for 20 minutes, then lower the temperature to 330℉-340℉ for an additional 15-20 minutes. Cover the top with foil to prevent overly-browned tops. Bake until the digital thermometer inserted into the center reads 190℉, or if you don't have a thermometer, tap the bottom of the bread. If it makes a hollow sound, it's done.
- Let it cool on a cooling rack before slicing or storing.
Video
Notes
- Can I freeze Challah? Challah can be frozen for up to 3 months. I prefer to freeze it sliced.
- What can I make with Challah bread? Use it to make French toast and bread pudding. I love it with butter and jam.
- Can I use less butter? Yes, use 1/2 cup (113 grams) of butter.

Hi, I’m Hani
Welcome!
Thank you for visiting Haniela’s. On my blog, you’ll find delicious sweet & savory recipes made with simple ingredients. Why not start a new adventure? Discover a world of cookie decorating with my step-by-step tutorials.

Hi, I’m Hani
Welcome!
Thank you for visiting Haniela’s. On my blog, you’ll find delicious sweet & savory recipes made with simple ingredients. Why not start a new adventure? Discover a world of cookie decorating with my step-by-step tutorials.


Was really looking forward to trying this. But, the recipe does not include any measurement for the sugar or vanilla bean paste. Also, you don't mention boiling water for the raisins in the video or the ingredients list.
Sorry I must have missed that in the video, but all ingredients and steps are included in the recipe here. 1tbl vanilla.:-)