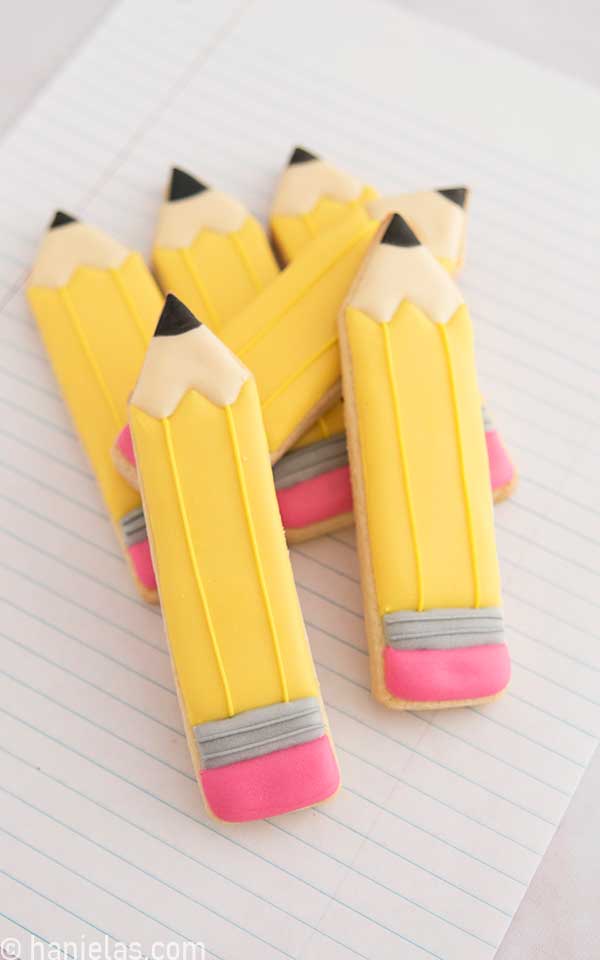
How To Decorate Pencil Cookies with Royal Icing
Whether you’re celebrating the first day of school, surprising a favorite teacher, or just looking for a fun project to share with kids, decorated yellow pencil cookies are always a hit.
updated from 2013
BACK TO SCHOOL PENCIL COOKIES STEP-BY-STEP
In this tutorial, I’ll show you how to create a bright yellow pencil design with a nostalgic charm. It reminds me of fresh notebooks, sharpened tips, and new beginnings.

THINGS YOU NEED
- Get all the tools and supplies in Haniela’s Amazon Shop
- Pencil Cookie Cutter, or make your own using a rectangular cutter
- Back To School Cutter Set
- Narrow Rectangular Cookie Cutter
- Gel Food Coloring: yellow, ivory, pink, black, gray
- Tipless Piping Bags
- Scribe Tool
- Edible marker – brown, black(optional)
- Template optional
This post contains Amazon affiliate links that earn me a small commission, at no cost to you. I only recommend products that I use and love. Learn more about my affiliate policy here.
PENCIL COOKIE SHAPE WITHOUT A CUTTER
If you don’t have a pencil cookie cutter, you can easily make the shape out of either a rectangle or a square cutter, too.
- Cut out rectangles, and then you can trim one end of the rectangular cookie into a point using a sharp knife, and then bake the cookies as usual (steps 1-4).

ROYAL ICING COLORS AND CONSISTENCIES
I used royal icing to decorate cookies. You can use standard royal icing made with egg whites (there are 3 recipes using meringue, fresh egg whites, and pasteurized egg whites in a carton recipe), vegan icing (using aquafaba), or glaze icing.
- Yellow Icing: 15-second consistency (pencil body)
- Pink Icing: 20-second consistency (eraser)
- Ivory Icing: 20-second consistency (wood/pencil conical point)
- Gray Icing: 20-second consistency, piping consistency (ferrule)
- Black Icing: 20-second consistency (lead/graphite)
DECORATE PENCIL COOKIES
- I used a simple cardstock template, and I traced a decorating guide onto a cookie.
- Template is optional; if you want to ensure that all the cookies are looking sharp and cohesive, it’s a good idea to use a template (steps 1-5).

- Let’s start with the body of the pencil, that’s the middle part. I’m using 15-second consistency yellow icing to outline and to flood this area.
- Use a scribe tool to smooth the icing across. Pop any air bubbles while icing is wet.
- Allow icing to crust before piping the adjacent areas.

- Use 20-second consistency pink icing to outline and flood a small area at the very end of the pencil to make the eraser (steps 1-5).
- Let it crust.

- Using yellow or golden yellow piping consistency icing, pipe two straight lines on the body of the pencil (steps 1-3).

- Now we can fill the ferrule area – a section between the body and the eraser with gray royal icing of 20-second consistency (steps 1-5).
- Let it crust well, and then pipe 2 straight lines across with piping consistency gray icing.

PENCIL LEAD/GRAPHITE DESIGN
You have two options to create lead/graphite on the pencil.
- Use Black Icing
- You can partially flood the wood part of the pencil with 20-second consistency ivory icing and let it crust. (steps 1-5).

- Then you can ice the very point with black icing (steps 1-3).

- Make graphite/’lead’ with a black marker
- If you don’t want to use black icing, you can ice the whole wood area with ivory icing, let it dry.

- Then use a black edible marker and draw the graphite on the very point (steps 1-3).

STAR COOKIES -FILLER COOKIES
If you’d like, you can also make cute little filler, bite-sized cookies. You can use any small cookie. Star works great!
- Flood the cookie with yellow icing of 15-second consistency and immediately dust the wet icing with yellow or gold sanding sugar (steps 1-6).
- Remove excess and let dry (steps 7-8).


YELLOW PENCIL COOKIES VIDEO TUTORIAL
Do you want to stay updated about free cookie decorating tutorials, live events, classes, and products? Sign up for Hani’s Cookie Decorating Newsletter.
FROM THE PAST
Here are my very first pencil cookies from 2013. As you can see, I used sandwich bags to decorate and made large and mini ones. Aren’t they adorable!?


I think you simply can’t go wrong with their sunny yellow design and playful school-day vibe!

MORE SCHOOL-INSPIRED IDEAS
- Apple Name Tag Cookies
- Graduation Cap Star Cookies
- Ruler Cookies without Decorating
- Homemade School Snacks via Happy Kids Kitchen
- Cute Nerdy Apple Back To School Cookies
COOKIE DECORATING TOOLBOX
- Beginner’s Guide To Cookie Decorating
- Ultimate Guide to Cut-Out Cookies (tips, tricks, troubleshooting)
- Royal Icing Recipe
- Small Batch Royal Icing Recipe
- Cookie Icing Recipes (includes vegan royal icing, glaze, fondant)
- Guide To Royal Icing Consistencies with Visual Help(what is stiff, flood icing, etc.)
- How To Freeze Royal Icing
- How To Make Royal Icing Transfers
- Royal Icing FAQ ( for example: how to make black icing, color bleeding, storage, and more)
- How To Make a Cookie Cutter Template
- Ultimate Guide To Cookie Decorating Tools
I published this cookie decorating tutorial on August 27, 2013. On August 15, 2025 I updated this tutorial with new step-by-step photos, written instructions, link to beginner’s decorating guides, and a video tutorial.

Hi, I’m Hani
Welcome!
Thank you for visiting Haniela’s. On my blog, you’ll find delicious sweet & savory recipes made with simple ingredients. Why not start a new adventure? Discover a world of cookie decorating with my step-by-step tutorials.

Hi, I’m Hani
Welcome!
Thank you for visiting Haniela’s. On my blog, you’ll find delicious sweet & savory recipes made with simple ingredients. Why not start a new adventure? Discover a world of cookie decorating with my step-by-step tutorials.