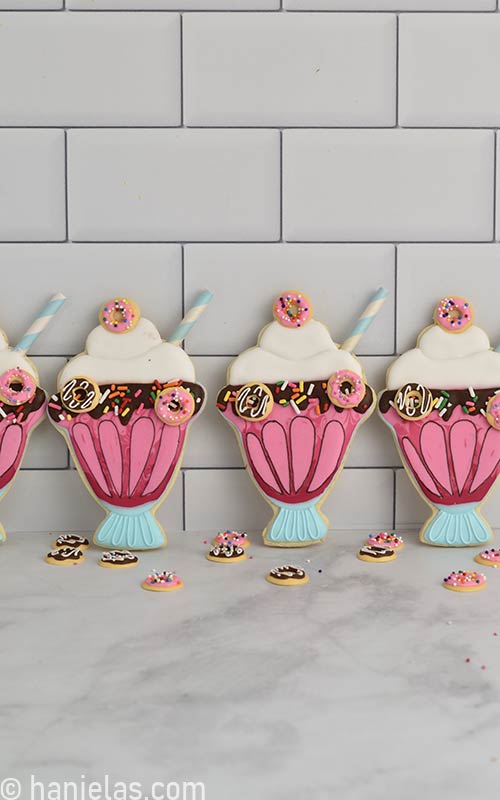
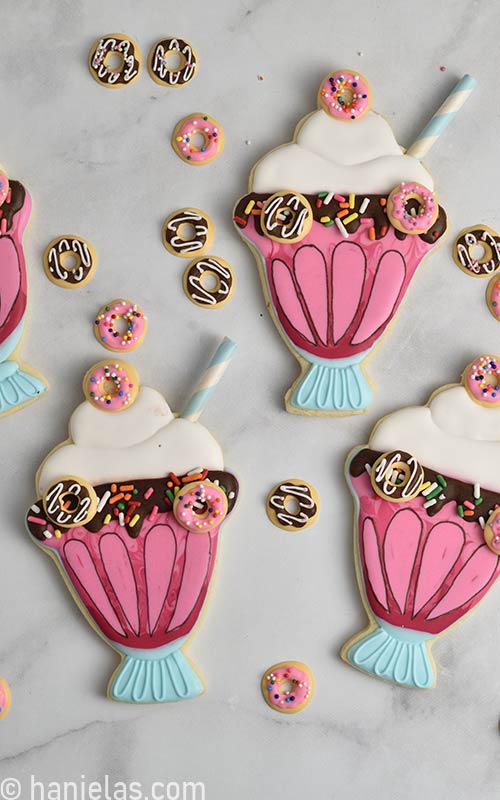
Decorated Milkshake Cookies
Today I’m going to show you how to make Decorated Milkshake Cookies adorned with cute royal icing donuts.

HOW TO MAKE DECORATED MILKSHAKE COOKIES
To make these fun royal icing decorated milkshake cookies I used an AnnClark cookie cutter to cut out my sugar cookies along with a paper straw. And I decorated the cookies with royal icing and mini sugar donuts.
- TABLE OF CONTENTS
- Donut Royal Icing Transfers
- How to Bake a Cookie with a Paper Drinking Straw
- Decorate Milkshake Sugar Cookies
- Tools, Recipes and Template
STEP 1 – DONUT ROYAL ICING TRANSFERS
Let’s start with mini donut sugar decorations. These are super easy to make and can be prepared ahead of time. You can refer to my Ultimate Guide to Royal Icing Transfers if you have more questions about transfers and how to use them in cookie and cake decorating.
To start I prepared my royal icing and colored it with gel food colors.
To make donut icing decorations I used : ivory, pink, brown and white royal icing.

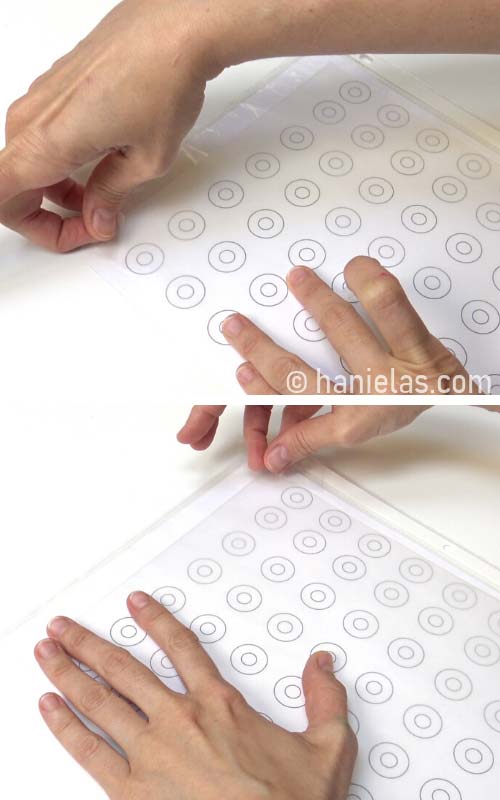
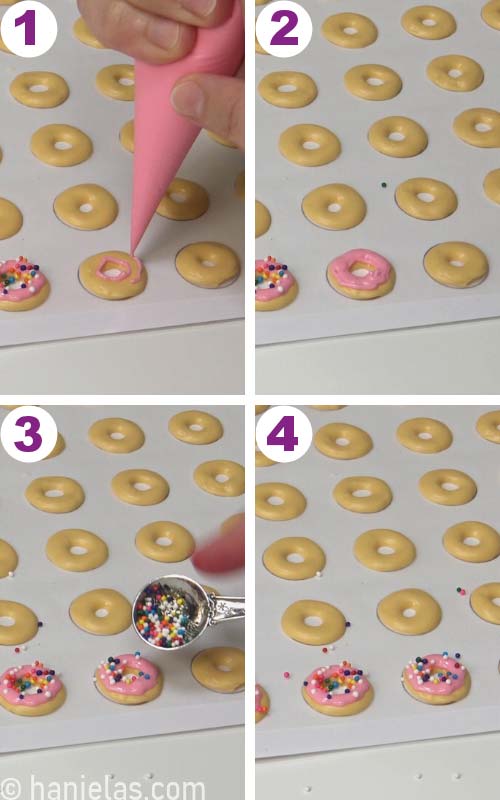
STEP 2 – USE A DONUT TEMPLATE AND WAX PAPER
Print a template (it’s listed at the bottom of the post) on a piece of paper. Place template on a firm flat surface (for example – a flat cardboard). Then secure a piece of wax paper over the template with a piece of tape.
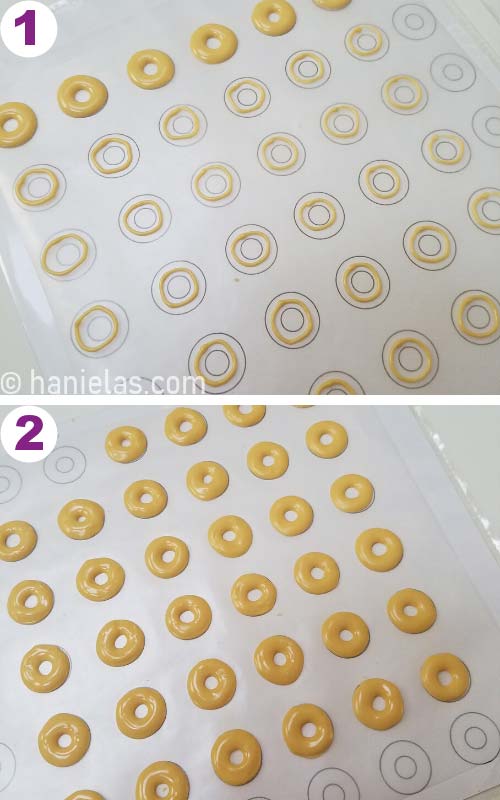
Pipe ivory donuts with 20 to 25 second consistency royal icing. Outline and flood. Use a scribe needle tool to shape icing and allow it crust before moving onto the next step.
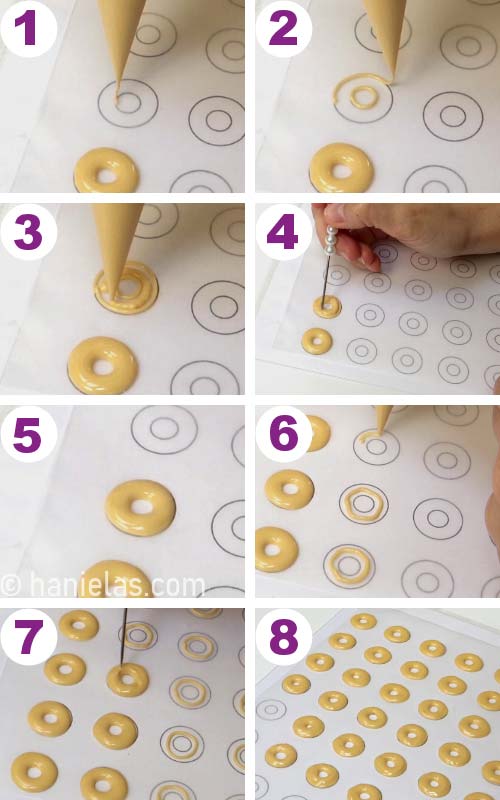
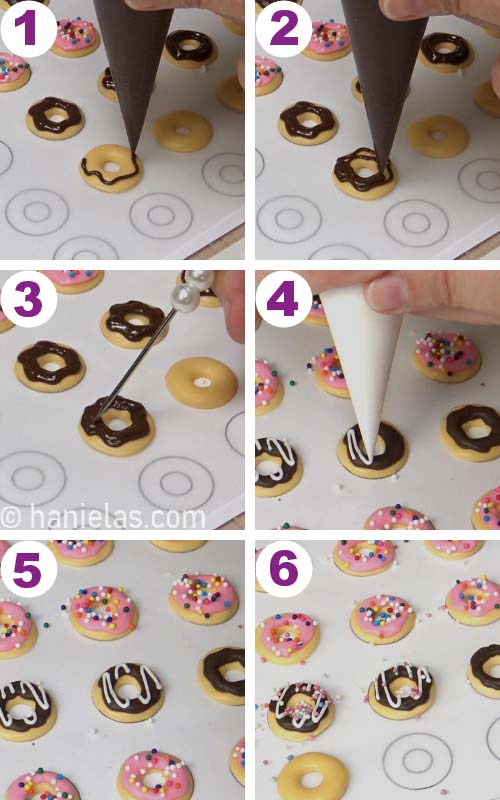
STEP 3 – HOW TO AVOID CRATERING IN ROYAL ICING
Are you experiencing cratering in your royal icing donuts? Here is a quick solution to prevent cratering. Pipe a support line in the middle of a donut shape. Let it crust and then flood the donuts. Support line will keep the icing from sinking and cratering. Allow icing to crust before piping over the support line.
Do you have more questions about royal icing? Find most common questions and answers in my Guide to Ultimate Royal Icing FAQ.
STEP 4 – DECORATE WITH SPRINKLES
With pink icing (20 second consistency) pipe a layer of icing on top of crusted donut shape. Immediately dust pink icing with rainbow nonpareils. Allow icing to dry completely.
Alternatively use brown icing (20 second consistency) and pipe a layer over the crusted donut shape. Allow brown icing to crust and then pipe a zig-zag line with white icing (piping consistency).
These donut icing decoration are pretty small. And therefore it’s best to use nonpareils sprinkles. Either regular or minis.
I love ChocoMaker Sprinkles. I often get them locally at Wegmans.

STEP 5 – ALLOW DONUT DECORATIONS TO DRY
It’s important to let royal icing transfers fully dry. Let decorations dry on a firm and flat surface. It’s best to let them dry overnight to be sure icing has enough time to dry fully.
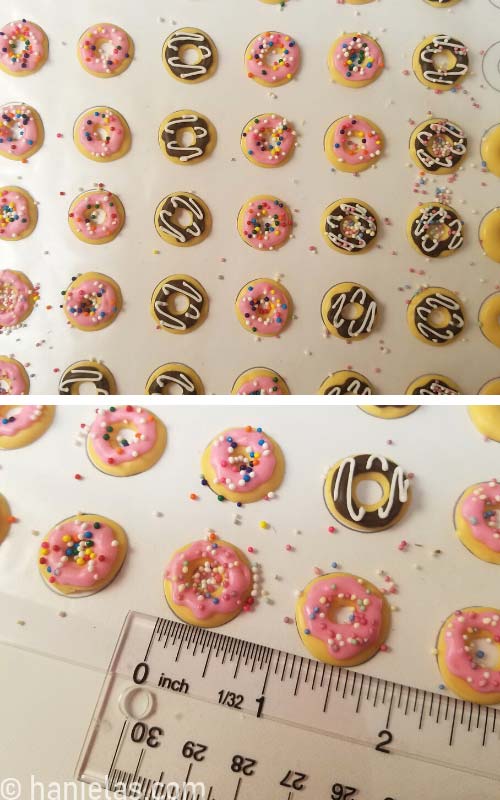
STEP 6 – REMOVE SUGAR DONUTS FROM THE WAX PAPER
Carefully peel off wax paper from dry donuts. Sugar decorations can be prepared ahead of time (days, weeks, months). Be sure to store them away from a direct sunlight and moisture.

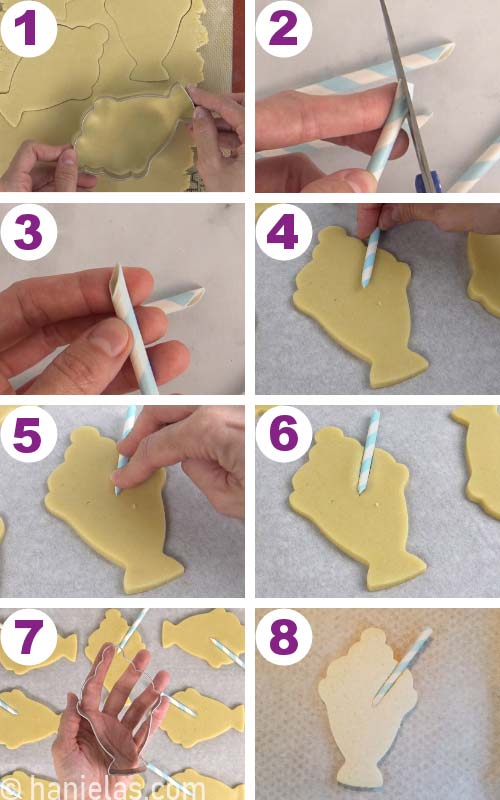
STEP 7 – BAKE A COOKIE WITH A DRINKING STRAW
I used a milkshake cookie cutter from AnnClark to cut out sugar cookies. Now, you can stop here and bake the cookies. But if you’d like to make them a bit more interesting you can also attach a drinking straw.
I used a paper drinking straw. Cut a paper drinking straw to size. Then trim one end at an angle. Now you can gently push drinking straw with the cut side down into an unbaked cookie. Bake cookies as usual. Let cookies cool on a baking sheet for 10-15 minutes before transferring to a cooling rack to cool completely.
STEP 8 – DECORATE MILKSHAKE COOKIES
To decorate the glass part of the milkshake design I used wet on wet royal icing decorating technique.
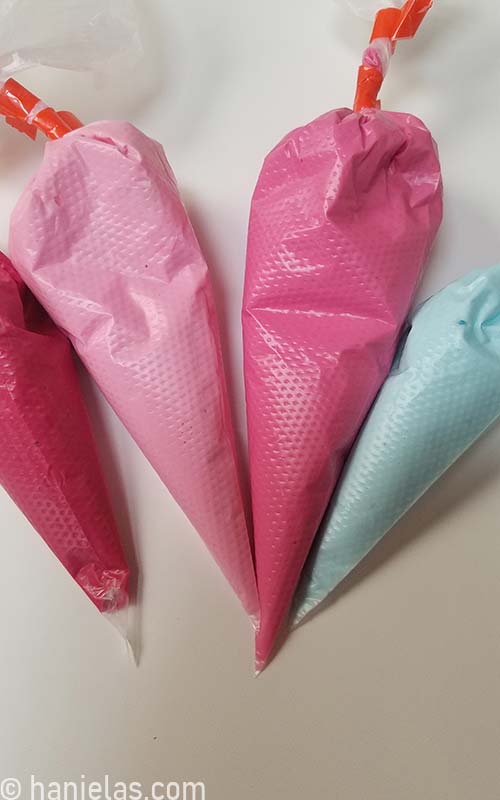
I used 4 colors : sky blue, dark pink, medium pink and light pink. To color my pink icing I used Claret ProGel Concentrated Food Color.
Outline with sky blue royal icing (15 second conistency), pipe little more icing on the bottom of the glass and then shape it with a scribe needle tool.

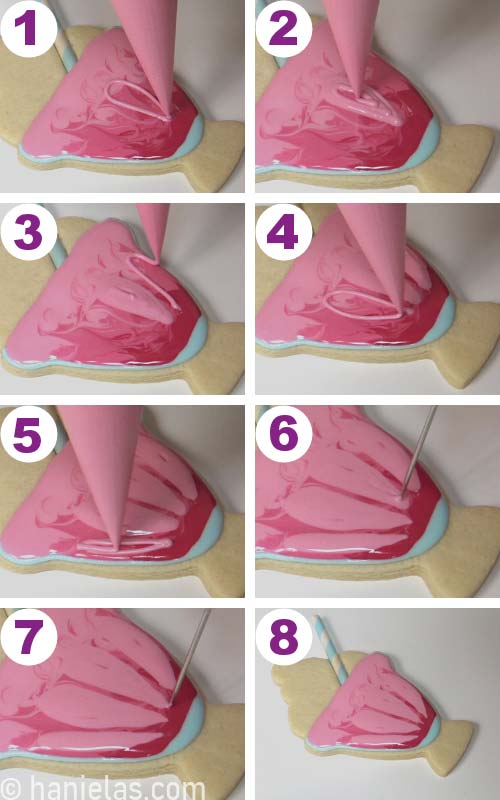
STEP 9 – MARBLE ROYAL ICING
Immediately pipe the inside with 15 second consistency 3 shades of pink or use Claret ( I used Claret ProGel Food Color to color my icing). Don’t over fill the cookie.
Use a fine scribe needle tool to shape the icing, especially details. And to marble layers use a tool with a thicker tip such as 2-in-1 tool. Don’t allow icing to crust, move onto the next step right away.

STEP 10 – WET ON WET ROYAL ICING
Now with the lightest pink icing pipe prolong tear drop shapes onto the wet icing. You should be able to fit in 4 tear drop shapes. Carefully fill each section.
Use a scribe needle tool to accentuate the points. Allow icing to crust well for 1-2 hours.
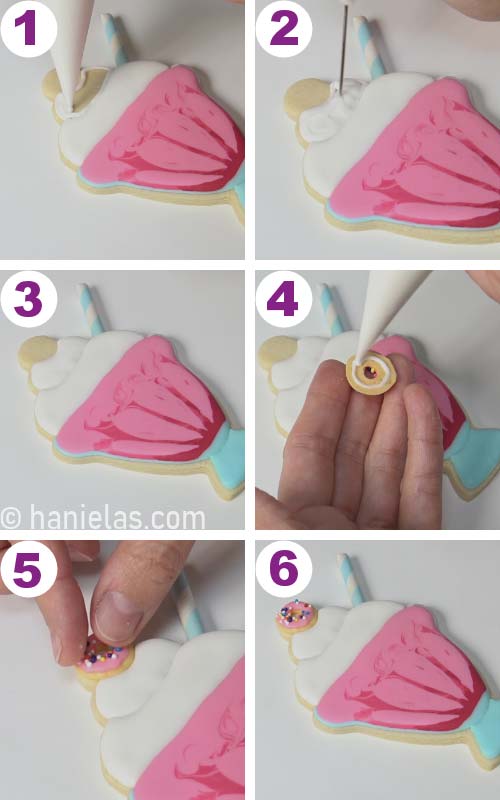
STEP 11 – ADD THE SWIRL
Now you can decorate the bottom with sky blue royal icing (20 second consistency).
TIP : To eliminate risk of a cave-in you can use a support line method I used to make the donut shapes.
Pipe white swirl layer above the glass section. Pipe over paper drinking straw. Allow icing to crust well.

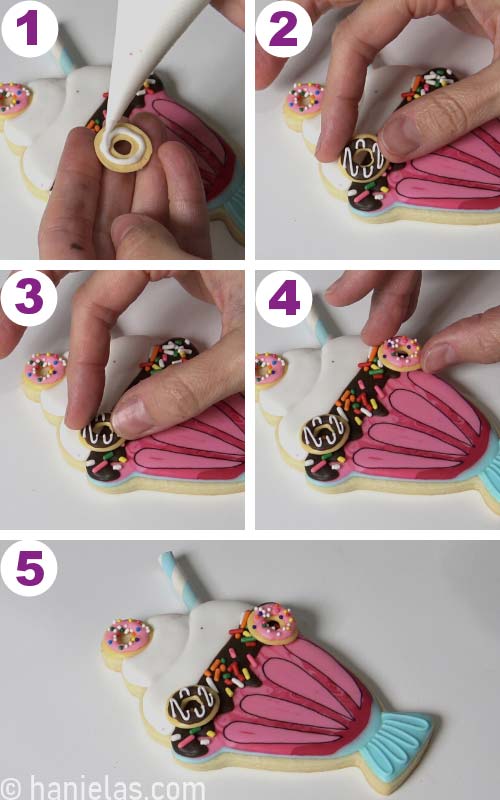
STEP 12 – ATTACH DONUT DECORATION
Now outline and flood the top swirl layer with white icing. Distribute icing with a needle tool.
And immediately attach donut icing decoration. Pipe a small amount of icing on the back and then glue donut decoration onto the cookie. Use a gentle shifting motion to make it flush with the cookie surface an make sure it touches the edge of wet white icing layer.
STEP 13 – CHOCOLATE LAYER AND SPRINKLES
Pipe chocolate icing over the top part of glass design. While wet, sprinkle icing with rainbow jimmy sprinkles.
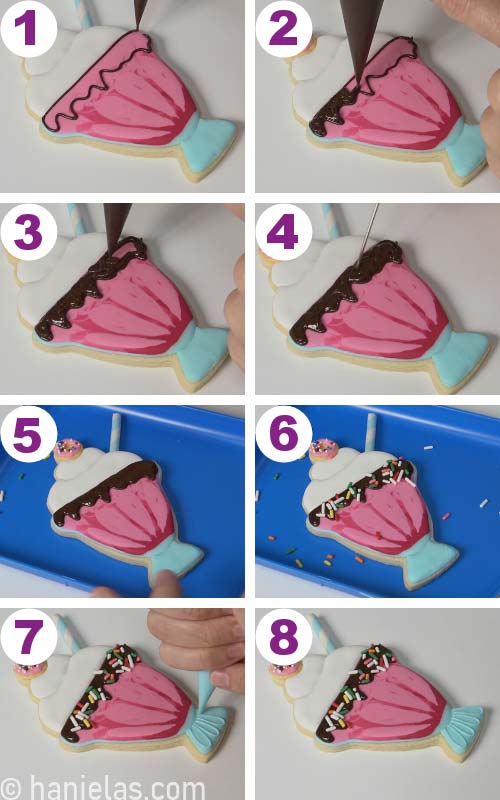
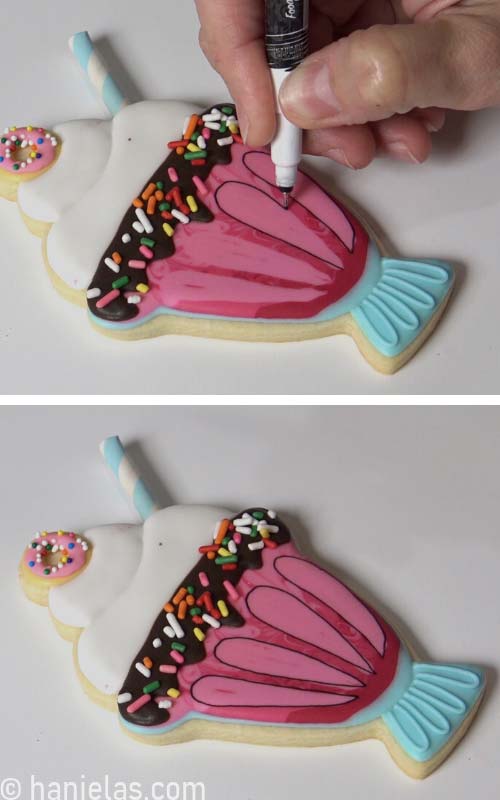
STEP 14 – DRAW WITH EDIBLE MARKER
Accentuate wet on wet design with edible marker. I used a fine tip edible marker to outline each tear drop shape.
STEP 15 – DECORATE WITH DONUTS
And lastly adorn glass part of the milkshake design with more sugar donut decorations.
TO MAKE DECORATED MILKSHAKE COOKIES YOU NEED
- RECIPES
- Sugar Cookies
- Royal Icing
- TOOLS
- Get all the tools you need in my Amazon Shop
- Mini Donut Template
- Cookie Cutter
- Piping Bags
- Edible Marker – Rainbow Dust Fine Tip Edible Marker
- Scribe Needle Tool
- Wax paper
- Food Gel Colors : Claret (ProGel), Sky Blue, Chocolate Brown
- Rainbow Sprinkles – Nonpareils, Jimmies
- USEFUL TUTORIALS
- Decorated Milkshake Cookies – step by step video with narration
This post contains Amazon affiliate links that earn me a small commission, at no cost to you. I only recommend products that I use and love. Learn more about my affiliate policy here.

Hi, I’m Hani
Welcome!
Thank you for visiting Haniela’s. On my blog, you’ll find delicious sweet & savory recipes made with simple ingredients. Why not start a new adventure? Discover a world of cookie decorating with my step-by-step tutorials.

Hi, I’m Hani
Welcome!
Thank you for visiting Haniela’s. On my blog, you’ll find delicious sweet & savory recipes made with simple ingredients. Why not start a new adventure? Discover a world of cookie decorating with my step-by-step tutorials.