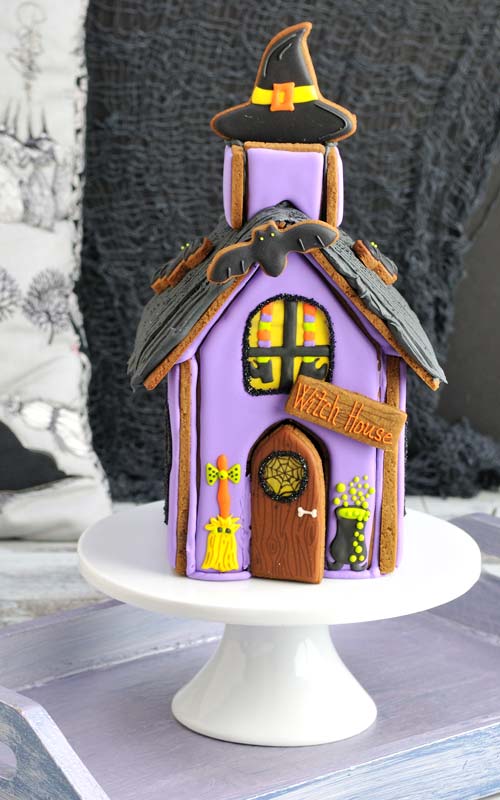
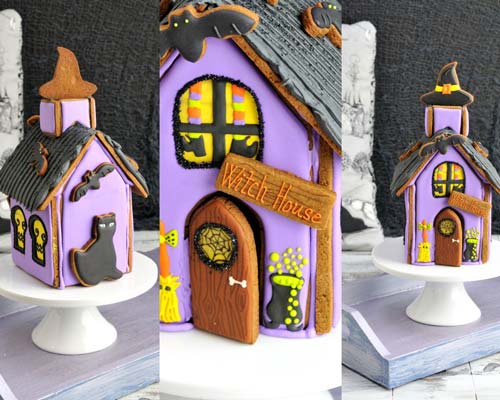
Witch’s Gingerbread House
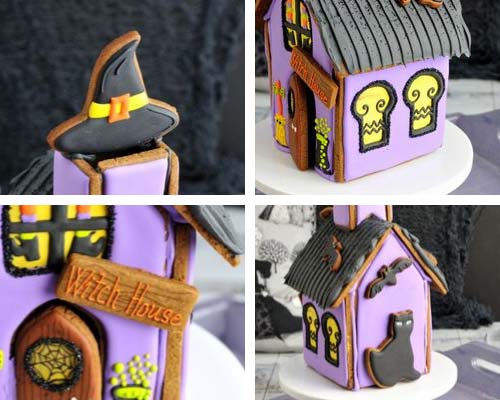
This Witch’s Gingerbread House is a perfect addition to all Halloween festivities. I iced the house with royal icing and adorned it with decorated gingerbread bats, witch hat and black cat cookies. Let me show you how to make it with my DIY cookie decorating tutorial.
Updated post from 2014
HOW TO MAKE WITCH’S GINGERBREAD HOUSE
- TABLE OF CONTENTS
- Gingerbread House Panels
- Side Panels
- Front and Back panels
- Witch’s Broom
- Bubbling Cauldron
- Cat Cookie
- Bat Cookie
- House Sign
- Front Door
- Witch’s Hat Cookies
- Witch’s Gingerbread House Assembly
- Textured Roof
- Recipe and Tools
GINGERBREAD HOUSE PANELS AND COOKIE DECORATIONS
Let’s start with gingerbread cookie dough. To make this wizardly gingerbread house I used gingerbread cookie dough recipe for houses and centerpieces along with my royal icing recipe.
And to cut out all the house panels, doors and chimney pieces I used card stock templates and an exacto knife/pen blade and bench scrapper. For house panels I highly recommend that you use a bench scrapper. It’s works great!
I also used 3 cutters to make bats, witch hat and a black cat.
SIDE HOUSE PANELS
ROYAL ICING COLORS AND CONSISTENCIES :
- Yellow, Purple – 15 second consistency
- Black -20 second consistency
DECORATING STEPS :
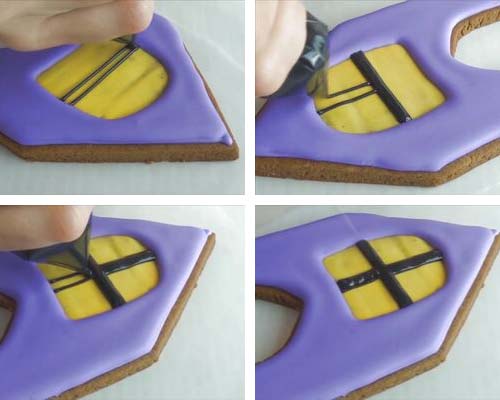
Brush a thin layer of yellow royal icing (15sec) onto the cookie. Let dry. Then trace the window outline with an edible marker and a template. Outline and flood the cookies with purple icing (15sec). Allow icing to dry overnight.

Pipe the window frames with black icing (20sec). Let icing dry. Then outline each window frame with black (20sec) and dust icing with black sanding sugar. Gently shake off excess sanding sugar and allow icing to dry.

FRONT AND BACK HOUSE PANELS
ROYAL ICING COLORS AND CONSISTENCIES :
- Purple, Yellow -15 second consistency
- Black, Orange, Green, Purple – 20 second consistency
DECORATING STEPS :
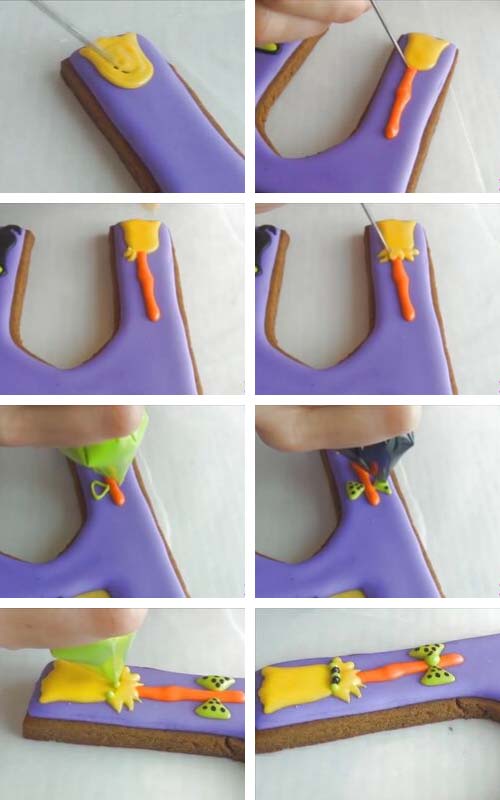
Brush a thin layer of yellow icing on a window section of front panel. Allow icing to dry for an hour. Then outline and flood with purple icing (15sec). Let icing dry overnight.

Pipe the window frame with black icing (20sec) and let crust well.
Then pipe the witch’s legs, alternating colors (orange, green, purple). Let crust and then pipe with’s boots with black icing (20sec). Allow icing to dry. Finish window designs by outlining window with black icing (20sec) and immediately dust it with black sanding sugar.

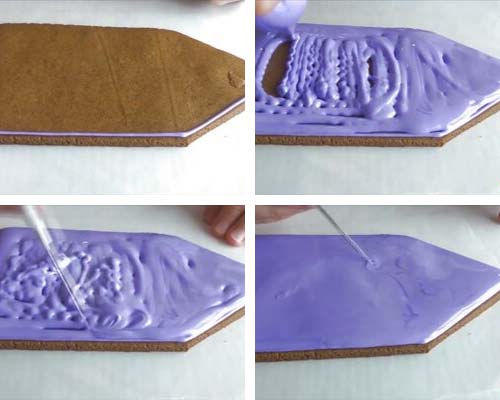
Outline and flood the back house panel with purple icing (15sec). Let dry overnight.
WITCH’S BROOM
Witch’s gingerbread house wouldn’t be complete without her magical broom.
ROYAL ICING COLORS AND CONSISTENCIES :
- Yellow, Orange, Green, Black – 20 second consistency
DECORATING STEPS :
First pipe the broom bristles with yellow (20sec). Let the icing crust and then pipe the broom’s handle with orange (20sec). Let crust again. Finish by piping more bristles at the top. And pipe a green bow on the top of the handle.
BUBBLING WITCH’S CAULDRON
ROYAL ICING COLORS AND CONSISTENCIES :
Black, Green – 20 second consistency
DECORATING STEPS :
Outline and flood cauldron with black (20sec). Allow icing to crust well. Then flood the hollow oval with green (20sec). Let crust. Next pipe green dots. And let icing dry.

CHIMNEY
ROYAL ICING COLORS AND CONSISTENCIES :
- Purple -15 second consistency
DECORATING STEPS :
Flood each chimney panel with purple icing (15sec). Allow icing to dry overnight.

BLACK CAT COOKIES
ROYAL ICING COLORS AND CONSISTENCIES :
- White – 20 second consistency
- Black – 15 second consistency
DECORATING STEPS :
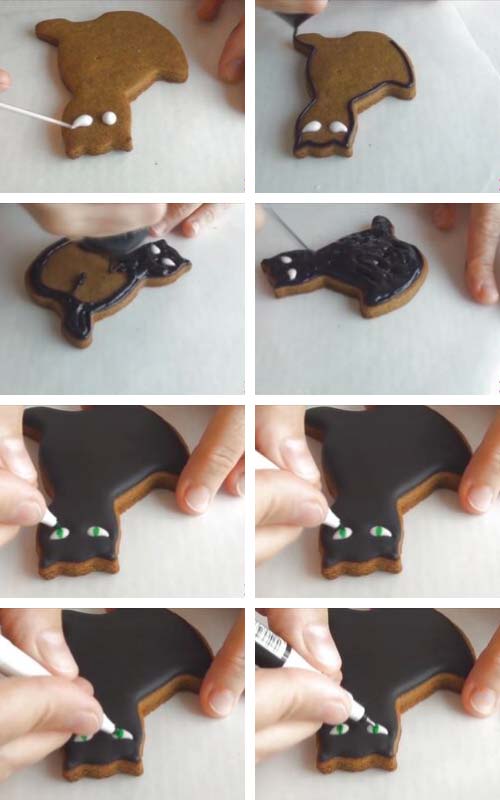
Pipe eyes with white icing (20sec). Use a needle tool to shape the icing. Let crust. Then outline and flood the cookie with black icing (15sec). Let dry. Draw eye details with edible markers. I used green and black markers.
BAT COOKIES
ROYAL ICING COLORS AND CONSISTENCIES :
- Black -15 second consistency
- Green – 20 second consistency
DECORATING STEPS :
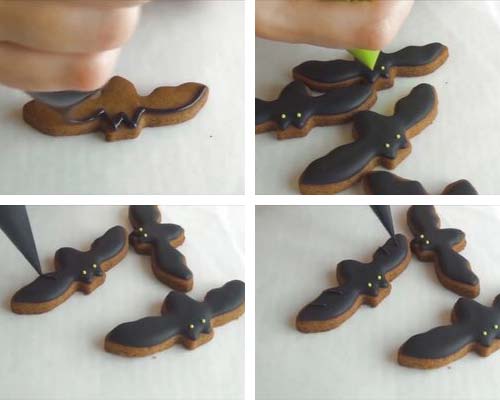
Outline and flood bat cookies with black icing (15sec). Let icing dry. And then pipe small green (20sec) eyes.
HOUSE SIGN
ROYAL ICING COLORS AND CONSISTENCIES :
- Orange – piping consistency
DECORATING STEPS :
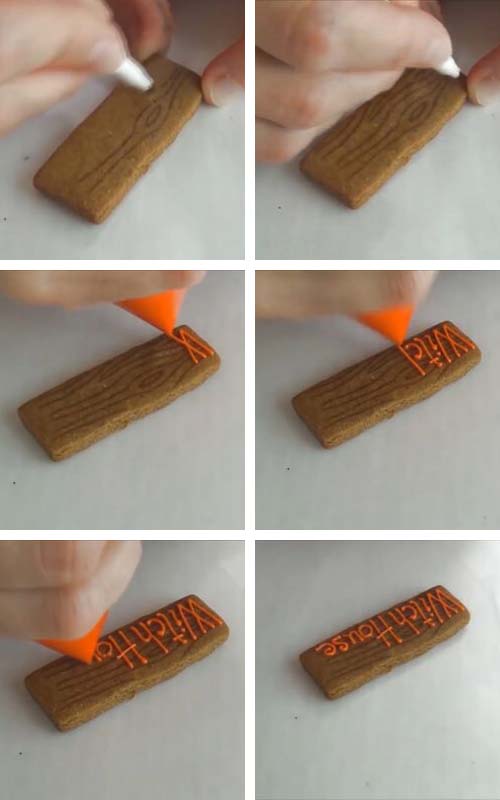
With brown edible marker draw wood grain pattern onto the cookie. Then with orange icing (piping consistency) pipe Witch House on the cookie.
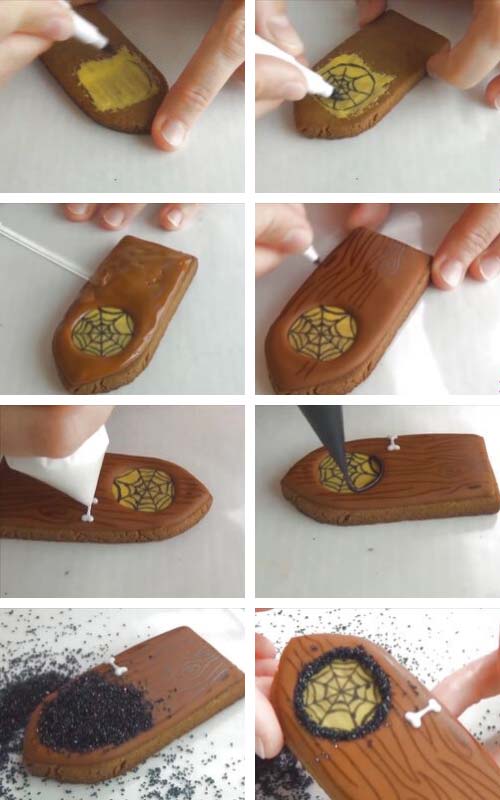
FRONT HOUSE DOOR
ROYAL ICING COLORS AND CONSISTENCIES :
- Yellow, Brown – 15 second consistency
- White – piping consistency
- Black – 20 second consistency
DECORATING STEPS :
Brush a thin layer of yellow icing on the door. Let dry. Then with black edible marker draw the cobweb design on the yellow icing. Outline and flood the door cookie with brown icing (15sec). Let icing dry.
Then outline cobweb window pane with black (20sec) and dust icing with black sanding sugar. Then with edible marker draw wood grain pattern onto brown icing. Pipe bone door handle with white icing (piping consistency).
WITCH HAT
ROYAL ICING COLORS AND CONSISTENCIES :
- Black, Yellow – 15 second consistency
- Orange -20 second consistency
- Black – 20 second consistency or piping – for details
DECORATING STEPS :
Pipe hat’s band with yellow icing (15sec), let it crust. Then flood crown and brim with black icing (15sec.) Allow icing to dry. Finish by piping buckle with orange icing (20sec). Let dry.

WITCH’S GINGERBREAD HOUSE ASSEMBLY
ROYAL ICING COLORS AND CONSISTENCIES :
- Purple – stiff consistency
DECORATING STEPS :
Glue the front, side and back panels with stiff royal icing and allow icing to dry for 5-6 hours. While icing is drying support panels in place with small bottle or skewers.

Then glue the roof panels onto gingerbread house base. Support roof panels with small sprinkle bottles or use skewers. They help to keep roof panels from sliding down while icing is drying. Allow icing to dry overnight.

TEXTURED ROOF
ROYAL ICING COLORS AND CONSISTENCIES :
- Black – stiff consistency
DECORATING STEPS :
Spread thick black royal icing onto the roof panels. Then create striped texture with a decorating comb. Wipe excess icing off the comb and repeat. Dust wet black icing with black sanding sugar.

Secure chimney pieces onto the roof with royal icing. Allow to dry. Then adorn house, roof and chimney with bat cookies and a witch hat cookie.

Attach house sign on the front panel with stiff royal icing. Hold it in place for 30 second to a minute. Glue the black cat cookie on the back panel.


TO MAKE WITCH’S GINGERBREAD HOUSE YOU NEED
- RECIPES
- Gingerbread Dough for Houses and Centerpieces
- Royal Icing
- TOOLS
- Cookie Cutters – Witch Hat, Cat
- Bat Cookie Cutter
- House Templates
- Food Colors
- Piping Bags
- Icing Comb – to make the roof
- Black Sanding Sugar
- Pen Blade – to cut out smaller cookie parts (doors)
- Bench Scrapper or a ruller – work great for cutting out house panels
- Needle Tool
- Edible Markers – brown ( to trace outlines, draw wood grain on the front door ), black (spiderweb on the front door)
- Food Paint Brush – front door cobweb design
- RELATED TUTORIALS
- Ultimate Guide to Royal Icing Consistency
- How to Freeze and use previously Frozen Royal Icing for Cookie Decorating
- Royal Icing FAQ
MORE HALLOWEEN TREATS :
- Skull Cake Roll
- Witch Cupcake Cookies
- Candy Corn Marshmallows
- Haunted Ghost Gingerbread House
- Apple Vampire Teeth
- Halloween Pretzels
- Candy Corn Peppermint Patties
PIN IT for later
This post was originally published on October 7th, 2014. On October 6th, 2019 I updated this post with new step by step photos, written text and a video.
This post contains Amazon affiliate links that earn me a small commission, at no cost to you. I only recommend products that I use and love. Learn more about my affiliate policy here.

Hi, I’m Hani
Welcome!
Thank you for visiting Haniela’s. On my blog, you’ll find delicious sweet & savory recipes made with simple ingredients. Why not start a new adventure? Discover a world of cookie decorating with my step-by-step tutorials.
Hi, I’m Hani
Welcome!
Thank you for visiting Haniela’s. On my blog, you’ll find delicious sweet & savory recipes made with simple ingredients. Why not start a new adventure? Discover a world of cookie decorating with my step-by-step tutorials.