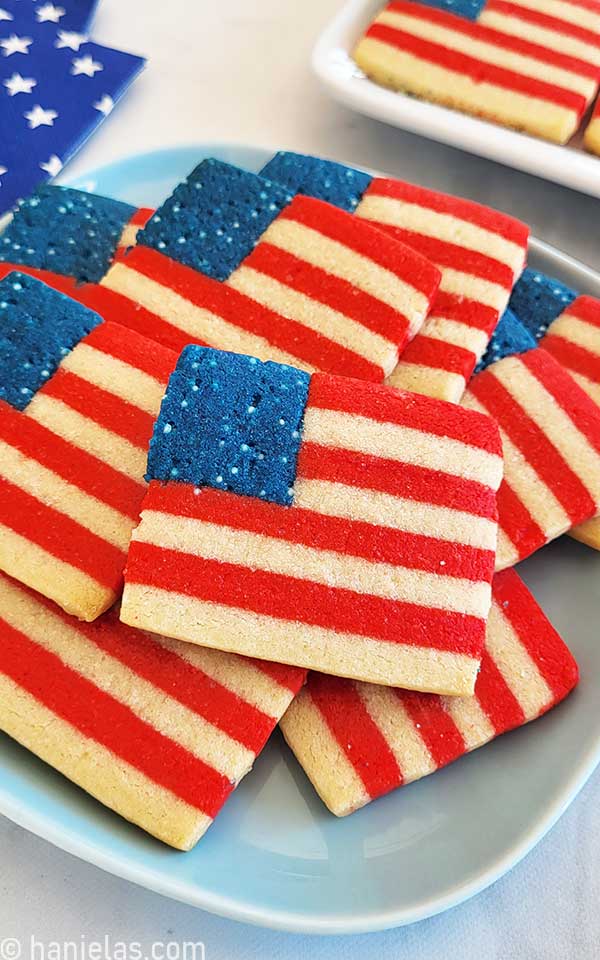
American Flag Icebox Cookies |Video|
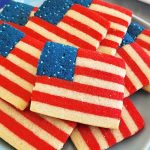
Looking for an easy make-ahead cookie for your next patriotic celebration? These icebox American Flag cookies can be prepared up to 3 months in advance. Simply freeze the cookie dough log, then slice and bake whenever you’re ready. They’re perfect for Memorial Day parties, 4th of July barbecues, or any festive gathering. Just bring them along and watch them disappear first!
updated from 2011
WHY MAKE AMERICAN FLAG ICEBOX COOKIES?
- Festive and eye-catching – They instantly fit patriotic celebrations and look impressive on a dessert table.
- Make-ahead – What I probably love most is that once the patterned cookie dough log is assembled, you can freeze it for weeks or even months. They’re easy to bake in batches, which is perfect for busy holidays like the 4th of July or Memorial Day.
- Great for shipping – I’m obsessed with gifting bakes to friends and these ship exceptionally well.
- No decorating involved -If you’re looking for a patriotic cookie idea but don’t have the time (or patience!) to decorate with icing, these cookies might just be your next baking project. What do you think?

COOKIE RECIPES
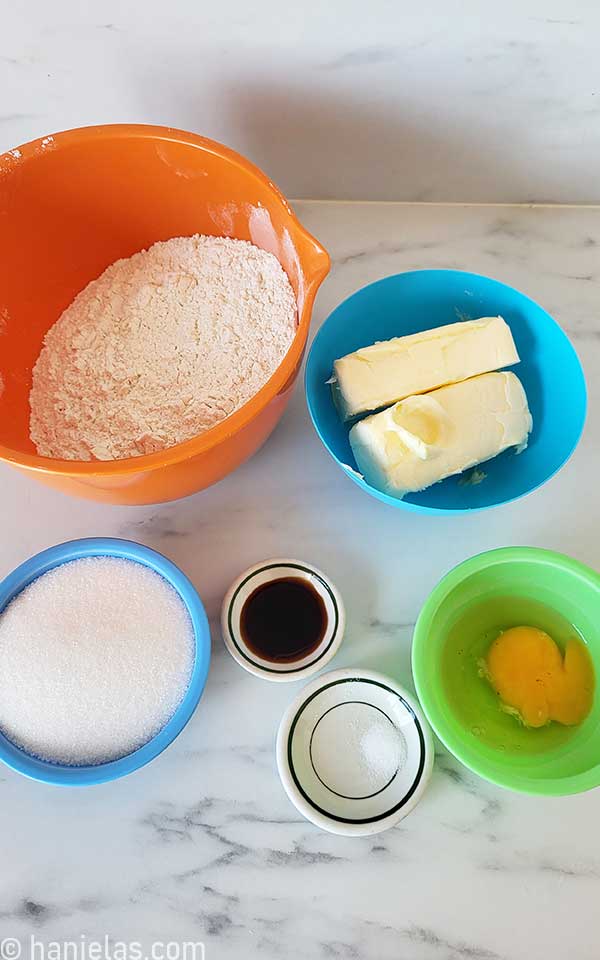
To make themed icebox cookies such as colored pencil cookies, I like to use one of two recipes: a classic sugar cookie recipe made with granulated sugar (see the recipe card), or, if you prefer a cookie with a softer bite, use my cookie dough made with powdered sugar.
COOKIE DOUGH
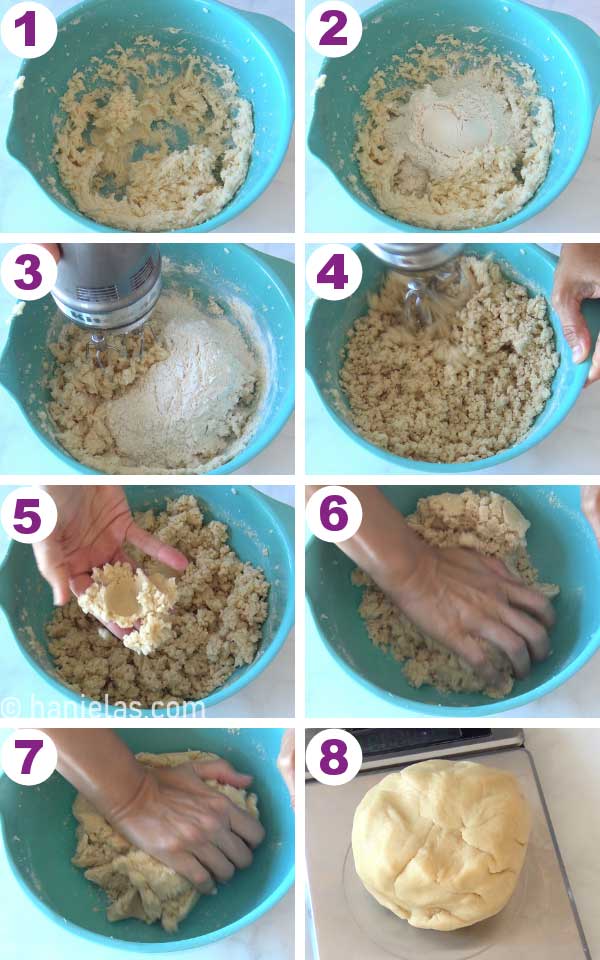
Cookie dough is prepared using a standard method, creaming of butter and sugar, for about 3 minutes (steps 1-4). I like whisking the egg with the extract to help it blend more easily into the butter. Beat it in gradually, scraping the bowl in the process. (steps 5-8).

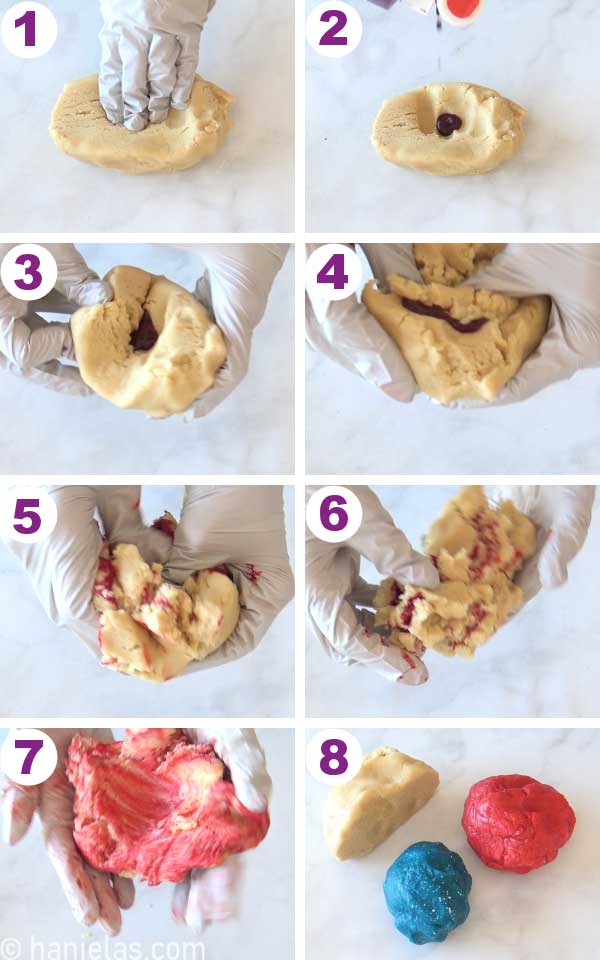
Into the butter mixture, beat the flour mixed with salt in three additions. Beat on low to medium-low speed until moist crumbs form, about 1 to 2 minutes (steps 1-4). Gather cookie dough into a disk (steps 5-7). If you have a kitchen scale, weigh the cookie dough and divide it into 4 equal parts (step 8).
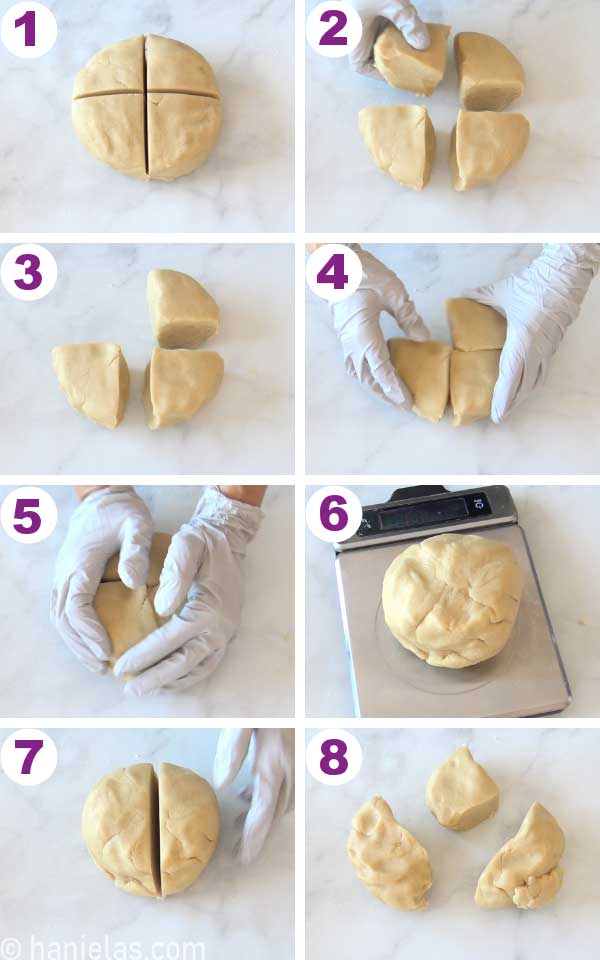
DIVIDE COOKIE DOUGH
If you don’t have a kitchen scale, form an even disk and cut the dough in half horizontally and vertically (step 1). Take one-quarter of the dough and set it aside (steps 2-3). Gather the remaining 3 cookie dough pieces into a disk (steps 4-5). Divide the disk in half (steps 6-7). At this point, you should have three cookie portions (step 8).
COLOR COOKIE DOUGH
- It’s best to color cookie dough right after it’s been made.
- If you wait after chilling the cookie dough, the dough doesn’t take color well, and the cookies can bake unevenly.
- Use concentrated gel food colors. I don’t recommend liquid gel colors.
- Wear gloves.
Let’s start with the blue dough– Color the smallest portion of cookie dough with blue food color. Make a well in the dough and pour in royal blue gel food coloring. Knead the dough gently until the color is homogeneous throughout. Knead in white nonpareils (steps 4-8). Nonpareils sprinkles are optional. If you don’t have them, don’t use them.

Color red dough – Color one of the two larger portions with red gel food color (steps 1-7). You should have small blue dough, red, and uncolored cookie dough (step 8).
ROLL OUT COOKIE DOUGH
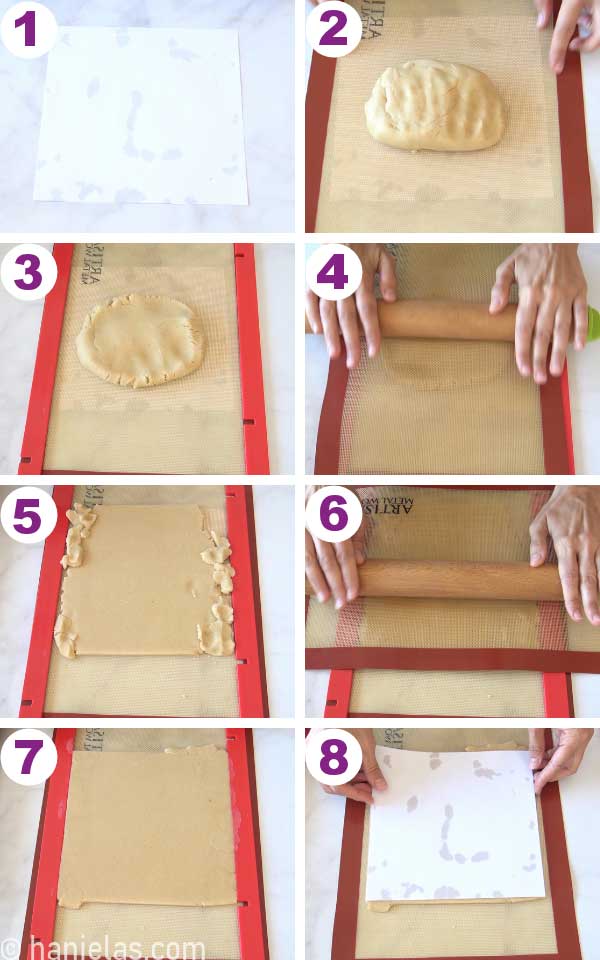
To roll out red and uncolored dough, I used ¼-inch rolling guides and an 8×8-inch template (step 1). You can use parchment, silicone mats or food wrap. Place a template under the silicone mat. Place uncolored cookie dough on the top. Flatten it with your hands (steps 2-3). Roll out the cookie dough and trim the edges as needed. Use the cut-off pieces to patch any areas that need more dough until you form an even 8×8-inch square. Roll the dough again with a rolling pin to smooth it out. Then place your template on top to check the size and adjust if necessary (see steps 4–8). Cover the dough and slide the silicone mat with rolled-out dough onto a cutting board.
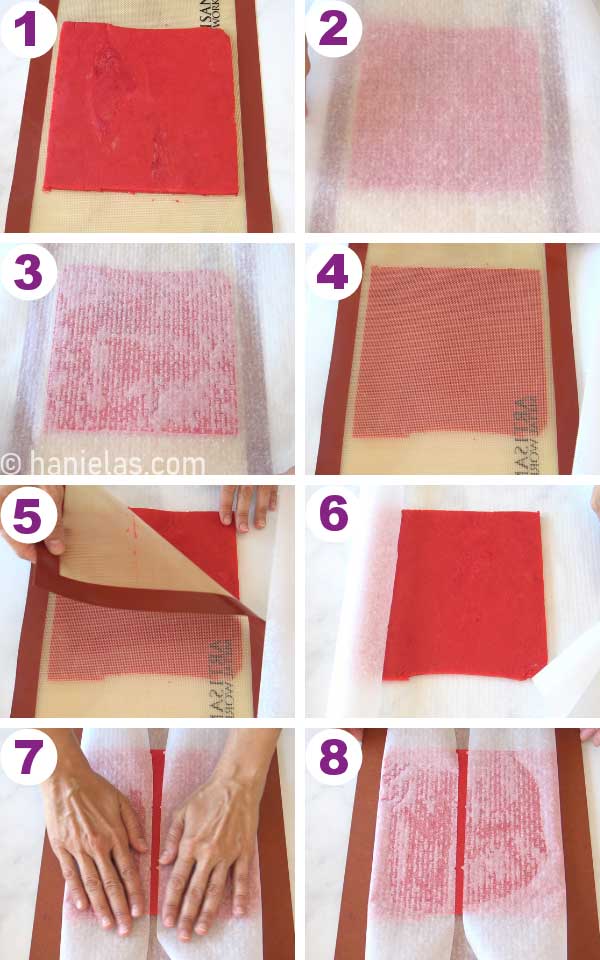
Repeat with the red cookie dough (steps 1-5). I turned the rolled-out dough onto a parchment sheet (step 6). Slide the parchment with red dough onto an uncolored cookie dough square. Place the cutting board with 2 stacked cookie doughs into the fridge. Chill the dough for 15 minutes (steps 7-8).
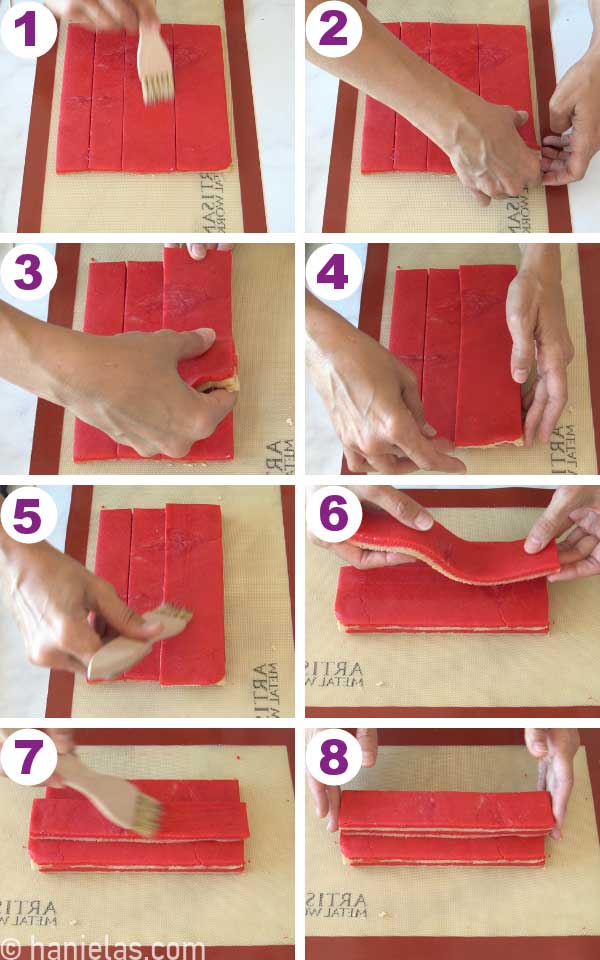
LAYER WHITE AND RED COOKIE LAYERS
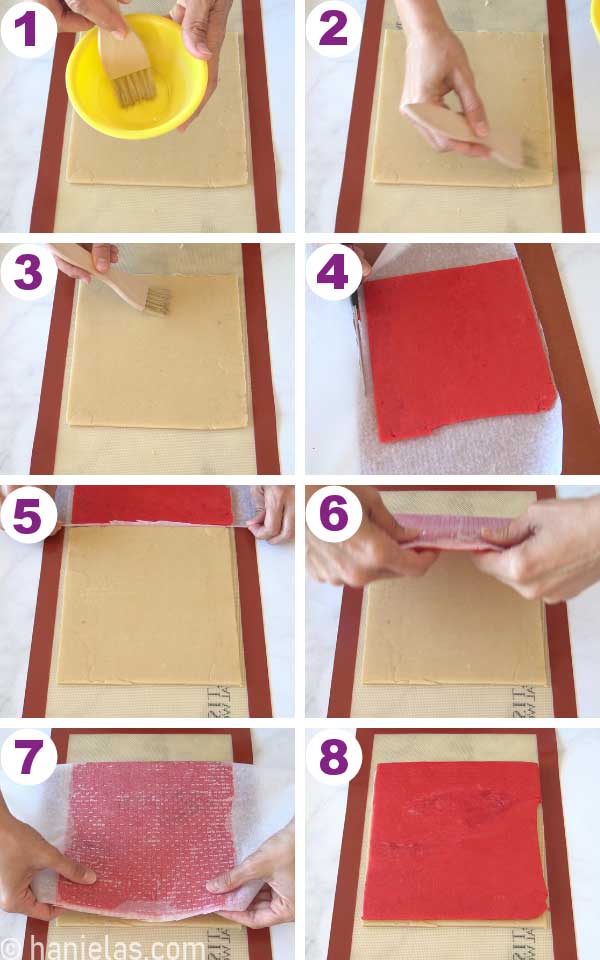
Brush a little bit of water onto the uncolored cookie dough (steps 1-3). Trim the parchment around the red dough to make it easier to handle (step 4). Carefully invert the red cookie dough square onto the uncolored dough. Peel off the parchment (steps 5-8).
ASEEMBLE RED AND WHITE STRIPED COOKIE LOG
Place the template on the top of the stacked cookie dough squares and trim the excess. Remove template (steps 1-4). Divide the square into two 2.5-inch strips and two 1.5-inch strips (steps 5-8). If cookie dough is too soft, chill it for 15 -30 minutes. It’s easier to handle when slightly chilled.

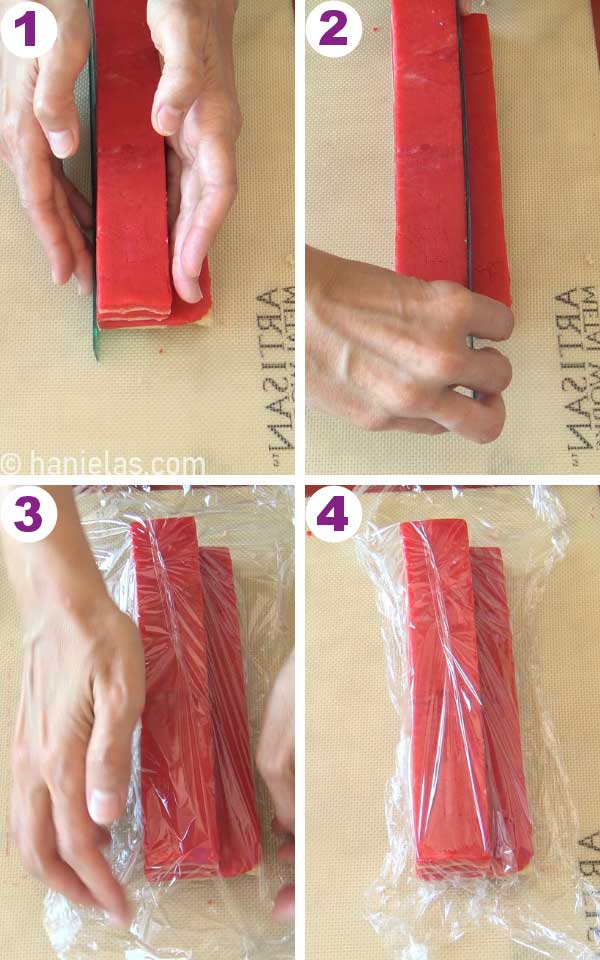
Stack two 2.5-inch strips of dough – Brush a 2.5-inch strip with a little water. Carefully lift the second 2.5-inch strip and place it on the top of the first strip. Check the profile of stacked layers; you should see a white-red-white-red cookie dough pattern (steps 1-4).
Assembling the ‘L’ Shape Cookie Log – Brush the top of the 2.5-inch strip with water (step 5). Carefully lift the 1.5-inch strip of cookie dough and place it onto the top of the 2.5-inch strip. Align it with the edge and repeat with the second 1.5-inch strip (steps 6-8). Be sure to stack layers, alternating white and red layers. You should have an “L” shape profile log.
Use a ruler to adjust the sides, keeping them straight. Avoid using your fingers for the best result. They can cause dents in the cookie dough. Cover with a food wrap and chill for 15 minutes (steps 1-4).
SHAPE BLUE COOKIE LOG
Shape the blue cookie dough into an 8-inch log (step 1). Roll it out to ½ inch thick and a little over 2 inches wide (step 2). Cut the dough in half. Brush one strip with some water and carefully lay the second piece of blue dough on the top (steps 3-8).
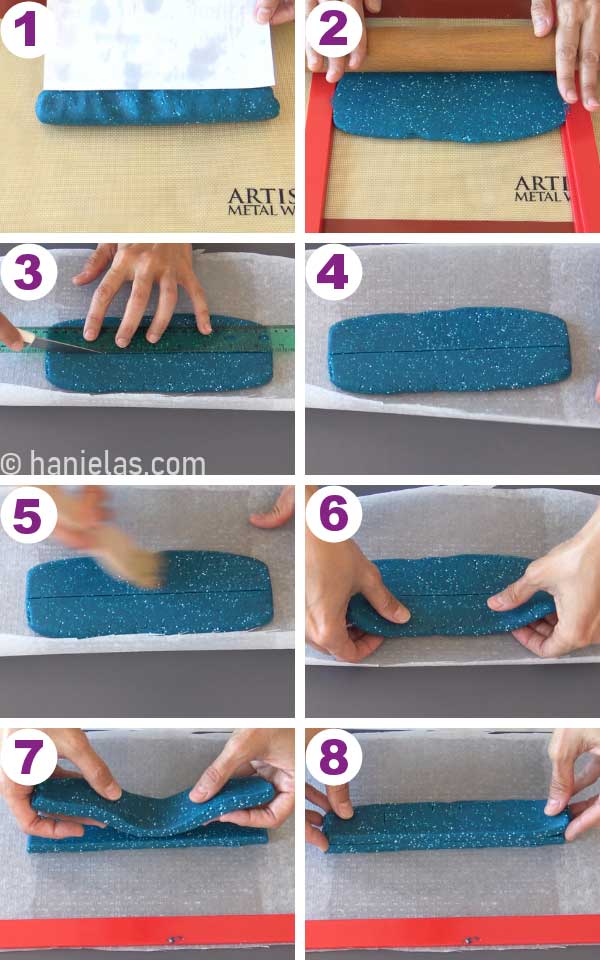
Trim one side and measure 1-inch with a ruler. Trim the excess dough. You should have a 1-inch by 1-inch by 8-inch blue log (steps 1-6). Chill for 10 minutes. It’s easier to handle.

COOKIE LOG ASSEMBLY
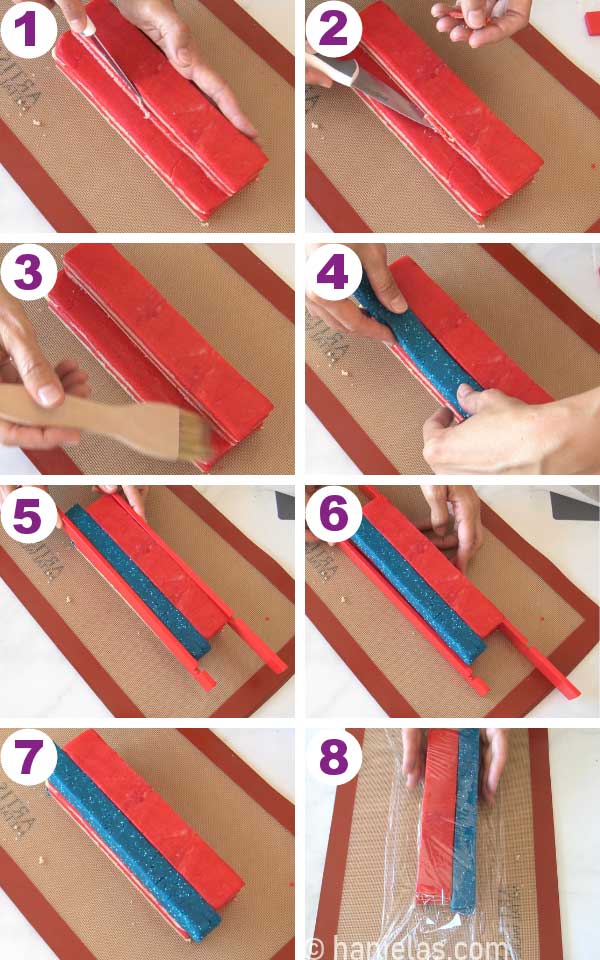
- I noticed the inner edge of the ‘L’ shaped cookie log wasn’t straight, so I trimmed it with a knife before adding the blue cookie log (steps 1-2).
- Brush the inner edges with a bit of water (step 3).
- Carefully lift the chilled blue layer and place it onto the red-white log, filling the empty ‘L’ log section.
- Use rulers or handy straight rolling guides to push the blue log into place, keeping the edges straight and avoiding making dents in the cookie dough (steps 5-7).
- Cover the cookie log well with food wrap and freeze it on a flat surface for 1 to 2 hours before slicing (step 8).
- If you are not making the cookies right away, double-wrap the frozen log in food wrap and place it in a freezer-safe Ziploc bag. Freeze for up to 3 months.
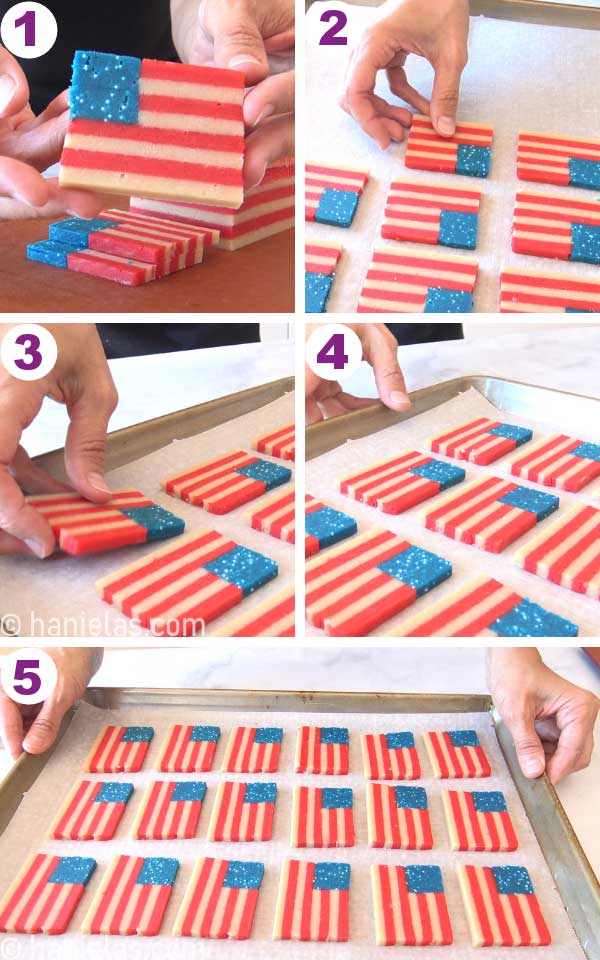
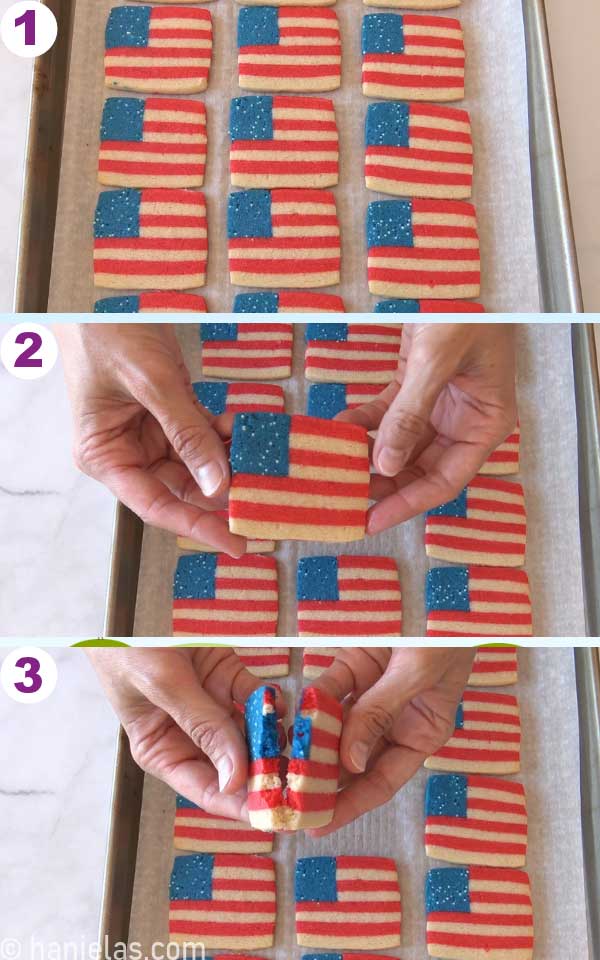
SLICE COOKIES
- Place a frozen cookie log onto a cutting board and remove the food wrap. If you find the cookie dough too hard to slice, let it sit for 5 minutes. Trim the long edge as needed to make it even (steps 1-3). Trim the ends (step 4).
- Use a ruler to divide the log into ¼-inch pieces.
- Slice cookies with a sharp knife.

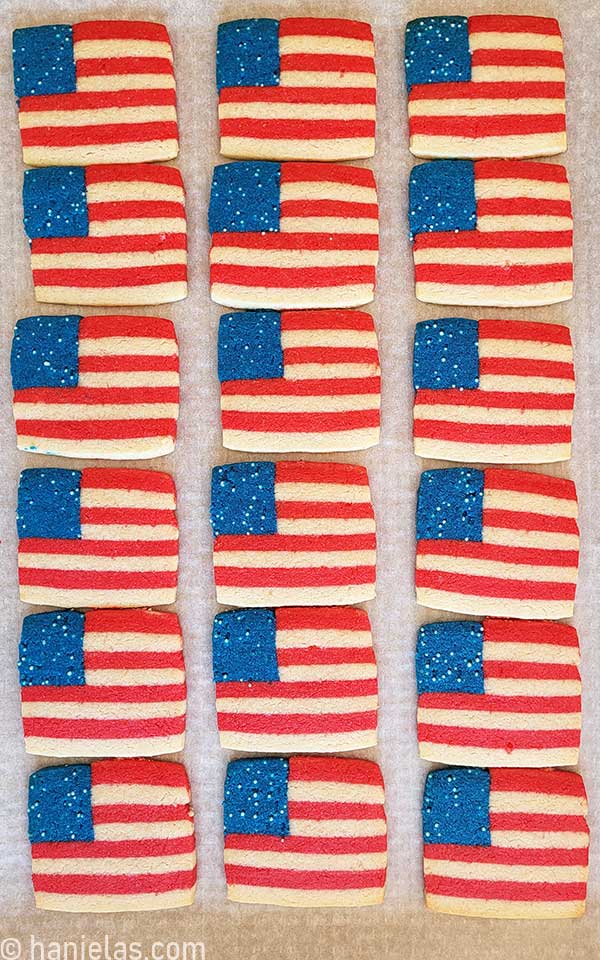
BAKE
Transfer chilled cookies onto a baking sheet lined with parchment or a perforated mat. Bake in the preheated oven at 375°F (190°C) for 10 minutes. Let cool before storing. Baked cookies can also be frozen.
SUCCES TIPS
Refrigeration solidifies butter and properly hydrates flour. This helps mitigate excessive spread in baking.
Chill the dough between steps – It makes assembly easier and yields clean, crisp
If you need to trim the cookie dough, do so after it is well-chilled.
Slice the assembled log chilled – very important.
Store baked cookies in an airtight container for up to 2 weeks. Or freeze for up to 3 months. How To Freeze Cookies.
Color the dough right after it’s made. It takes on color better.
Use concentrated gel colors. Don’t use liquid colors.
Use gloves
Most likely, the butter was too soft when you made the cookie dough. Use room temperature butter and chill the sliced, unbaked cookies before baking.
To achieve even layers, use rolling guides to ensure uniform thickness.
I haven’t had any issues using water as my glue medium. Make sure you don’t use too much water. It can make the dough soggy. You can also use egg white as glue. Lightly whisk egg white until foamy. Don’t use too much, or the cookie layers can slide.
American Flag Cookies
Ingredients
Cookie Dough
- 1 cup room temperature unsalted butter 2 sticks, 226 grams
- 3/4-1cup cup granulated sugar 150-200 grams (for sweeter cookies use 200grams)
- 1 egg large egg
- 2 tsp Vanilla Extract
- 3 cups all-purpose flour 430 grams
- 1/4 tsp Salt
Instructions
AMERICAN FLAG COOKIES
Sugar Cookie Dough
- Cream butter (2 sticks, 226 grams) and sugar (3/4 cup to 1 cup, 150 grams to 200 grams) on medium-high speed for 3 minutes. For sweeter cookies, use 200 grams of sugar.Whisk egg and 2 teaspoons of Vanilla extract. Gradually add egg mixture to butter-sugar mixture. Beat for a minute. Scrape down the bowl a few times.
- Sift flour and salt into a bowl.
- Gradually in 3 additions beat the flour mixture into the butter mixture. Beat on medium-low speed. Beat until thick moist crumbs are formed. Gather dough together and shape it into a disk.
Divide Cookie Dough
- Divide freshly made cookie dough into 4 equal parts. Take one part and set it aside. Press the remaining 3 parts together to form a disk and cut it in half.
Color Cookie Dough
- Color the smallest piece of cookie dough with a blue gel food coloring. And one of the larger pieces with gel food color. You should have blue, red and uncolored pieces of cookie dough.
Shape American Flag Cookie Log
- Roll white and red cookie dough into an 8×8-inch square. Chill. Brush white dough with some water. Layer red dough onto the white. Divide the 8×8-inch white/red cookie square into strips: two strips of 2.5-inch, and two strips of 1.5-inch.Layer one 2.5-inch strip on top of the second 2.5-inch strip. Then layer both 1.5-inch strips of red/white dough onto the 2.5-inch log, aligning the left edges. Cover and chill for 15 minutes.Shape blue dough into an 8-inch log. Roll it out 1/2 inch thick, to a little over 2 inches wide. Cut it in half lengthwise and stack to form a log of 1-inch by 1-inch by 8-inch. Trim the sides with a knife to form this log size. Chill for 10 minutes.Layer blue log into a cavity on red/white log. Cover well and freeze for 1-2 hours.For detailed instructions refer to the blog post with a step-by-step tutorial.
Bake Cookies
- Preheat the oven to 375°F (190°C).Slice the cookies 1/4 inch thick. Bake for 10 minutes. Cool and store in an airtight container for up to 2 weeks.
Video
This post was originally published on June 21st, 2011. On May 28th, 2022, I updated this recipe post with new step-by-step pictures, written text, and video.

Hi, I’m Hani
Welcome!
Thank you for visiting Haniela’s. On my blog, you’ll find delicious sweet & savory recipes made with simple ingredients. Why not start a new adventure? Discover a world of cookie decorating with my step-by-step tutorials.

Hi, I’m Hani
Welcome!
Thank you for visiting Haniela’s. On my blog, you’ll find delicious sweet & savory recipes made with simple ingredients. Why not start a new adventure? Discover a world of cookie decorating with my step-by-step tutorials.
When you are doing your American flag cookies. What mat are you using with the red side bars..
Hi Ben,
Thank you your stopping by.
To answer your question, I used a standard silicone baking mat and also parchment. Red side bars, these are rolling guides, they are 1/4 inch thick each, and 1 inch wide.
Happy 4th of July!
I followed your recipe exactly, but my cookies spread like crazy when baked. :/
Hi Marty,
I’m sorry to hear that. I’m trying to think what could be the problem. The only thing that I can think of is
butter that was too soft.
Kids are going to live these! Very clever Hani!
Thank you so much June.♥