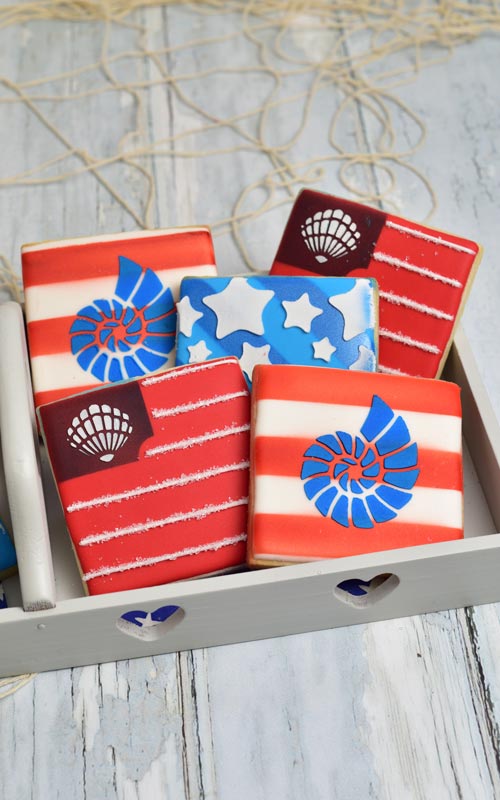
Patriotic Seashell Cookies
Whether you love spending time at the beach or you’re a seashell collector I think you’ll love making these Patriotic Seashell Cookies. They are super simple and easy to make. And with red, blue and white colors they are great for 4th of July festivities, too.
PATRIOTIC SEASHELL COOKIES
I’m going so share with you a simple cookie decorating tutorial. For this cookie decorating project I used a 3 inch square cookie cutter. To decorate I used royal icing , Airbrush and nautical stencils. Stencils are really fun to use.

FLOOD THE COOKIES
I used Fresh Lemon Royal Icing to decorate. That being said if you have egg allergies or follow a special diet you can make Vegan Royal Icing instead.
Color royal icing with red and blue gel coloring. Then thin it down with water to 15 second consistency. I’ll be working with red, blue and white royal icing.
HOW DO I MAKE RED ROYAL ICING?
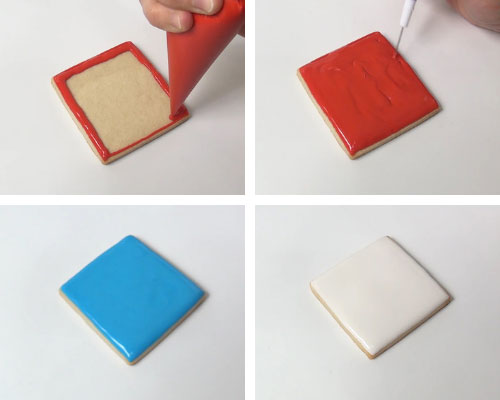
Flood each square cookie with 15 second consistency royal icing. Use a needle to distribute the icing evenly and to accentuate the corners. Then let the icing dry.
WHAT IS 15 SECOND CONSISTENCY? Learn how to thin royal icing with my Guide to Royal Icing Consistency.
AIRBRUSHING
Airbrushing is an effective way to decorate cookies. You can create impressive patterns literally in a matter of seconds. To make the stripes I used a wide stripes stencil.

Secure a wide stripes stencil into a stencil snap holder. Feed few drops of red airbrush food coloring into the airbrush cup.
First, test the color flow on a piece of a paper towel. Then line by line airbrush cookies, keeping the stencil place. Carefully lift up the stencil and let the airbrush color dry for 30 minutes.
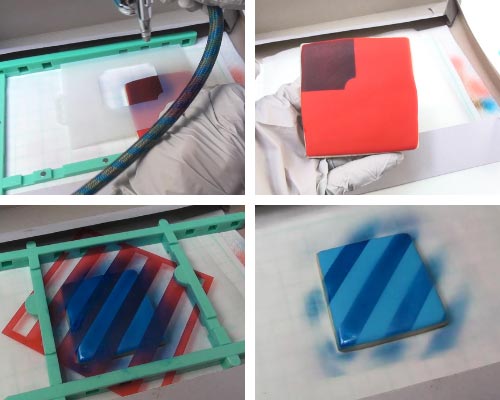
Place a stencil over a cookie on an angle to make diagonal stripes.
At the very last minute I decided to make a USA flag too. To create a flag canton (the top hoist rectangular area) I used a square stencil. Position square stencil onto a cookie. Hold lower right corner in place with your fingers or use a needle tool and airbrush with blue airbrush color. Keeping a stencil in place ensures clean airbrushed edges.
SEASHELLS STENCILS
When stenciling with royal icing I use stiff royal icing and to spread icing over the stencil I like to use either a small spreader, spatula or a sugar smoother.

Position seashell stencil on a dry iced cookie. Hold the stencil in place and spread a thin layer of stiff royal icing over the stencil. Carefully lift up the stencil. Oh how pretty!

Instead of stars or dots in the canton USA flag area I used a small seashell border. Spread a thin layer of white stiff royal icing over the stencil and then carefully lift it, away from the surface of the cookie.
It’s such a pain to pipe the stars with royal icing. Why not use a star stencil instead?

Secure star stencil with a stencil holder and spread a thin layer of white royal icing over the stencil. Carefully lift up the stencil. Notice there is residue icing on the edges. Scrape it off with a small spatula or a knife. Let icing dry.
APPLY SANDING SUGAR
Finish the American flag design by piping straight lines across with white piping consistency royal icing. Dust icing with white sanding sugar.

TO MAKE PATRIOTIC SEASHELL COOKIES YOU NEED
- RECIPES
- Sugar Cookies
- Royal Icing
- TOOLS
- Piping Bags
- Needle Tool
- Food Colors
- Stencils : Seashell Border Stencil, Shell Stencil
- Stencil Holder
- Spreader
- Sugar Smoother
- Airbrush
- Airbrush Colors : red, blue
- White Sanding Sugar
- USEFUL TUTORIALS
- Royal Icing FAQ
- Guide to Royal Icing Consistency
- Freezing Royal Icing
- Patriotic Seashell Cookie video tutorial with narration
MORE PATRIOTIC IDEAS :
- Patriotic Star Cookies
- 4th of July Peppermint Patties
- 10 Fun Patriotic Desserts
- Easy American Flag Cookies
- 4th of July Berry Tarts
PIN IT for later

This post contains Amazon affiliate links that earn me a small commission, at no cost to you. I only recommend products that I use and love. Learn more about my affiliate policy here.

Hi, I’m Hani
Welcome!
Thank you for visiting Haniela’s. On my blog, you’ll find delicious sweet & savory recipes made with simple ingredients. Why not start a new adventure? Discover a world of cookie decorating with my step-by-step tutorials.

Hi, I’m Hani
Welcome!
Thank you for visiting Haniela’s. On my blog, you’ll find delicious sweet & savory recipes made with simple ingredients. Why not start a new adventure? Discover a world of cookie decorating with my step-by-step tutorials.
These are great ideas. But when you put the thicker icing using the stencil on the seashell cookies, how do you get it so the stencil design just doesn’t mix into the icing that its on top of? You seem to have to “push down” the stencil icing onto the icing that’s already there.
Hi Sean,
stenciling is done after the base layer of icing has dried.