Saint Patrick’s Day Rainbow, Bunting Banner, Shamrock Cookies
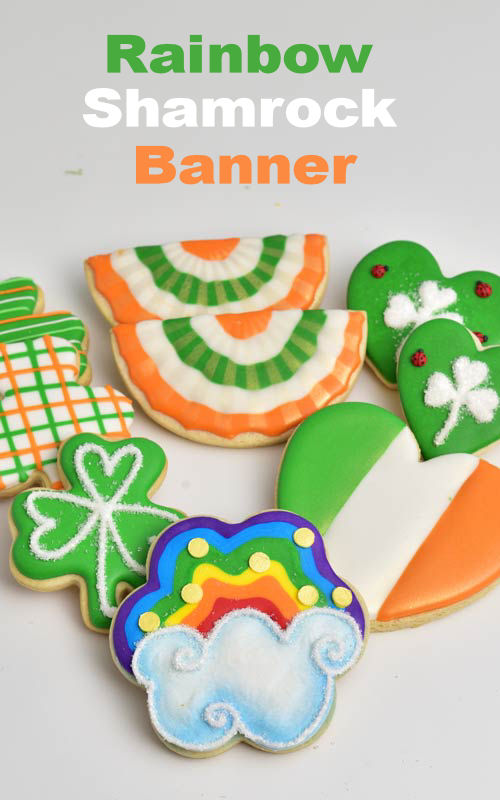
In my previous post I promised you more Saint Patrick’s Day Cookies. I’m keeping my promise and today we are going to make simple Saint Patrick’s Day Rainbow, Bunting Banner, Shamrock cookies. I also had some heart shaped cookies and so I put an Irish twist on them.
Today I’m using shamrocks, flower, half round, and heart shapes to make Saint Patrick’s Day cookies.
This post includes a complete video tutorial with cookie decorating demonstration. Scroll down to view the video.
PLAID SHAMROCK AND HEART FLAG COOKIES
Shamrock, a symbol of Ireland with its 3 leaves representing faith, hope and love is an obvious choice for Saint Patrick’s Day Celebrations.
I made few simple shamrock designs. One of them is wet on wet plaid design. I like to use a grid guide underneath my cookies to make sure my plaid lines are evenly spaced out.
Furthermore you can use the grid to evenly divide the heart cookie into sections. Grid is also useful when making tufted designs, too.

- Plaid Shamrock Cookies
- Flood cookie with white royal icing.
- Pipe green lines across, use a grid guide underneath the cookies if needed.
- Then pipe orange lines across, making a plaid patterns. Let dry.
- Heart Flag Cookies
- Use a marker to divide cookie into sections. Use a grid if needed.
- Flood each section with different color icing. In this case green, white, and orange. Let dry.
ROYAL ICING TRANSFERS
Designs I’m sharing with you today include 2 decorations that are royal icing transfers: Gold coins and super cute and tiny Ladybugs. Both can be made ahead of time.
Since I have already shared how to make both of these, I’m including links where you can find how to make them.
Royal Icing Gold Coins
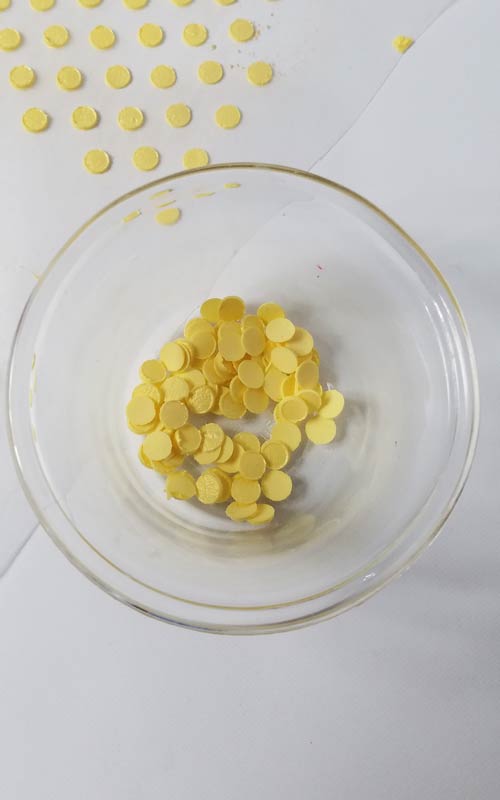
Step by step tutorial how to make Royal Icing Gold Coins
Ladybugs
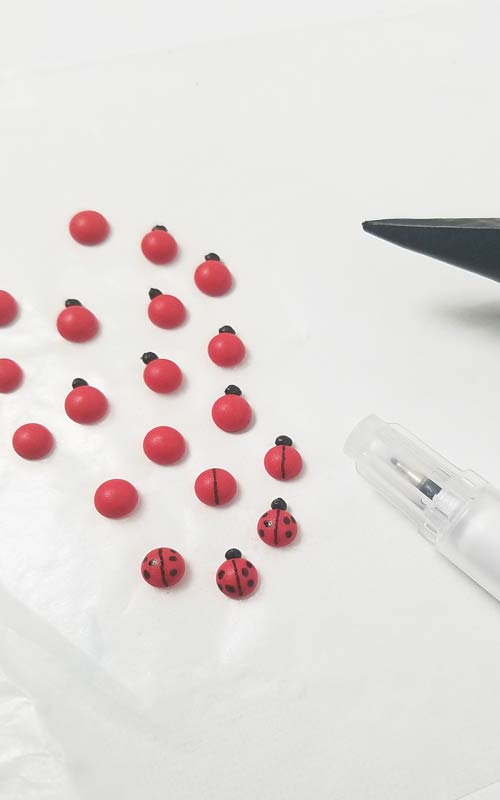
Step by step tutorial how to make Royal Icing Ladybugs.(watch the video)
HEART SHAMROCK COOKIES with LADYBUGS
Do you love using sanding sugar? I do! It’s a great way to add texture and let’s be honest it also hides any imperfections. My shamrock wasn’t exactly perfect. Not only it looks much better but it sparkles, too.
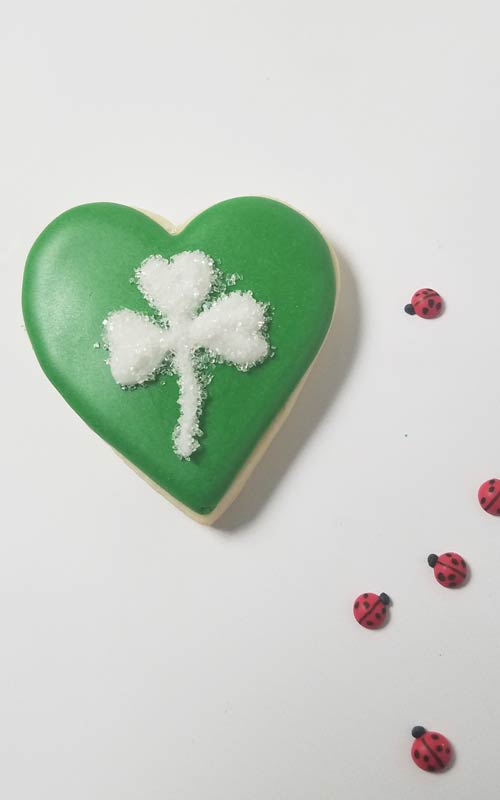
- Flood heart cookies with leaf green royal icing. Let dry.
- Then using white icing pipe 3 hearts and a stem.
- While still wet dust the shamrock with white sanding sugar.
- Let dry.
RAINBOW CLOUD COOKIES
This Rainbow Cloud Cookie is my favorite cookie from this set.
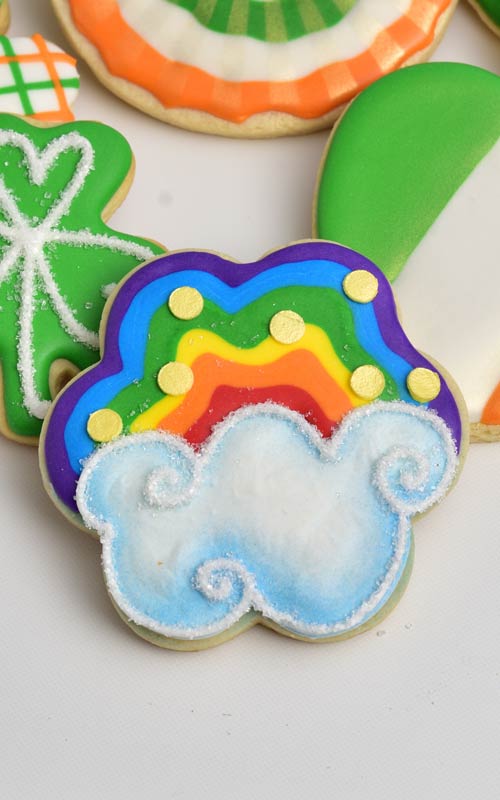
- With edible marker draw the outline for the cloud on the cookie.
- Then make the cloud with white royal icing, let it dry.
- Using sky blue airbrush color airbrush the edges.
- After you are done airbrushing take edible marker again and divide section above the cloud.
- Ice each section with different color icing. Starting with purple, blue, green, yellow, orange and red. Let dry.
- Using white royal icing outline the cloud and dust it with white sanding sugar. See how the cloud pops with the sanding sugar border!
- Decorate the rainbow part with royal icing gold coins. Use royal icing for the glue.
- Use tweezers to to position gold coins on the cookie.
BUNTING BANNER COOKIES
I was looking online for some different ideas for Saint Patrick’s Day and I came across bunting banners in Ireland colors. They looked super cute and I decided to go with the idea. Green section was suppose to have white shamrocks but I forgot to add them.
Lucky me, I found a brilliant tutorial on how to make Bunting Banner Cookies over at Semi Sweet blog where you can also shop for variety unique cookie cutters Mike designs himself.
Originally I was going to airbrush my banner cookies with black. I wanted to mist them concentrating on the right edges of the stencil. After, I ran this scenario in my head and saw my hands stained by black airbrush color. I realized lightly misting just one section of the stencil perhaps too finicky. Then I found the tutorial on Semi Sweet Blog and I knew I had to try metallic color instead. I used Gold Airbrush Color instead.
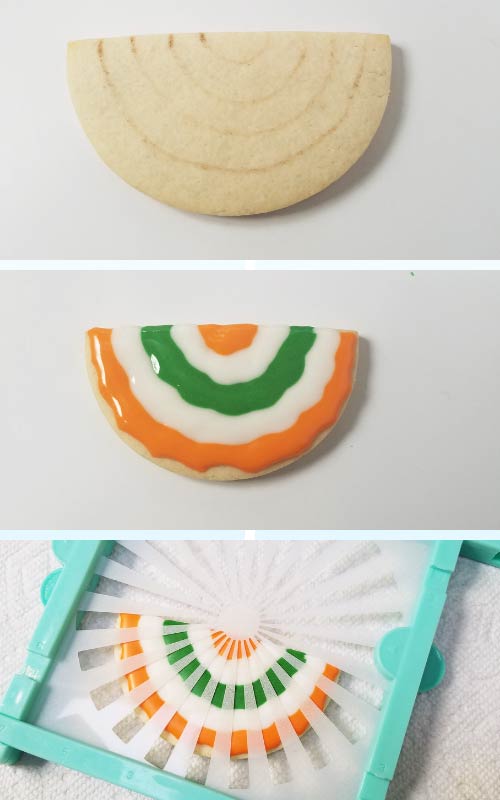
- Start by cutting a 3.5 inch cookie in half. Bake as usual. Let cool.
- Divide cookies into sections, use edible marker to draw the guides.
- Then flood the cookie with 15 second consistency royal icing, alternating colors. Don’t wait for the icing layers to crust.
- Let dry.
- Secure Starburst Stencil into a stencil holder and airbrush with gold metallic airbrush color. Make sure to thoroughly stir/ shake metallic airbrush colors.
- Thoroughly clean the airbrush gun.
TO MAKE SAINT PATRICK’S DAY RAINBOW, SHAMROCK AND BANNER COOKIES YOU NEED
- RECIPES
- Cookie Recipes : Sugar Cookies, Vegan Sugar Cookies, Chocolate Cookies
- Royal Icing
- Vegan Royal Icing
- ROYAL ICING TRANSFERS
- Wax Paper
- Ladybugs
- Red Royal Icing : 25 second consistency
- Black Royal Icing : 25 second consistency
- Black Edible Marker– super fine tip
- Coins
- Ivory Yellow Royal Icing : stiff consistency
- Polka Dot Stencil
- Spreader
- Airbrush
- Metallic Gold Airbrush Food Color
- TOOLS
- Cookie Cutters : round, hearts, flower, shamrock
- Piping Bags
- Food Colorings
- Needle Tool
- Tweezers
- Edible Marker – brown to draw the guides
- Airbrush
- Metallic Gold Airbrush Food Color – bunting banner cookies, heart flag cookies
- Sky Blue Airbrush Color – cloud design
- Starburst Stencil – for bunting banner cookies
- White Sanding Sugar – shamrock outline, shamrock on heart cookie
ROYAL ICING CONSISTENCIES
- Refer to a video for step by step instructions
- Rainbow Cookies
- White : 25 to 30 second consistency, little bumps here and there are great for a cloud appearance
- Rainbow Colors : 15 second consistency
- Shamrock Cookies
- White, Green : 15 second consistency
- Green, White, Orange : piping consistency – to pipe lines across on top of the dry royal icing base layer
- Orange, Green – 15 second consistency – make plaid design using wet on wet technique (see the grid technique in the video)
- White : piping consistency – pipe white shamrock outline on top of dry green base, then dust it with white sanding sugar
- Bunting Banner Cookies
- White, Orange, Green : 15 second consistency
- Heart Shamrock Ladybug Cookies
- Green : 15 second consistency
- White : 25 second consistency – to pipe white shamrock on dry green layer, then dust it with sanding sugar
- Heart Flag Cookies
- White, Green, Orange : 15 second consistency

This post contains Amazon affiliate links that earn me a small commission, at no cost to you. I only recommend products that I use and love. Learn more about my affiliate policy here.

Hi, I’m Hani
Welcome!
Thank you for visiting Haniela’s. On my blog, you’ll find delicious sweet & savory recipes made with simple ingredients. Why not start a new adventure? Discover a world of cookie decorating with my step-by-step tutorials.

Hi, I’m Hani
Welcome!
Thank you for visiting Haniela’s. On my blog, you’ll find delicious sweet & savory recipes made with simple ingredients. Why not start a new adventure? Discover a world of cookie decorating with my step-by-step tutorials.