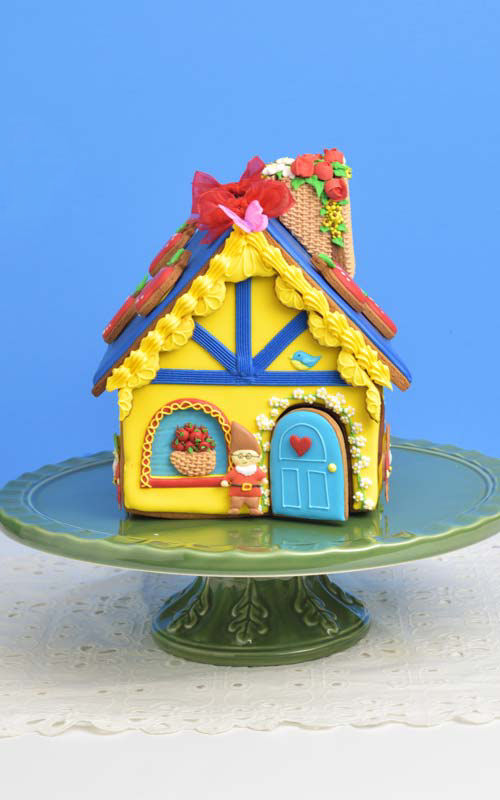
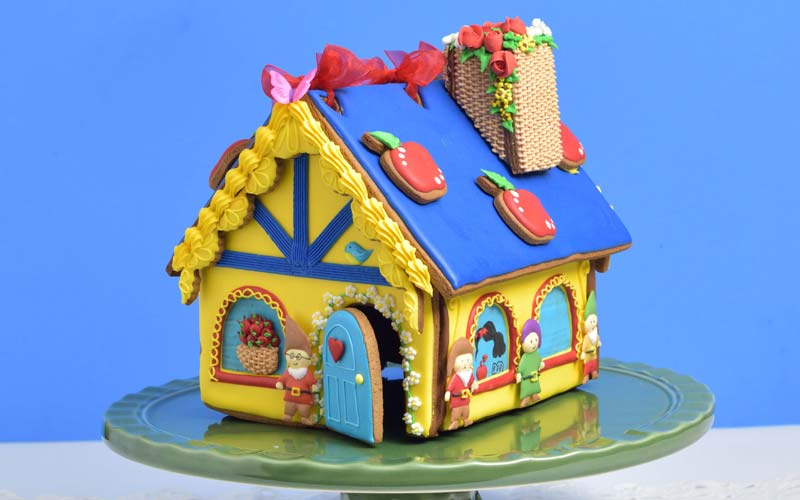
Snow White and the Seven Dwarfs Gingerbread House
Last year I made Beauty and the Beast inspired gingerbread house. Ever since you have been asking for more princess inspired houses. Today I’m going to show how to make a beautiful Snow White and the Seven Dwarfs Gingerbread house.
GINGERBREAD COOKIES
I used my gingerbread cookie dough for houses and centerpieces. This dough produces sturdy cookies for centerpieces. I keep my gingerbread houses on display for weeks, even months.
Easy Blooms Cutter by Wilton proved to be useful for more than easy flower blooms. I used it to create decorative panels.

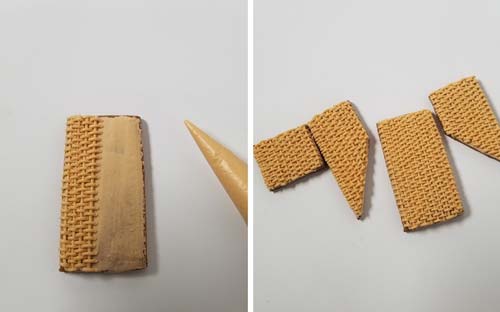
To make the triangle shaped panel I glued 2 cookies together. Be sure to use a little bit of water on the seam. This helps with the adhesion.
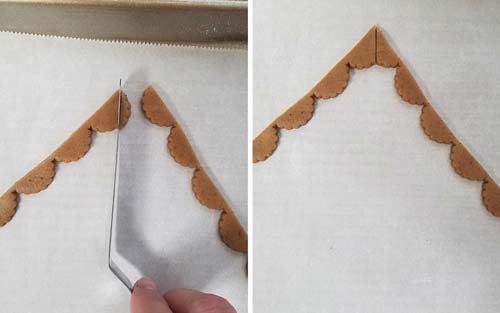
Then use a front house panel cutter to make a final trimming. This step will trim the bottom portion that would otherwise stick out once the house is built. Bake at 350F for about 12-14 minutes.

DECORATING
Before you start decorating always make sure you let the cookies cool completely. As a matter of fact don’t touch the house panels and other delicate cookie parts for at least 15 minutes after you take them out of the oven.
You can make all of the cookies few days before you plan on decorating. It’s perfectly fine.
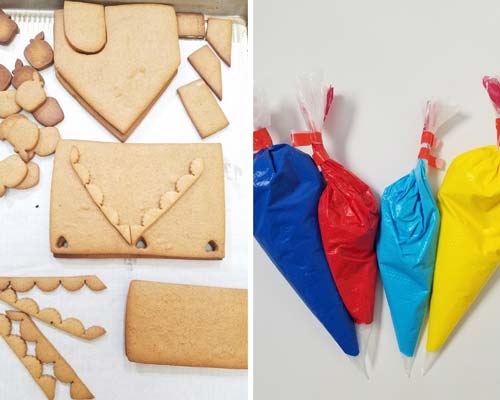
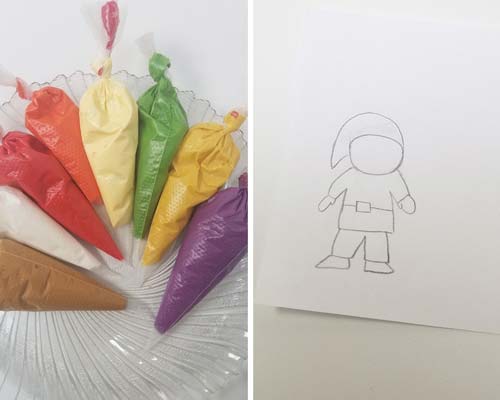
I flooded all the cookies with a base coat.
On most days I use 15 second consistency royal icing. However when icing larger areas I often thin icing a little more(12 -13 second) to make sure that it doesn’t start crusting before I’m done icing the cookie.
You also need to take your ambient temperature into account. If you work by a heater icing is most likely to crust faster.
ROYAL ICING TRANSFERS
Royal icing transfers(RIT) are great option when decorating houses. You can make them ahead of time. Days, weeks, even months. Store them in an airtight container, away from a direct sunlight.
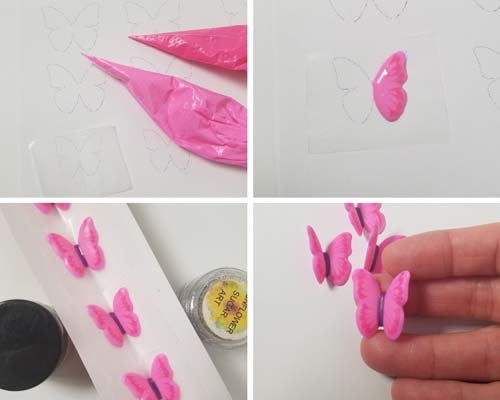
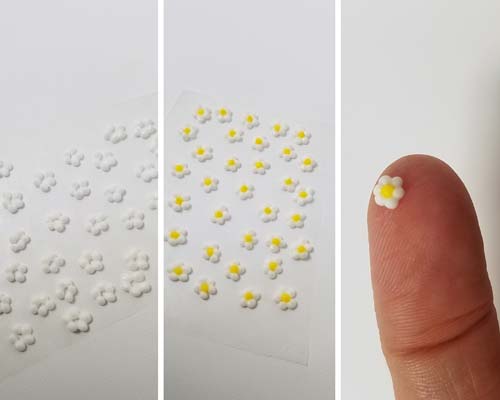
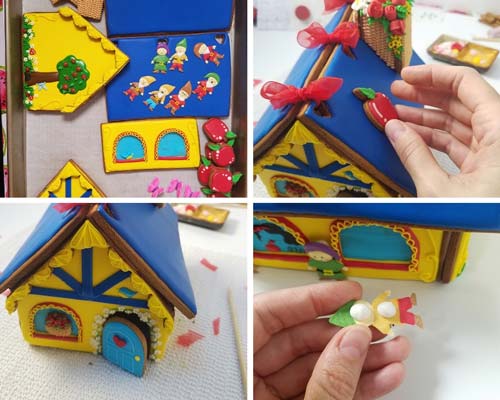
To decorate Snow White and Seven Dwarfs gingerbread house I made ladybugs, apples, apple basket, butterflies, birds, flowers and dwarfs as RIT.
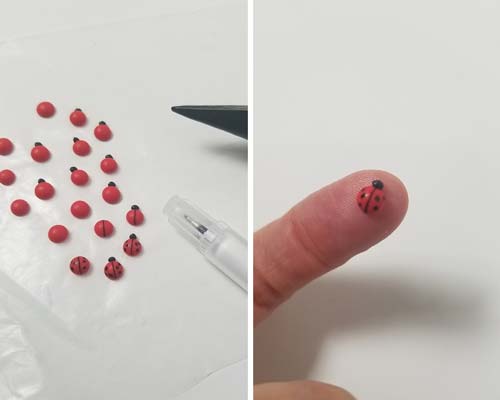
In a nutshell, you pipe royal icing on a piece of wax paper, parchment or acetate sheet. Then royal icing has to dry. It is a great practice to place wax paper with royal icing on a flat surface and let RIT dry completely.
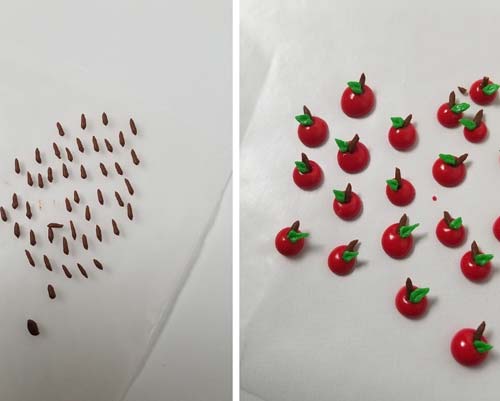
After icing dries you can peel off the backing and use decorations, or store them for later.
For thicker and larger applications it is best to wait 10-12 hours.
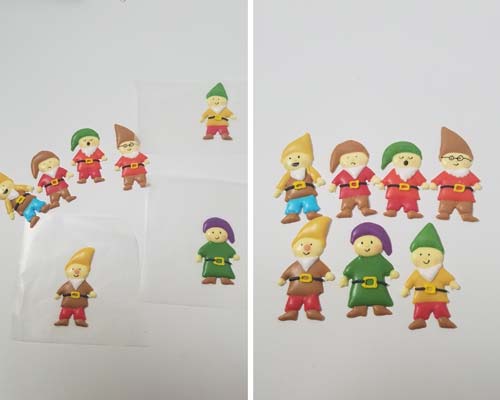
DWARFS
Dwarfs are also royal icing transfers and I used one template to create all of them.
I utilized 20 second consistency royal icing. Make sure to let the dwarfs dry completely before using pink petal dust on their cheeks and drawing their faces with edible marker.
It is best to let them dry overnight and then peel off the wax paper. They turned out so cute!
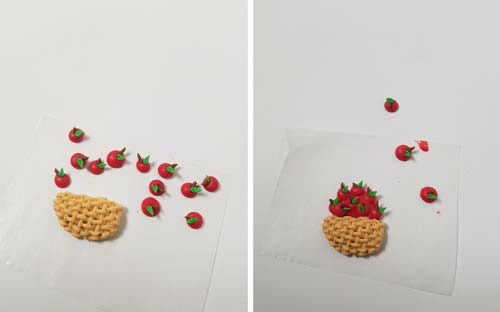
BASKET WEAVE
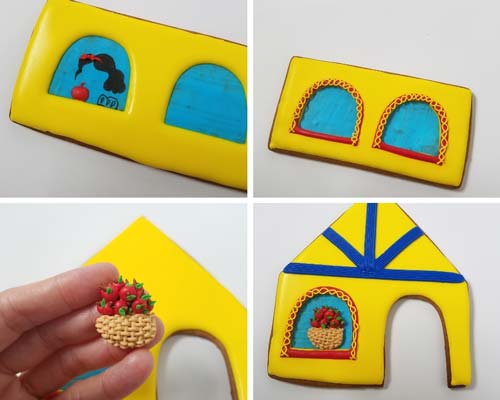
Chimney represents the Snow White’s basket.
First, I spread a thin layer of tan royal icing using a food pain brush. Then once this layer was dry I piped the basket weave design with stiffer icing.
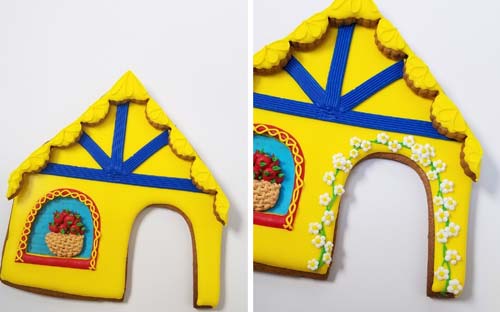
SNOW WHITE AND THE SEVEN DWARFS GINGERBREAD HOUSE PANELS
I prepared my flood icing for the panels. Always start with icing the largest sections to get them out of the way. Once you ice the panels with the 1st layer, it is important to let the panels dry. Don’t touch or move the cookies for at least 5-6 hours.
Refer to my Royal Icing FAQ on how to speed up the drying process.
As soon as the base layer is dry you can start adding second layer of decorations.
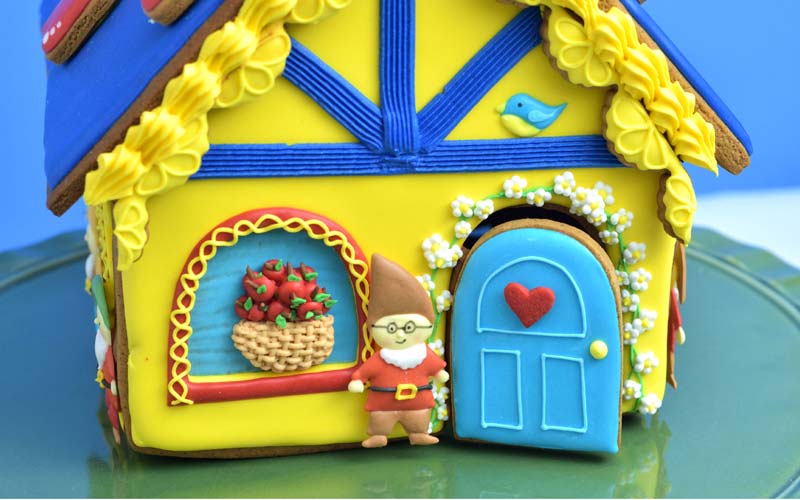
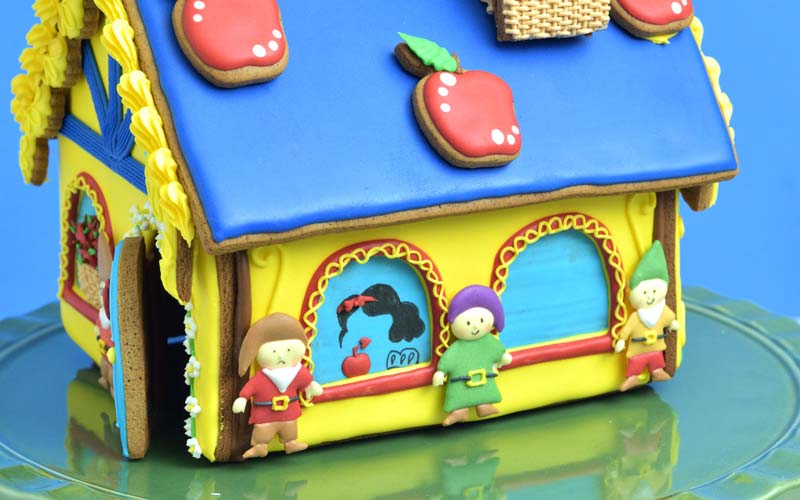
I used edible marker to draw the Snow White silhouette.
Attach royal icing transfers, use medium stiff royal icing for the glue.
PIPING TIPS
To simplify the decorating process of my Snow White and the Seven Dwarfs gingerbread house I used 4 piping tips.
- Flat Tip with Grooves (honestly I have no clue what this one is called) – blue beams
- Grass Piping Tip
- Leaf Piping Tip
- Star Tip
Use stiff royal icing to pipe blue beams with Flat Tip with Grooves.
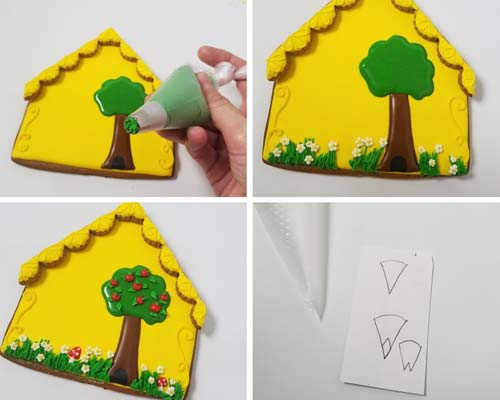
To decorate the back panel I used 2 tips. 1st the Grass Piping Tip to make the grass and a Leaf Tip to pipe the leaves. When making the grass with a grass tip make sure to use stiff royal icing.
I made a leaf tip by simply cutting the tip of the piping back into a V-shape.
ROOF PANELS
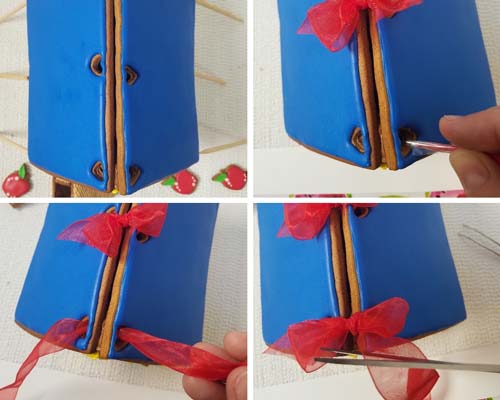
Notice I made 3 heart cutouts in each roof panel. Cut the holes before you bake the cookies. Try to cut them so they are somewhat aligned with the opposite roof panel. Then later you can easily thread the ribbon through.
I taped the end of the ribbon and thread it through the openings. Then I made the bows.
It turned out so cute!
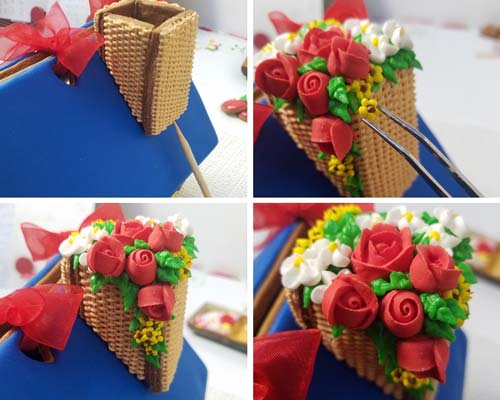
CHIMNEY – SNOW WHITE’S FLOWER BASKET
I like to add chimney after the house is built so the additional weight of the chimney is not going to cause house panels to slide as they are drying. (You can see the process of building the house in my video below.)
With the chimney attached I filled it with stiff royal icing all the way to the top and then I attached lots of cute flowers.
ADORN THE HOUSE WITH DWARFS, BUTTERFLIES, BIRDS AND DECORATED COOKIES
After overnight drying, house is standing and it’s time to add 7 dwarfs : Doc, Grumpy, Happy, Sleepy, Bashful, Sneezy, Dopey.
Use royal icing to attach butterflies, apple cookies and dwarfs. Let dry.
Enjoy a beautiful Snow White and the Seven Dwarfs gingerbread house.

To make Snow White and the Seven Dwarfs Gingerbread House you need:
- RECIPES
- Gingerbread Cookie Dough for houses and centerpieces
- Royal Icing
- TOOLS
- Cookies Cutters : house panels, Easy Blooms Cutter by Wilton (purple cutter below), mini apple cutter
- Piping Bags
- Needle Tool
- Paint Brush (food only)
- Piping : Grass tip, Petal tip(101), Flat tip, Star tip(21)
- Food Colorings : yellow, orange, red, ivory, brown, sky blue, royal blue, green, black
- Red Bow
- Wax Paper
- Flower Nail
- Tweezers
- Edible Markers : fine tip black marker, FooDoodlers
- Petal Dust(FDA) – to add color to the dwarfs’ cheeks
- Templates: dwarfs, bird, window, door
- MAKE ROYAL ICING ROSES : wax paper squares, flower nail and petal piping tip 101 or 102 for slightly larger roses. Please refer to this tutorial on how to make the roses ribbon roses.
- USEFUL TUTORIALS
- Royal Icing FAQ
This post contains affiliate links. Learn more about my affiliate disclosure here.

Hi, I’m Hani
Welcome!
Thank you for visiting Haniela’s. On my blog, you’ll find delicious sweet & savory recipes made with simple ingredients. Why not start a new adventure? Discover a world of cookie decorating with my step-by-step tutorials.
Hi, I’m Hani
Welcome!
Thank you for visiting Haniela’s. On my blog, you’ll find delicious sweet & savory recipes made with simple ingredients. Why not start a new adventure? Discover a world of cookie decorating with my step-by-step tutorials.

How had I never seen your gingerbread houses before today?! Another amazing one!!
Thank you Lora. Happy New Year.
Hi, I can’t find the templates to make the royal icing transfers, where are they?
Templates
Where can I find the gingerbread cutters for the Snow White house? Could you please let me know?
Hi Chris, I have them listed in the post, under tools, cookie cutters.