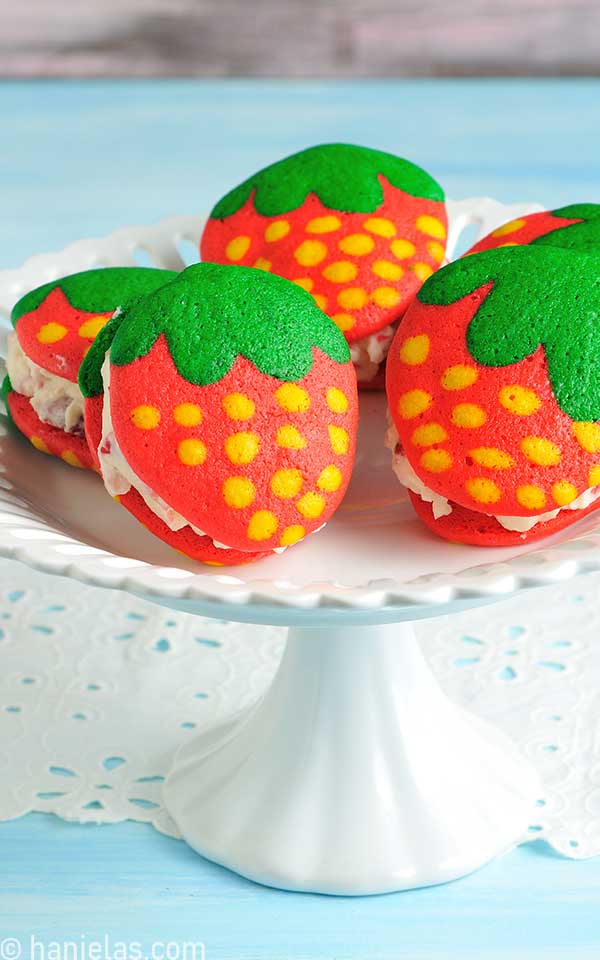
Stand Mixer Cookies
Surprise a baker in your life with these yellow bright decorated Stand Mixer Cookies. I got my 1st Kitchenaid mixer 15 years ago! There were not many colors to choose from and so I picked cinnamon red color. I wonder how many of you have this same color? I still love it. It mixed thousands of cookies and what does it really matter what color it is?! But I kind of wish it was yellow and I could decorate it with red cherry mixer decals.
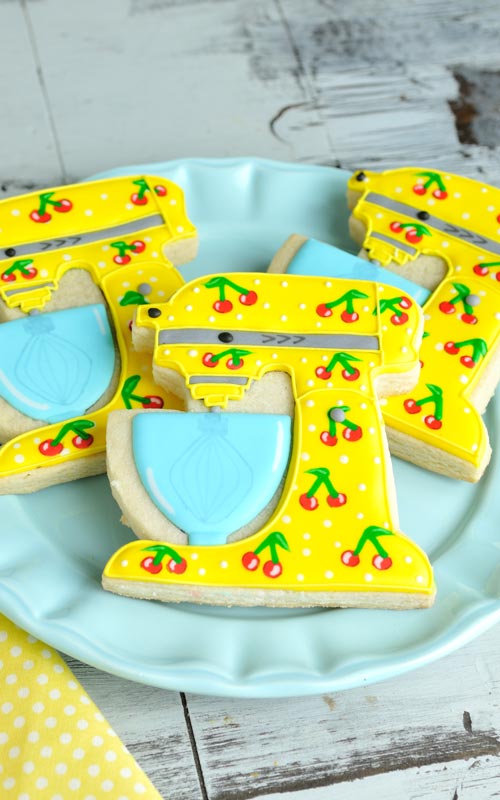
STAND MIXER COOKIES
Today I’m going to show how to decorate sugar cookies with a pretty cherry pattern, using wet on wet decorating technique. I used the same pattern to decorate my pretty Cherry Cake.
COOKIE CUTTERS
There are number of stand mixer cutters available. 4 inch cutter used in this tutorial is unfortunately discontinued. However, I found a suitable replacement in Bobbi’s Cookie Cutters Shop.

TEMPLATE
Stand Mixer design can seem somewhat daunting. But once you break it down into sections it gets a lot easier. I promise.
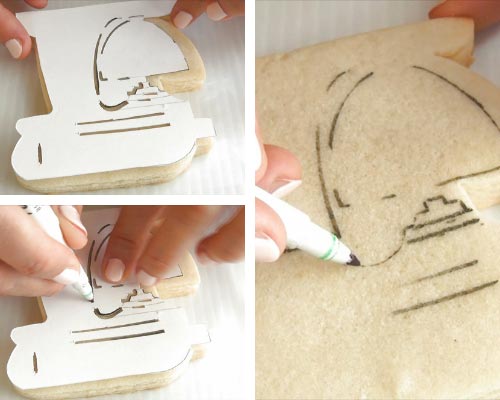
To break it into sections I made a paper template and I cut out small sections with an exacto knife. Then I traced the main outlines on cookies with an edible marker. It really helps to have outlines in place before you start decorating with royal icing.
GLASS MIXER BOWL
I know most stand mixer come with a stainless steel bowl. But I really love a glass bowl.
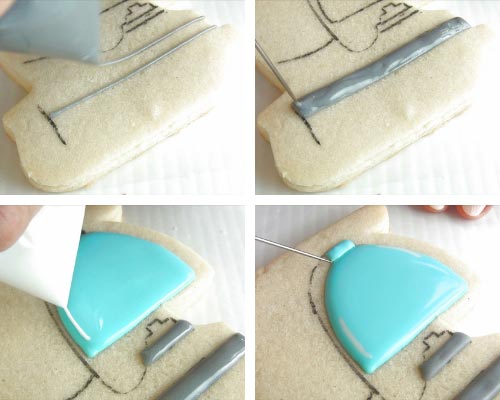
Flood long sections with gray royal icing 20 second consistency.
Make a glass mixer bowl with a light blue 20 second consistency royal icing. With white icing add shading on the side of the bowl. Let crust before adding a bottom section. Use a needle too to shape the icing while still wet.
WET ON WET TECHNIQUE
What is Wet on Wet ? Wet on wet refers to a technique that is used in cookie decorating. A good example of wet on wet are these Marbled Christmas Cookies or these Nutella Jar Cookies.
- For example :
- Flood a cookie with a yellow 15 second consistency royal icing.
- Then immediately pipe contrasting red (also 15 second consistency) dots onto the yellow.
- Since both colors are still fluid (yellow is not crusted or dry), red dots sink into the yellow base.
- This technique creates a seamless layer of icing with a polka dot pattern.
If you’d like to learn how to make 15 second consistency be sure to check my Guide to Royal Icing Consistency.
ROYAL ICING CHERRY PATTERN
I decorated mixer with wet on wet technique, creating cherry pattern. 1st I flooded the top part of the mixer. And then I decorated the bottom. It works well with the overall design.
Decorating in sections leaves you enough time to pipe the polka dots, cherry and leaf patterns without having to worry about icing crusting before you are finished.
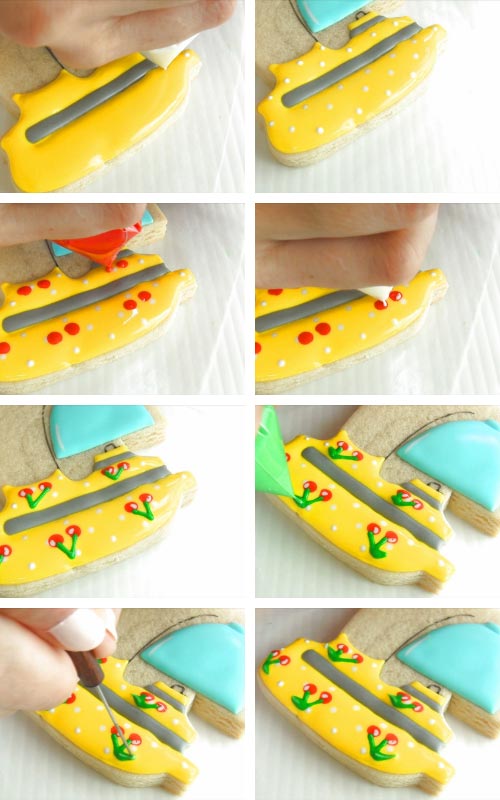
When using wet on wet technique to create patterns it is important that icing if thinned down to at least 15 second consistency, and little thinner is fine, too.
- Start flooding with a bright yellow royal icing 15 second consistency.
- Immediately follow with piping small white polka dots, cherries, stems and 2 tone green leaves with 15 second consistency royal icing.
- Shape the leaves with a needle tool, accentuating the point.
- Let it crust and then repeat on the bottom section.
- At this time you can also pipe small sections in the attachment area.
- Let the icing dry overnight
DRAWING WITH EDIBLE MARKERS
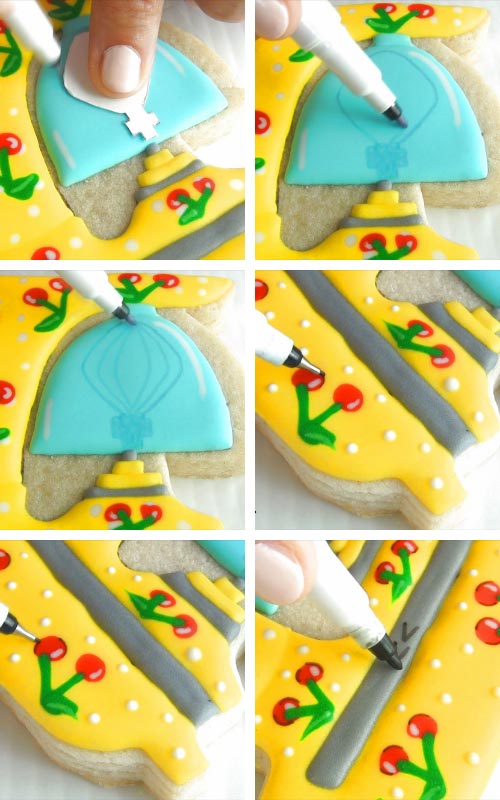
Once icing dries use edible markers to draw on the icing. I used gray marker to make the whisk and a fine tip black edible marker to enhance the cherries.
OUTLINE STAND MIXER COOKIES WITH ROYAL ICING
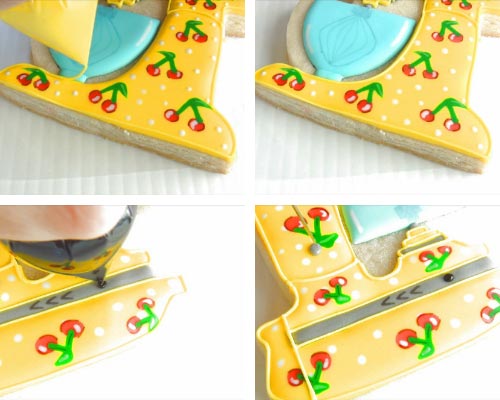
Last step includes outlining with yellow piping consistency royal icing. And also adding black and gray buttons with 20 second consistency royal icing.
One thing I forgot to mention is that I decorated these cookies using small sandwich bags. No fancy piping bags. However, I since switched to tipless piping bags.
TO MAKE DECORATED STAND MIXER COOKIES YOU NEED
- RECIPES
- Sugar Cookies
- Royal Icing : Fresh Lemon Royal Icing, Vegan Royal Icing
- TOOLS
- Stand Mixer Cookie Cutter (type mixer into the search box)
- Template
- Piping Bags
- Food Colors : yellow, green (I used 2 shades of green), super red, sky blue, black
- Needle Tool
- Edible Markers : Fine Tip Black Marker, Regular Tip Black Marker
- Favorite Decorating Tools
- USEFUL TUTORIALS
- Royal Icing FAQ
- Guide to Royal Icing Consistency
- How to Freeze Royal Icing
- Cherry Pattern Stand Mixer Video Tutorial with narration
ROYAL ICING CONSISTENCIES
- Yellow : 15 second and piping consistency
- Green / 2 shades of green : 15 second consistency
- White : 15 second consistency
- Blue : 20 second consistency
- Black : 20 second consistency
- Gray : 20 second consistency
MORE BAKER INSPIRED COOKIES :
PIN IT for later

This post contains Amazon affiliate links that earn me a small commission, at no cost to you. I only recommend products that I use and love. Learn more about my affiliate policy here.

Hi, I’m Hani
Welcome!
Thank you for visiting Haniela’s. On my blog, you’ll find delicious sweet & savory recipes made with simple ingredients. Why not start a new adventure? Discover a world of cookie decorating with my step-by-step tutorials.

Hi, I’m Hani
Welcome!
Thank you for visiting Haniela’s. On my blog, you’ll find delicious sweet & savory recipes made with simple ingredients. Why not start a new adventure? Discover a world of cookie decorating with my step-by-step tutorials.