We “Click” Valentine Cookies by Sue from Munchkin Munchies

Guess what? One of my very first blogging friends is visiting today. I’m so excited!
Meet Sue from Munchkin Munchies. Sue is a super talented blogger and I’m not exaggerating when I say that everything Sue posts on her blog makes me smile. It does. That’s the truth.
Do these make you smile? (Bunny) Cookies and Milk, how about these Game Face Football Cookies or these Strawberry Jam Jar Cookies. I told you, you’d smile.
Today, Sue is hanging out here, with her super sweet We ” Click” Cookies for Valentine’s Day.
When my friend, Hani (Haniela’s), asked me to guest post on her blog, I was over the moon! My excitement was followed by a bit of nerves…If you are familiar with Hani, you know that she makes exceptionally beautiful and creative cookies (among other things)! Gulp.

Trying to think of just the right cookie, I must have changed my mind at least five times! I was in a quandary…until I visited one of my favorite blogs and found some CUTE camera cookies there.
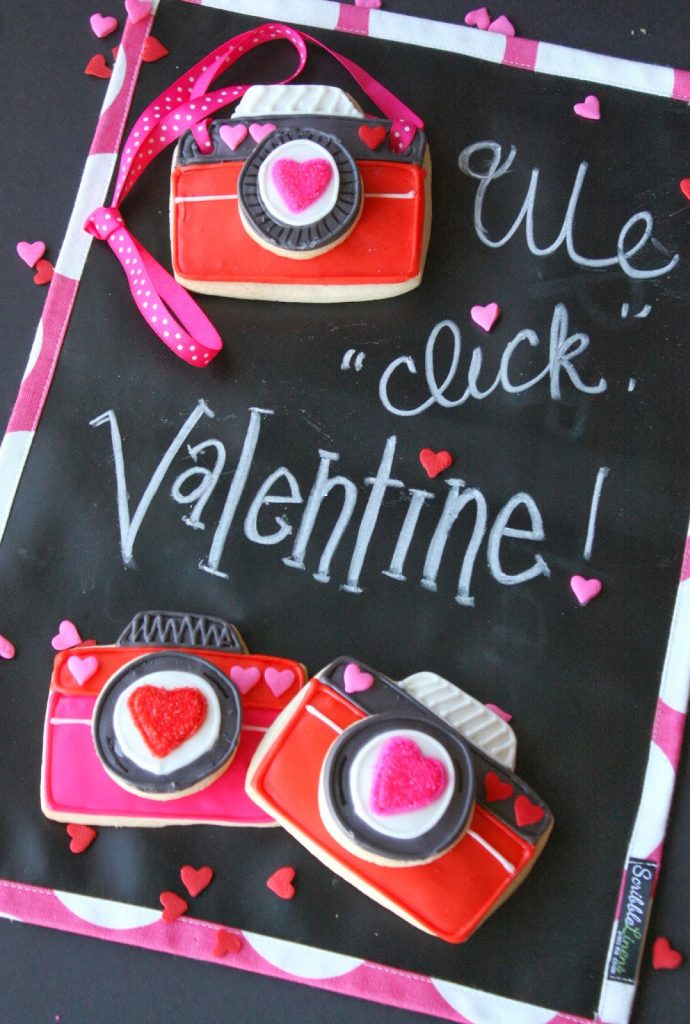
Some inspiration was sparked as I remembered that I had some plain camera cookies (along with the round cookie lenses) in the freezer:) I knew I could dress them up for Valentine’s Day.
Yippee! I was pretty happy with how they turned out.
You really can’t go wrong with red, pink, hearts and ribbon. I love Valentine’s Day!

My two-year old grandson was more than happy to pose with his cookie camera and say “Cheeeeese” for my camera. Picture Perfect!
Make some fun cookie cameras for all the Valentines you click with.
Valentine Camera Cookies
Ingredients:
Sugar cookie dough
Royal icing
Black, red, pink food coloring
Red and pink sanding sugar
Jumbo red and pink heart sprinkles
Coordinating ribbon (for camera straps)
Black edible marker
Directions:
1. Roll out cookie dough.
2. Cut out cameras with a camera cutter and a round cutter for the lens.
3. Place on parchment lined baking sheet.
(For cameras that will have straps, make holes in the top corners with a straw.)
4. Bake according to recipe.
5. When the cookies are still warm, use a straw to make a hole for the strap, if the hole has closed. Let cool.
6. Make the royal icing.
7. Divide up the royal icing and tint some with red gel coloring, some with pink and some with a couple drops of black to achieve gray.
8. Using a #3 tip, outline the main body of the cookie, leaving a thick strip at the top for a contrasting color.
9. Fill the main section with the royal icing and let set for about 15 minutes.
10. Outline the next section with a #3 tip and let dry for about 15 minutes.
12. Fill with the royal icing. Let dry for about 15 min.
13. Outline and fill the very top section with white or gray.
14. When all the sections have dried, outline again with the corresponding colors to add dimension.
15. Also add any other icing details at this point. Let dry.
16. Decorate each lens~first the outer ring, with gray royal icing. Let dry.
17. Fill the middle of the lens with white royal icing.
18. Let cookies dry overnight.
19. Use the black edible marker to add lines to the outer lens for details.
20. With the pink or red royal icing, and a #2 tip, add a heart to the middle of the lens.
21. Place the cookie on wax paper, and sprinkle liberally with the matching sanding sugar.
22. Let sit for about 15 minutes and then gently dump off excess sanding sugar onto the wax paper.
23. While it dries, add the white line detail across the body of the camera.
24. Add the jumbo heart sprinkle details to the camera with a small dab of royal icing.
25. Place royal icing on the back of the lens and gently place it on top of the camera.
26. Let it adhere to the camera until it is stable.
27. Thread ribbon through the camera holes and tie a small knot at each hole firmly, but gently.
Hani, Thanks so much for having me! I had a great time. You are one of my cookie heroes and I appreciate your talent, and the inspiration you share with all of us!


![Fall Leaf Cake [Template]](https://www.hanielas.com/wp-content/uploads/2019/08/fall-leaf-cake.jpg)
