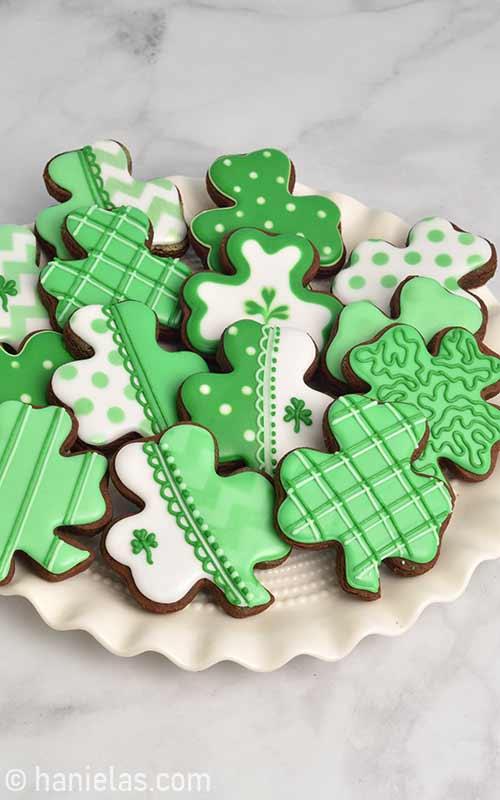
Decorated Vegan Shamrock Cookies Step-by-Step
It’s all about shamrocks today! I’m going to show you how to decorate simple green Shamrock Cookies for St.Patrick’s Day. And to make this tutorial even more special, I teamed up with my friend Ambs from SweetAmbs in a St. Patrick’s Day Collaboration.
Updated post from 2013
HOW TO MAKE DECORATED SHAMROCK COOKIES
It’s hard to believe I made my very first shamrock cookies back in 2013. So many years have passed since that original set! I decided it was time to refresh my decorated shamrock sugar cookie tutorial with a new layer of royal icing inspiration. In this updated version, I kept some of the original designs you loved and added a few new piped details to give them a fresh, modern touch.

THINGS YOU YOU NEED
- Fresh Lemon Royal Icing, Vegan Royal Icing
- Cut-out Sugar Cookies
- Get all the tools you need in my Amazon Shop
- Cookies Cutters: Shamrock, Lucky Shamrock
- Piping Bag
- Gel Food Colors
- Sriber Needle Tool
- Airbrush
- Stencils: chevron, large polka dot
- Stencil Holder or use magnets to secure the stencil
This post contains Amazon affiliate links that earn me a small commission, at no cost to you. I only recommend products that I use and love. Learn more about my affiliate policy here.
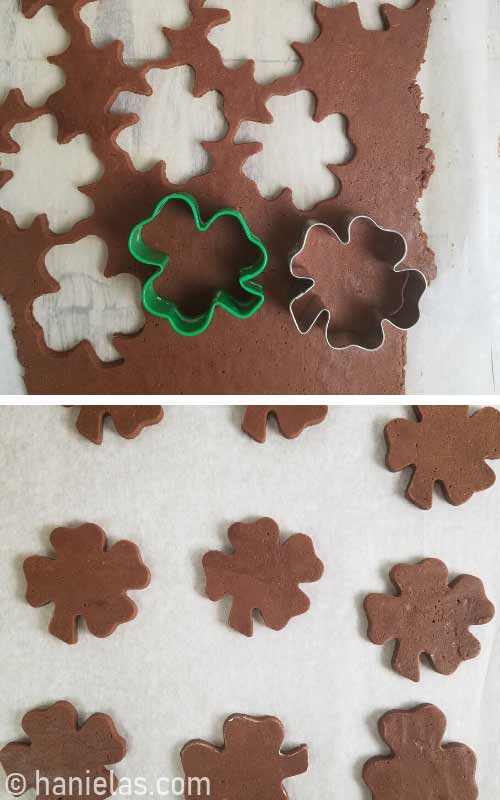
SUGAR COOKIES & ROYAL ICING
To make chocolate shamrock cookies, I used my Vegan Chocolate Sugar Cookies. And to cut out shapes I used 3 and 4 leaf clover cookie cutters. And since so many of you have asked for vegan royal icing. I developed a delicious vegan royal icing recipe, and I used it to decorate these cookies, too.
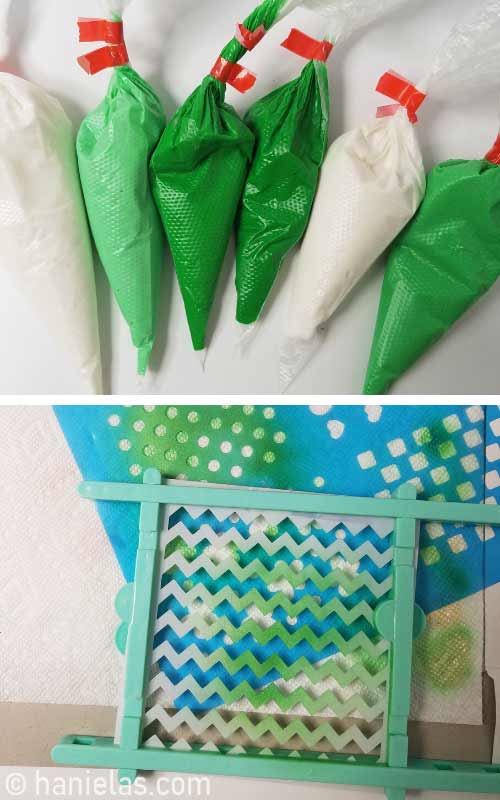
ROYAL ICING COLORS AND CONSISTENCY
I used several different shades of green to decorate cookies.
TIP: To create different shades of green, you can add yellow, blue food, brown, ivory, or black food coloring to green. Or use different green colors like moss, forest, olive, sage etc. To lighten the color add some white icing.
- Base Layer: 15-second consistency flood icing (variety of greens and white colors)
- Piped Details: piping consistency icing
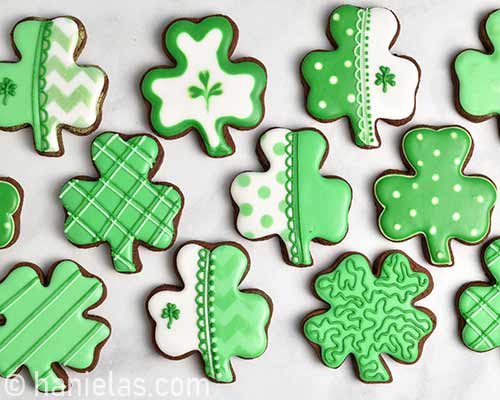
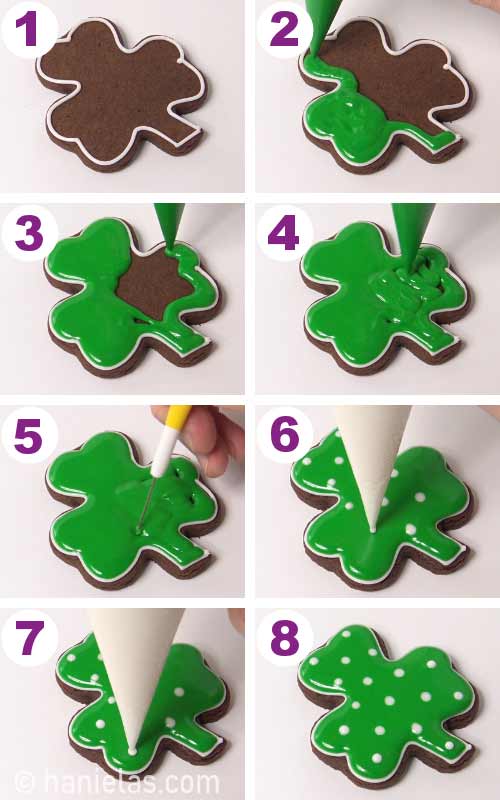
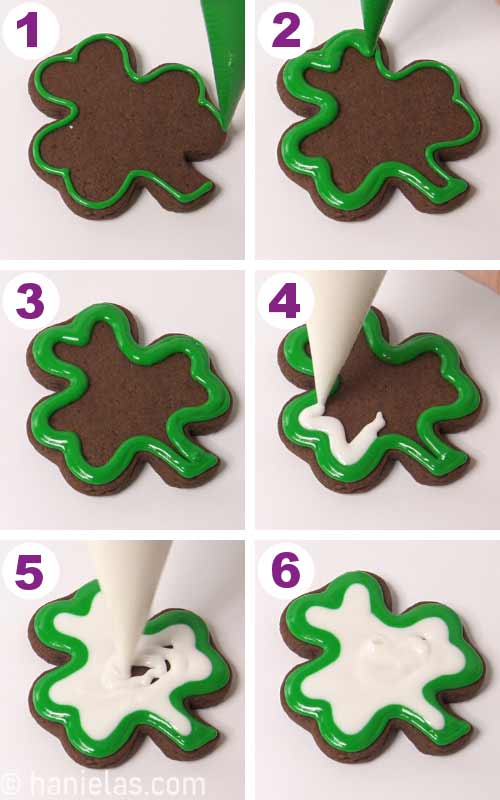
POLKA DOT SHAMROCK COOKIES
Start by outlining shamrock cookie with white icing (piping consistency). Let the white outline crust for 5 minutes and then flood the cookie with green icing (15sec). Use a needle tool to distribute the icing evenly, (step 1-5).
Immediately take white icing (15sec) and pipe white dots into the wet green royal icing. This technique is called wet on wet, (step 6-8).
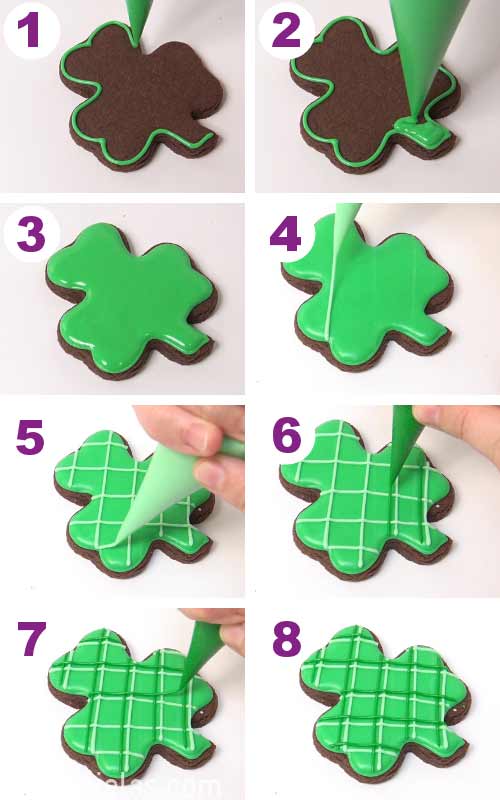
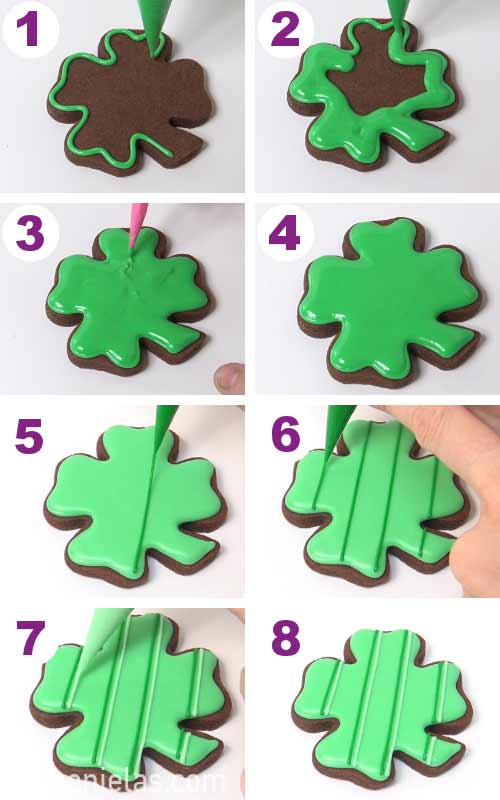
PLAID SHAMROCK COOKIES
Outline and flood the cookie with green royal icing (15sec). Let the icing dry, (step 1-3).
Then with different shades of green pipe straight lines across. First with one shade of green pipe lines in one direction. Then opposite direction, repeat with different shade of green, creating plaid design,(step 4-8).
TIP: When piping straight lines first you need to anchor line at the starting point and then anchor it at the end point. When you are anchoring royal icing line decrease the pressure you are putting onto a piping bag. It takes practice and so don’t worry if you can’t get it to work right away.
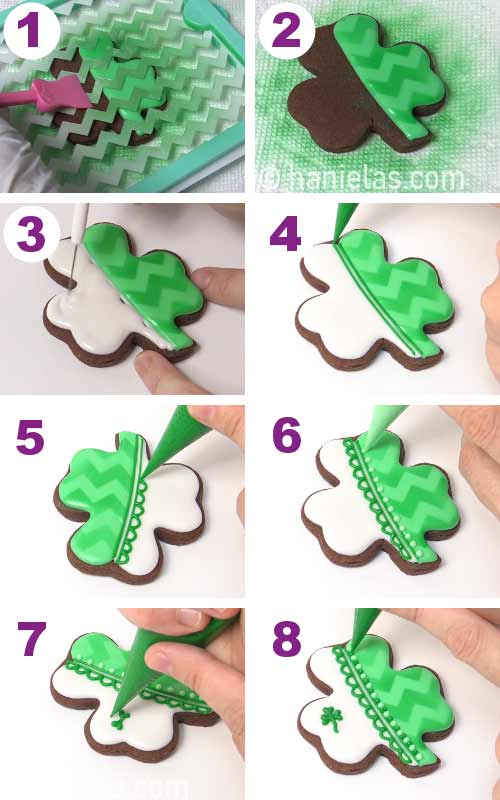
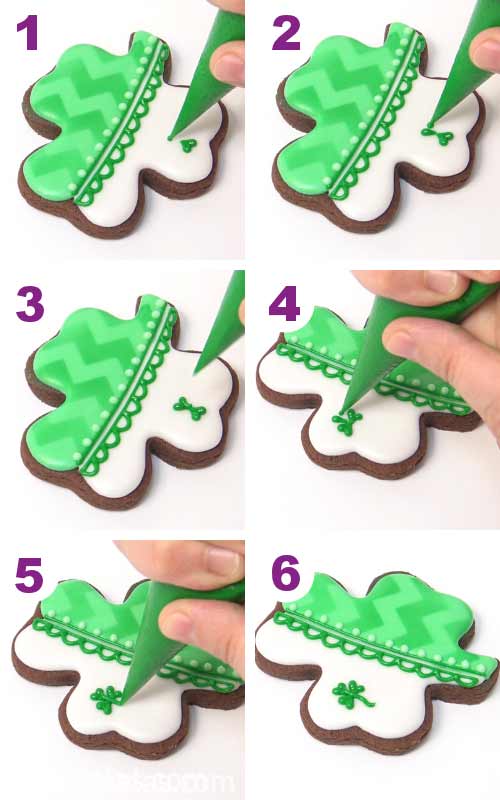
AIRBRUSHED SHAMROCK COOKIES
First outline and flood ½ of the shamrock cookie with green icing (15sec). Allow to dry or crust thickly, (step 1-8).
AIRBRUSHING
Secure chevron stencil into a stencil holder. Place cookie on a paper towel and then place stencil holder with a chevron stencil over it. Airbrush iced portion of the cookies with an even layer of metallic green airbrush color. Carefully lift up the stencil, (step 1-8).
Then flood the undecorated half of the cookie with white royal icing (15sec). Let the icing crust well. Then with a piping consistency royal icing (2 shades of green) pipe scalloped edge, straight lines and dots, (step 4-8).
HOW TO PIPE A SHAMROCK WITH ROYAL ICING
To pipe a simple shamrock with royal icing start by piping a heart with piping consistency royal icing. Pipe a 2 tear drop shapes to make a heart.
Then pipe another heart opposite to the 1st heart making sure bottom points of hearts are joined. Then pipe another heart perpendicular to the 2 first set of hearts. Make a shamrock stem and shamrock is finished. (step 1-6).
STENCILED CHEVRON COOKIES
Outline and flood the cookie with white icing (15sec). Let the icing dry or allow it to crust thickly. Then place chevron stencil over the cookie and airbrush cookie with metallic green airbrush color, (step 1-4). Pipe a small green shamrock in the middle, (step 5-8).

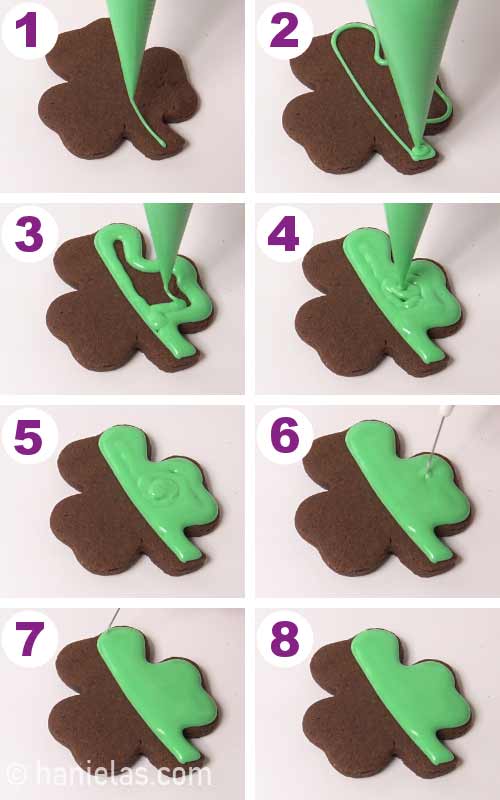
WET ON WET ROYAL ICING SHAMROCK
With dark green icing pipe a thick outline. Immediately flood the middle with 15 second white icing, (step 1-6).
Then while white icing is wet pipe 3 large green dots into the white icing creating a triangular shape, (step 1).
Creating wet on wet royal icing shamrock is super easy and fun. Use a needle tool or a toothpick to shape green icing while both white base and green dots are still fluid. Don’t allow icing to crust.
Pull tip of the needle tool through the middle of top polka dot and drag the needle tool down to create a stem, (step 2).
Then repeat with 2 side polka dots except don’t drag icing straight after you pull it through the polka dot. But instead change the direction and drag it down so it becomes part of the stem you created in the step1.

LUCKY SHAMROCK COOKIES
To make 4 leaf clover cookies aka lucky shamrock cookies I used 4 leaf clover cookie cutter.
Outline and flood the cookies with different shades of green royal icing (15sec). Let the icing dry and then pipe straight lines across with different shades of green (piping consistency).
CORNELLI LACE
And lastly pipe cornelli lace- free piped curved line that never crosses.
TIP: If you find it hard to complete swirly cornelli line all at once, take a break. It’s okay. Then continue where you took off.


COLLABORATION WITH SWEETAMBS
For our St. Patrick’s Day collaboration, Amber created these beautiful rainbow lucky shamrock cookies.

This post was originally published on March 8th, 2013. On February 11th, 2020, I updated this post with new step-by-step photos, written text, and a video.

Hi, I’m Hani
Welcome!
Thank you for visiting Haniela’s. On my blog, you’ll find delicious sweet & savory recipes made with simple ingredients. Why not start a new adventure? Discover a world of cookie decorating with my step-by-step tutorials.
Hi, I’m Hani
Welcome!
Thank you for visiting Haniela’s. On my blog, you’ll find delicious sweet & savory recipes made with simple ingredients. Why not start a new adventure? Discover a world of cookie decorating with my step-by-step tutorials.


Would you make a video tutorial on the piping basics of lines, circle, scallops, zigzag and such.
I’m a beginner- love your website and ideas! Thank you
Hi Stacha,
here you can find couple of template you can use to practice piping with royal icing
Royal Icing Piping Practice Sheets
Your cookies are so Awesome! I wish I could be you. You obviously are filled with Talent.
These shamricks are so pretty! How do you pipe on them so well?