Summer is not over yet, despite all the social media constantly feeding me with images and videos about Summer being over! Can I please indulge for a little longer !? It’s Summer and ice cream is still in season. Here is a really fun no bake I guess I can call it a cake, what else would you call it?
A comment on you tube said it’s not a cake…hm, so I’m not sure what it is. Yes there is no cake but I’m not going to stress about it, is that really that important? No, I didn’t think so. So here is Rice Krispie Ice Cream Cone Cake.
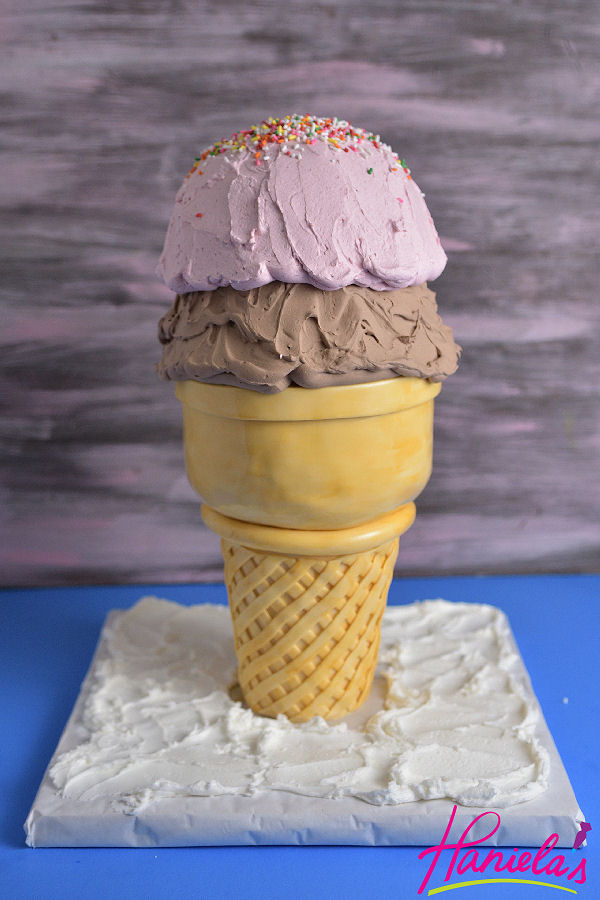
Rice Krispie Cake Layers
you need :
2 – 6 inch rounds
2 – 6 inch half spheres
3 -4.5 inch rounds
You need 1 1/2 of the swiss buttercream recipe(recipe link below)
24 cups rice krispies cereal
4 bags of mini marshmallows
2sticks (1cup) butter
2tsp vanilla extract
If making chocolate rice krispies (recipe cane be doubled,, adjust chocolate and cocoa powder amounts accodringly) : 6cups cereal 1/4 cup butter, 1/4 cup cocoa powder, 1cup melted chocolate
Melt butter, add marshmallows and stir until marshmallows are melted, stir in vanilla extract.
Pour melted marshmallows over cereal, stir well with a buttered wooden spoon until all combined. Press into prepared molds.
If making chocolate rice krispies, stir cocoa powder with cereal, add melted chocolate to melted marshmallows and then add marshmallow mixture into the dry cereal, stir well and press into the molds/pans. Let cool slightly then unmold an repeat as many times as needed for the ice cream cone shape and ice cream scoops. Follow the video to see how to put it all together.
add 1cup cooled, melted chocolate into basic Vanilla Swiss Buttercream, for double dose of chocolate add 1/2 sifted cocoa powder
Strawberry Swiss Buttercream
add 1 cup good quality seedless strawberry jam, or thick strawberry puree, you add few drops of pink food coloring to get a desired color shade.To support the “gravity defying” design I used a simple cake board dowel support system. I found a center of the board and used a screw and little bit of glue to secure the dowel to the board. Use a foil or in my case I ended up using freezer paper to cover the board.
Hello! It seems awfully quiet here this week. We are having a bit of a heat wave going through the area and so my evenings, instead of blogging, now are fully devoted to our garden and my flowers. They all are in need of water, I’ve been running around with a watering can,…
As you all know I’m so behind with posting pictures from our garden, mainly because there is so much to do in there and I just don’t have enough time to go through all the pics in time! Today I spent nearly 2 hours weeding, cleaning and preparing the area for a…
Just the other day I bought some gingham paper plates and it got me thinking that in fact I haven’t tried gingham on cookies using a stencil. I usually paint the pattern with a brush so I decided to make a simple stencil from a piece of paper (if you remember I made a similar template…
Guess what? One of my very first blogging friends is visiting today. I’m so excited! Meet Sue from Munchkin Munchies. Sue is a super talented blogger and I’m not exaggerating when I say that everything Sue posts on her blog makes me smile. It does. That’s the truth. Do these make you smile? (Bunny) Cookies and Milk, how about these Game…
Finally I’m able to share with you a new blog post, my first post in 2012. I’m still very much under the weather with some kind of a bug; but as many of you know as adults we don’t have much choice and I can’t be lying in the bed forever though rest assured I’ll be sure to…
With the 4th of July approaching I thought I’d share with you a cute candy idea, perfect for the festivities, they can be altered in many ways – Home Made Peppermint Patties. I made them using different colors(Candy Cane for Christmas, for this coming holiday I used Patriotic red – blue – white, but…