Star Wars Gingerbread House
Over the years many of you asked me to make a Star Wars Gingerbread house. It seemed like an impossible task to accomplish. It felt like it was too complicated and honestly I was a little overwhelmed by the idea.
Then one night, while watching a show I quickly drew a basic design outlines and there was no going back. This Star Wars house looked so fun on a flat piece of a paper that I had to bring it to life.
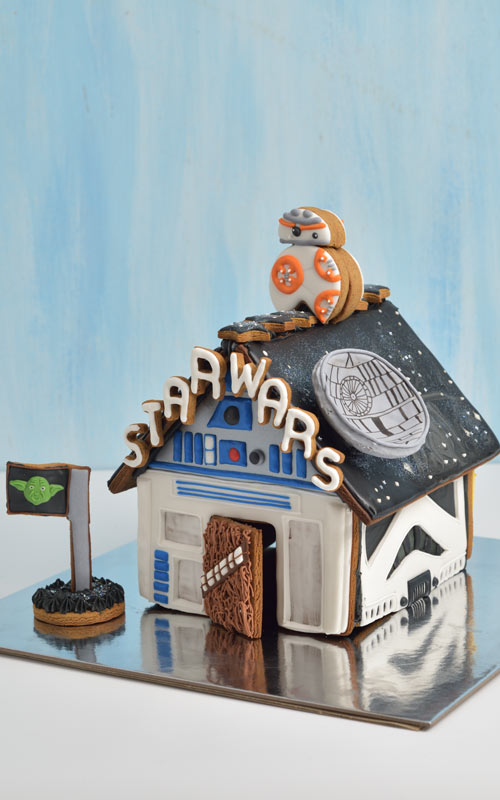
I got up and baked the gingerbread panels, prepared decorating templates and royal icing. I worked non stop on this gingerbread house as if I was possessed by some unstoppable force. Really looking forward to the final product. And it didn’t disappoint. I hope you like it too.
- TABLE OF CONTENTS
- Gingerbread House Cookies and Royal Icing
- Shaping Gingerbread
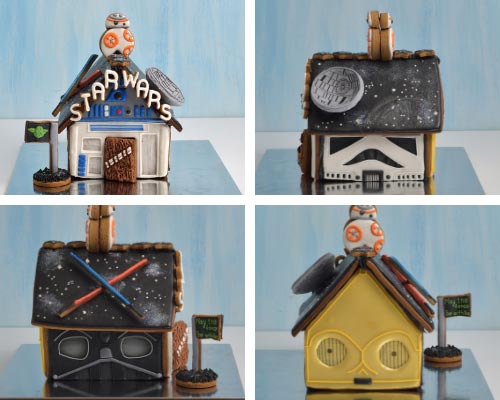
- Darth Vader
- Stormtrooper
- C-3PO
- R2-D2
- Death Star
- Galaxy Roof
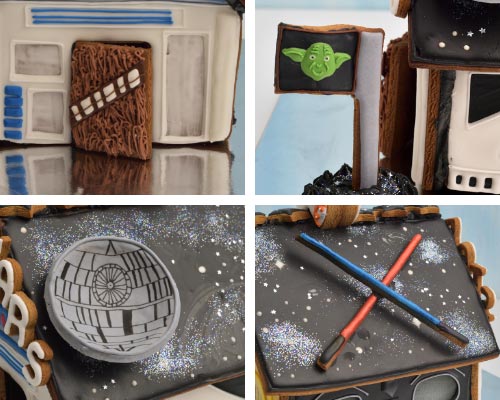
- Chewbacca
- Lightsaber
- BB-8
- Star Wars House Assembly
- Recipes, Tools and Templates
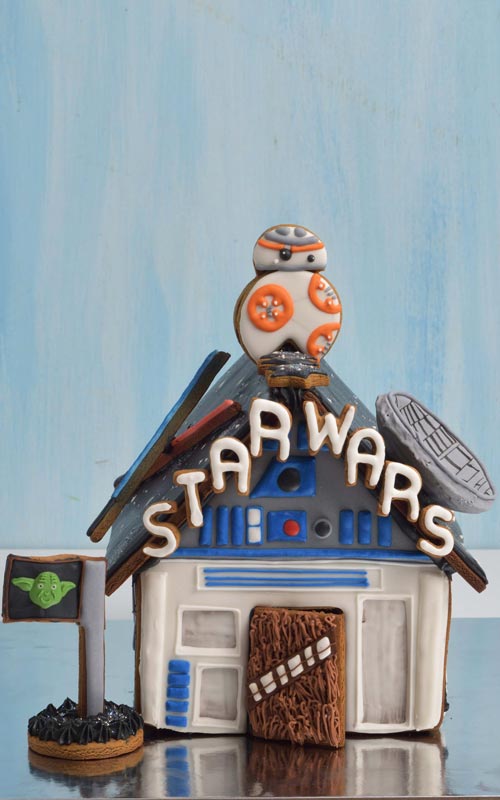
STAR WARS GINGERBREAD HOUSE
GINGERBREAD HOUSE COOKIES AND ROYAL ICING
Gingerbread house panels and all the cookie decorations can be baked ahead. Since there are not for eating you can bake them a week or 2 before decorating. Store them in an airtight container until ready to decorate. For the list of cookie cutters used JUMP TO RECIPES AND TOOLS.

I’m using royal icing to decorate the cookies. You can make and color royal icing ahead of time. A day or 2 is perfectly fine. Then thin and bag the royal icing into piping bags on the day you plan to decorate. Royal icing can separate when left sitting for hours. I you see any separation in your icing, remix the icing. You can also gently massage the piping bag to reconstitute the icing.
Generally speaking first I like to color icing, then I thin it down with water. I like to reserve a little bit of thick icing from each color for piped details.
SHAPING GINGERBREAD
How to shape the Death Star ( dish shape) without a silicone mold? Shape the foil into a ball. Then spray it with a nonstick spray and shape a round cookie on it to make curved cookie. To balance it on the baking sheet you can use a canning jar band or flatten one side of the foil slightly so it won’t roll on a baking sheet.
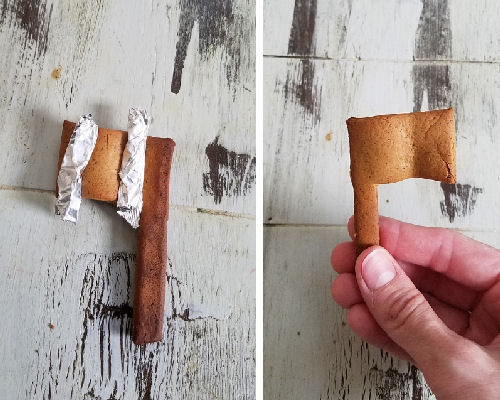
I used a foil to shape the gingerbread flag to add movement.
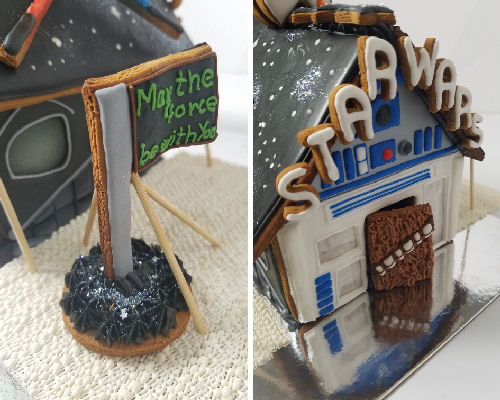
I don’t have small letter cookie cutters, what can I use instead? You don’t have small letter cutters STAR WARS ? No worries. Make royal icing transfers instead. Pipe letters onto a wax paper and let dry overnight. Then peel off wax paper and attach letters onto the house using stiff royal icing.
No airbrush? No worries. You can easily skip airbrushing steps. Or if you really want to include the shading you can use a black marker and use a lightly moistened food only paint brush to create shading. Draw with black marker on the edge that is airbrushed. Then lightly moisten pain brush and dilute the black marker lines, creating shading.
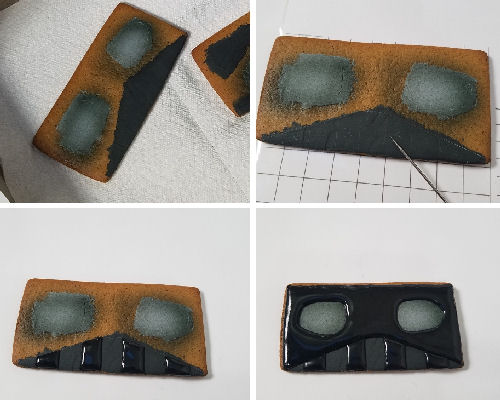
DARTH VADER
In both of these designs ( Darth Vader and Stormtrooper ) I utilized an eye mask feature to create the house windows. I first let the brushed royal icing layer dry before airbrushing with black food airbrush coloring.
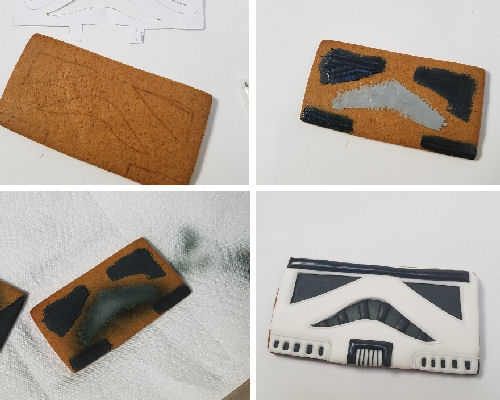
STORMTROOPER
C-3PO
Back house panel is C-3PO.

I used a mustard colored icing to ice the cookie. Then I let it dry completely, before airbrushing it with gold airbrush color. I also used edible marker to make the lines across the eyes. All the details around the eyes, and nose are piped with piping consistency royal icing. I used about 20 second consistency to make the black mouth.
R2-D2
Divide cookie into sections using a template. Use edible marker and trace outlines on the cookie.

Brush a thin layer of white icing onto where the windows are, and let crust for 20 minutes. Then ice with white and gray royal icing. Let dry overnight.
With a template trace outlines onto the grey sections. Airbrush with metallic silver airbrush color and let dry 10 minutes. With 20 second consistency royal icing ice small blue sections. Outline with piping consistency royal icing.
DEATH STAR
Death Star is represented by a satellite dish.
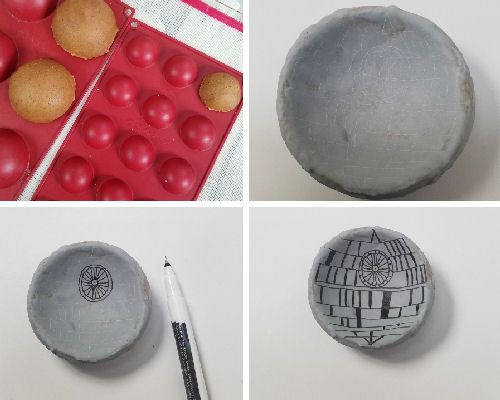
To make a curved gingerbread I shaped a round unbaked cookie on a half sphere mold. Bake as usual and then let it cool completely before decorating.
I used a thin gray royal icing to ice the inside and the outside of the cookie. Then with a pin I scratched the design on the icing. With a fine tip edible marker I drew the design on the inside of the dish.
GALAXY ROOF

For the galaxy design I decided to go with black, gray and white royal icing. While the icing was wet I embellished it with edible glitter and silver star sprinkles. It was so simple to make. You can see the process in the video as well.
CHEWBACCA
Chewbacca door is super cute and easy to make
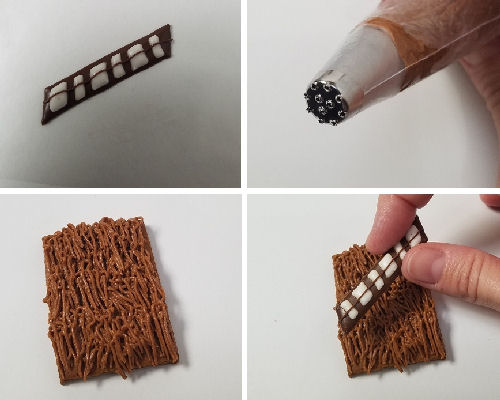
First, I made a belt royal icing transfer. And then I used grass piping tip to pipe the textured royal icing on a cookie. Make sure you pipe in one direction. Immediately and with care press a dry royal icing transfer into the icing. Be careful not to break the royal icing transfer in half by putting too my pressure on it. If you are not 100% sure how to do it, make sure you watch a video for step by step visual directions.
LIGHTSABER
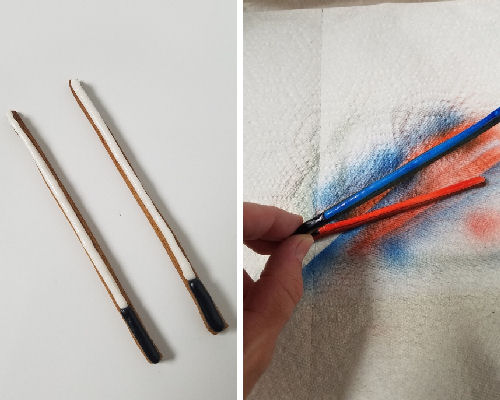
I used thin gingerbread pieces to make the lightsabers. I iced them with black (handle) and white(blade). Then I airbrushed them with red and blue colors.
BB-8
BB-8 sits on the roof. To make it fit snugly I used a front panel cookie cutter and I cut the groove into the cookies. Then to make the cookie thicker I glues 2 cookies together.

STAR WARS HOUSE ASSEMBLY
I can’t emphasize this enough. Use thick royal icing and build the house in steps.

Make sure you use thick icing to glue the panels but make sure it’s not too stiff. If icing is too stiff it will not create a strong bond, too runny and you’ll have a hard time keeping the gingerbread panels upright.
Let the base wall structure dry for 5-6 hours before adding the roof on the top.
Use small bottles or skewers to support the walls while drying. Also, use skewers to support the roof panels. Let dry overnight.
Non stick rubber liner keeps the skewers from sliding.
TO MAKE STAR WARS GINGERBREAD HOUSE YOU NEED
- RECIPES
- Gingerbread Dough for House and Centerpieces
- Royal Icing
- TOOLS
- Cookie Cutters : House panels, Small Alphabet Cutters, Round Cutters(to make death star and BB-8)
- Half Sphere Silicone Mold
- Exacto Knife or use bench scrapper – to cut out lightsabers, doors and yoda flag
- Templates : Star Wars House Template (R2-D2, Darth Vader, Death Star), Star Wars House Template (C-3PO, Stormtrooper)
- Piping Bags
- Grass Piping Tip
- Star Piping Tip
- Airbrush
- Airbrush Food Colors : black, blue, red, metallic silver and gold
- Food Colors : black, royal blue, orange, yoda green(leaf green, yellow, ivory, brown, touch of orange), brown, mustard yellow ( C-3PO is yellow, little ivory and brown)
- Edible Jewel Dust
- Silver Star Sprinkles
- Needle Tool
- Edible Marker : fine tip black marker, brown marker
- Wax paper
- Paint brush
- Skewers – support for the house while icing is drying
- Pliers – to cut the skewers
- USEFUL TUTORIALS
- Guide to Royal Icing Consistency
- Detailed Star Wars Video Tutorial with captions
- How to Freeze Royal Icing

PIN IT for later

This post containsThis post contains Amazon affiliate links that earn me a small commission, at no cost to you. I only recommend products that I use and love. Learn more about my affiliate policy here.


Wow, just wow!!! Grace would LOVE this! All the details you put into this really make it a work of art! Beautiful job!!
Thank you so much Glory. I really enjoyed making this one. It was so much fun. As a matter of fact I still have it. 🙂
So enjoyed reading your process in this! Spectacular house…. I think my grandson will be having me bake those BB-8 cookies! 🙂
Thank you June. It was really fun and and despite all the details it was one of the easier houses I made. What a lucky grandson.