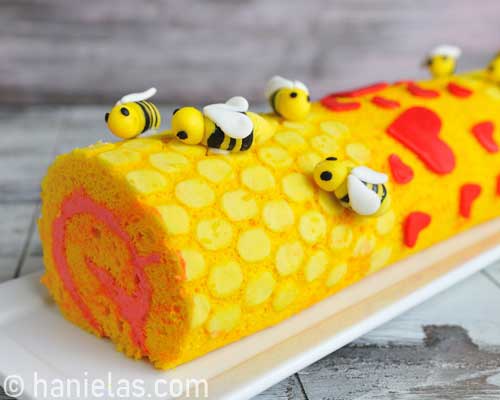
Bee Mine Valentine’s Day Cake Roll
This cute Bee Mine Valentine’s day Cake Roll design was inspired by the popular bee mine Valentine’s day theme. It features a honeycomb pattern and adorable fondant bumblebees and red hearts!

HOW TO MAKE BEE MINE CAKE ROLL FOR VALENTINE’S DAY
This pretty honeycomb-patterned Valentine’s Day cake is made using a simple sponge cake recipe. The cake is filled with an easy-to-make cream cheese filling. Decorated cake can be prepared ahead of time. Store it in the fridge for up to 3-4 days, well covered.
- TABLE OF CONTENTS
- Honeycomb Cake Pattern
- Bake the Cake
- Fill the Cake Roll
- How to make Fondant Bumble Bees
- Decorate Cake Roll with fondant decorations

HONEYCOMB PATTERN
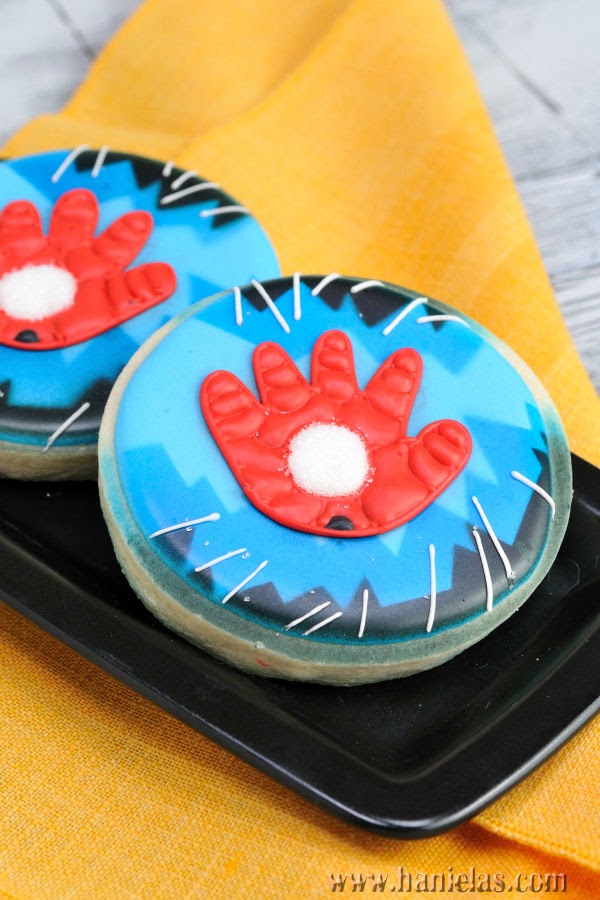
Outside of the cake is decorated with a pretty honeycomb pattern. To achieve this look I used a honeycomb stencil. I used the same stencil to make these pretty Heart Valentine’s Day Cookies.
Prepare pattern cake batter following the recipe (recipe is listed in the recipe card at the bottom of this post). Color batter with yellow gel food coloring.
Cut the parchment sheet to the size of the half sheet rimmed baking sheet. Then place parchment paper onto the baking sheet and secure stencil on top of the parchment with magnets. If you don’t have magnets be sure to hold the stencil with your fingers while you are spreading pattern cake batter over the stencil. Magnets help to keep the stencil in place.
Spread a thin layer of pattern cake batter over the stencil. Then carefully lift up the stencil. Wash the stencil under running water. Dry it by pressing/dabbing the kitchen towel or paper towel onto both sides. Try not to use rubbing motion as often it can cause some damage to the stencils. Repeat stenciling.
Then slide the parchment with a stenciled honeycomb pattern onto a flat tray and freeze it for 30 minutes.

CAKE BATTER
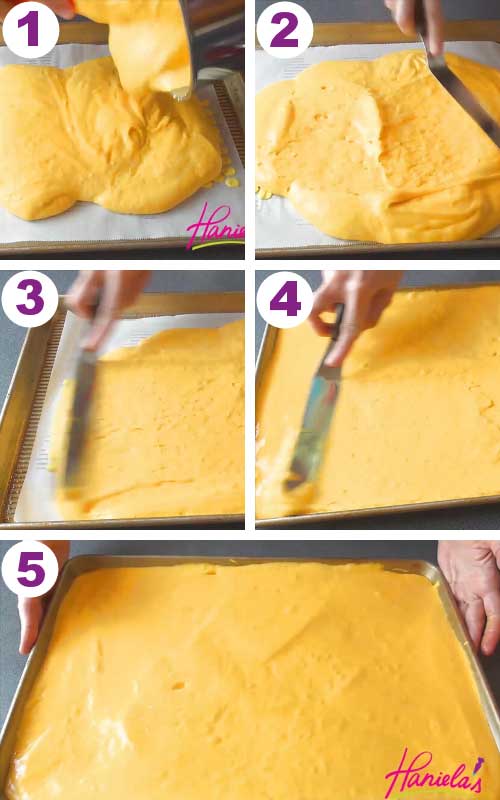
While the pattern is in the freezer prepare the cake batter following the recipe below. Prepare cake batter close to the 30-minute mark. You don’t want the sponge cake batter to be sitting out for too long. Color naturally yellow cake batter with a little bit of orange food coloring, just so it’s darker than the honeycomb pattern.
Spray the baking sheet with a nonstick spray. Take the tray with a frozen pattern out of the freezer and slide the parchment with a honeycomb design facing up onto the bottom of the baking sheet. Pour the prepared cake batter onto the parchment and carefully spread it with a long spatula.
BAKE THE CAKE
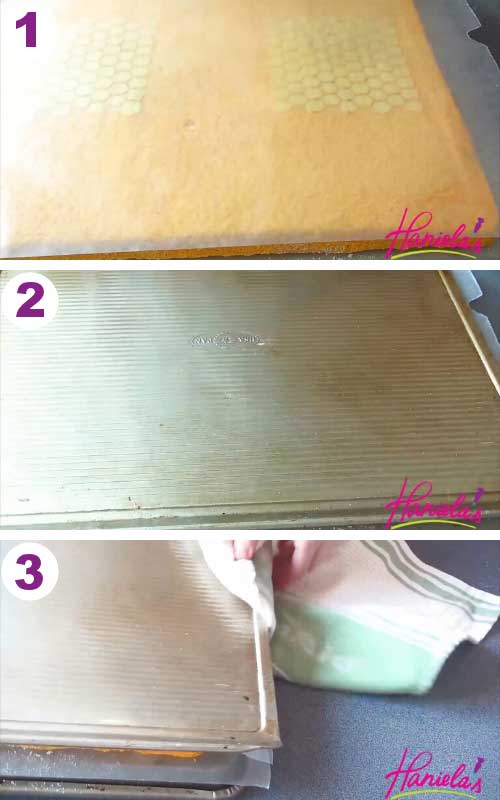
Bake the cake in the preheated oven at 350F for 12-15 minutes. Don’t overbake. Take the rimmed baking sheet out of the oven and run a small spatula along the edges. Then invert hot baked cake onto a flat tray/cookie sheet lined with wax paper dusted with powdered sugar. At this point, you’ll see a pretty honeycomb pattern thru the parchment paper. Carefully peel off the parchment paper from the hot cake.

You want the honeycomb pattern to appear on the outside of the cake roll. This means that when you roll the cake, the pattern should be facing your work surface. Right now the pattern is facing up. We need to flip the cake.
Place a piece of wax paper on top of the cake. Then place a flat tray or a flat cookie sheet on the top. Holding both, the bottom tray and a top cookie sheet flip the cake upside down.
SHAPE THE CAKE ROLL
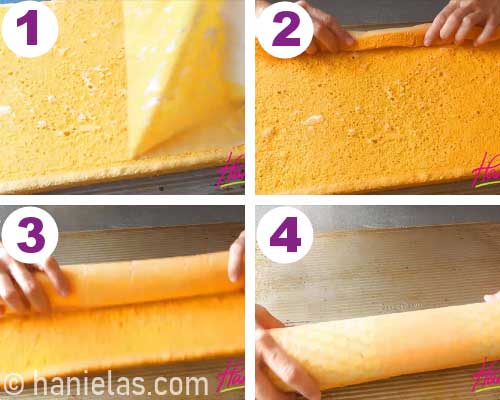
Once the honeycomb pattern is facing your work surface we can roll the cake. Peel off the top wax paper and carefully roll the cake while it is still warm. Wrap the cake into a kitchen towel and allow it to cool completely before filling.
FILL CAKE ROLL
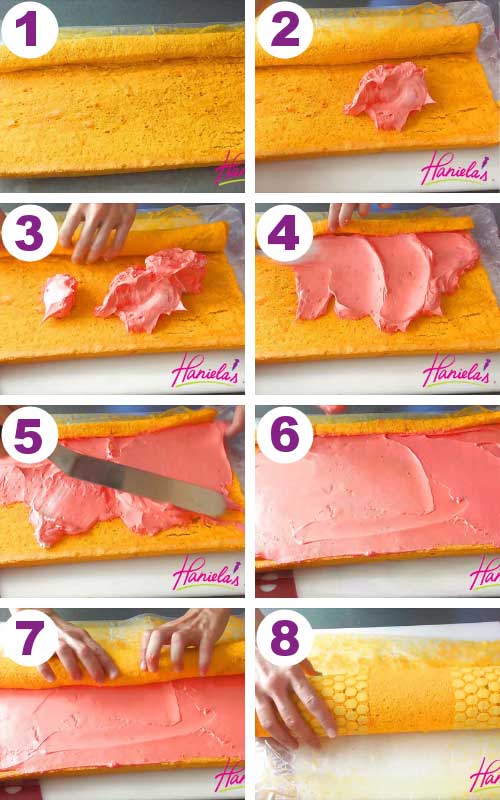
Prepare cream cheese filling. If the desired color it with red gel food coloring. Carefully unroll the cooled cake and spread the filling over the cake with a spatula. Then carefully roll the cake into a log. Cover and chill for a couple of hours before decorating. Chilling allows the cake to become firmer and it’s easier to decorate then.
HOW TO MAKE FONDANT BUBBLE BEES
To decorate the cake I used cute fondant bumble bee decorations. These can be made ahead of time from fondant. If you don’t have any fondant on hand you can prepare a small batch of fondant from marshmallows and powdered sugar (recipe in the recipe card below).
TO MAKE FONDANT BEES YOU’LL NEED
- Small Batch Marshmallow Fondant
- Gel Food Colors
- Crisco
- Corn Starch
- Small Rolling Pin
- Small Round Cutter or use a Large Round Piping Tip
- Food Only Paint Brush
- Silicone Baking Mat
Prepare a small batch of marshmallow fondant. Color about ¼ cup with yellow gel food coloring and also add a dot of orange gel color to achieve more of a golden hue yellow. Knead well. Color another ¼ cup with black food coloring. I often knead in a little bit of Crisco, too. Crisco makes it easier to knead in the color. If the fondant becomes too sticky add a little bit of corn starch. Wrap well in a food wrap if not used right away.
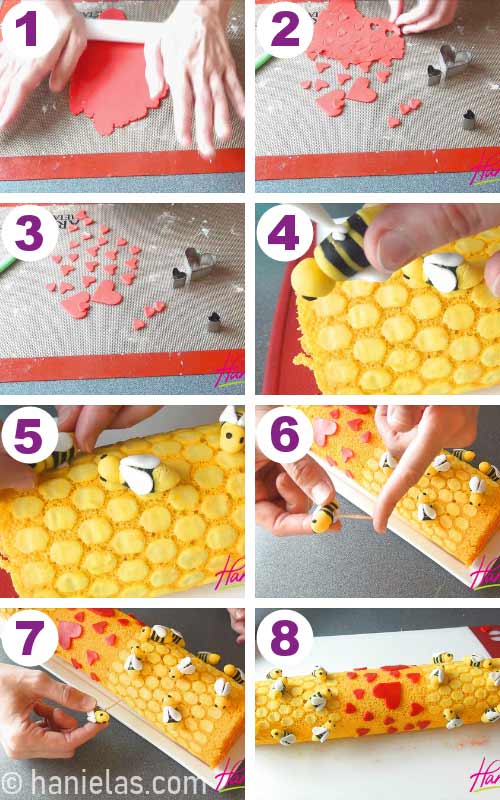
SHAPE FONDANT HONEY BEES
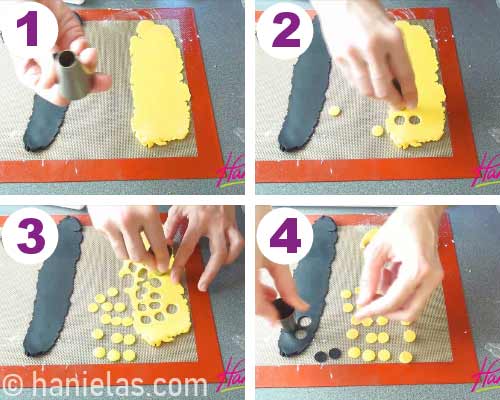
Onto a silicone baking mat roll our both, yellow and black fondant to about 1/12 inch (2mm). Cut out small rounds using a narrower side of a large round piping tip (about ¼ inch rounds). Then Rather yellow fondant scraps into a ball and roll it out again, to about 1/8 inch (3mm). And again cut out rounds with the narrower side of a large piping tip. Gather scraps and wrap both pieces of fondant into a food wrap to prevent it from drying out.
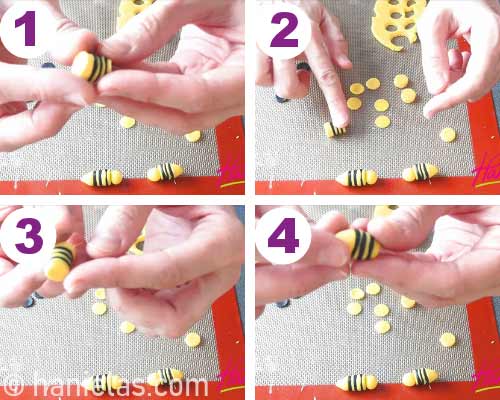
Glue rounds together alternating colors. Brushing a little bit of water onto fondant rounds.
First glue together thin rounds (1/12,2mm thick) in this order – Yellow, Black, Yellow, Black, Yellow, Black. Then take one thicker yellow round 1/8 inch (3mm) and glue it onto the black fondant round.

Then shape a small black and yellow striped log by rolling it gently. Shape the end with thicker yellow round into a cone shape (bee’s abdomen) and also shape the other end (thorax) slightly into a partial cone (not pointy).
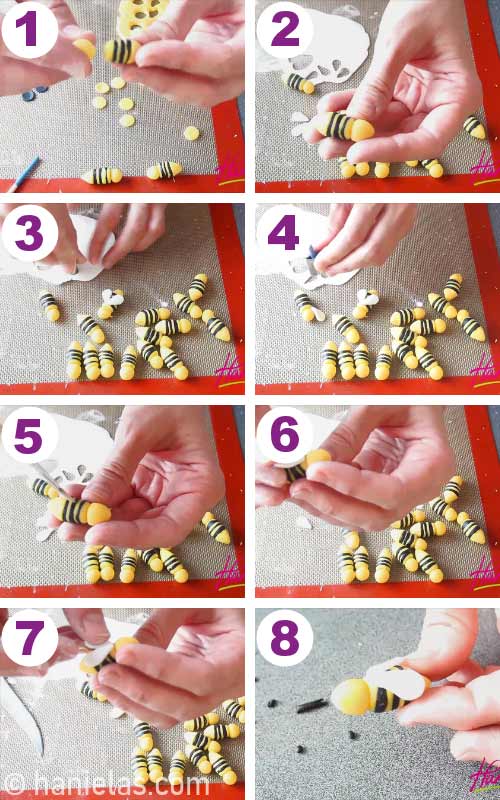
Then shape a thicker yellow fondant round into a ball. Shape it slightly and glue it onto the striped section.
WINGS AND EYES
Now we can add the wings. Roll out a small piece of white fondant to about 1/12 inch thick, 2mm. Cut out small tear drop shapes and glue them onto the bee. If you don’t have a tear drop shape cutter you can use a small heart cutter and cut the heart fondant cut out in half.
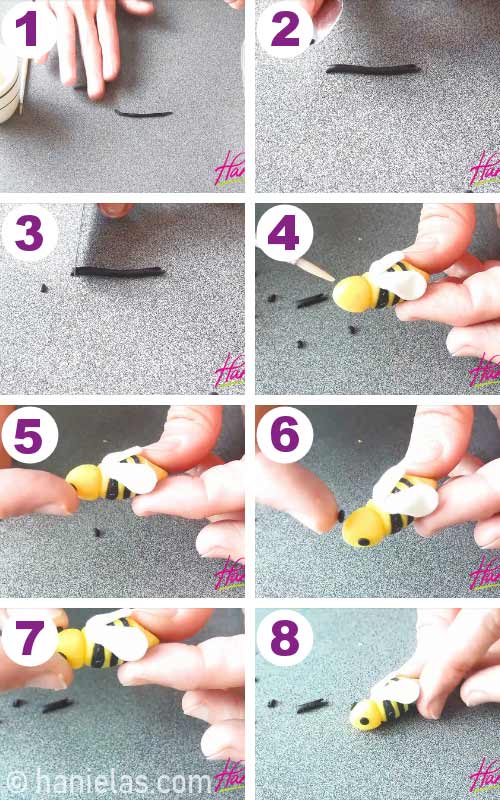
Lastly, shape a small piece of black fondant into a thin snake. Cut up small rounds. These will be eyes. Shape each round into a small ball and glue it onto the bee’s head. Allow bees to dry for 5 hours or overnight.
These bees are fully edible, they will not become very hard. If you’d like your fondant to dry hard you can add tylose powder to the fondant. Knead the tylose powder into the colored fondant.
I used marshmallow fondant treated with tylose powder to make fondant lollipop decorations for my Willy Wonka Cake and to make a candy cane handle for my Hot Cocoa Mug Cake.
DECORATE CAKE WITH FONDANT BUMBLE BEES AND HEARTS
To decorate the bee mine valentine’s day cake roll I used pretty red fondant hearts along with honey bees. Color a little bit of white fondant with red gel food coloring and cut out hearts of different sizes.
Glue the hearts and fondant bees onto the cake with a little bit of royal icing. To help fight the gravity when attaching fondant bumble bee on the side of the cake roll insert a toothpick into the fondant bee and then into the cake. A toothpick will support the weight of the fondant bee and it won’t fall off of the cake. Just be sure to remove the toothpick before serving the cake.
This cake turned out really adorable, don’t you think?! And it can be used for Valentine’s Day Cake and a Baby Shower.

TO MAKE BEE MINE VALENTINE’S DAY CAKE ROLL WITH FONDANT BUMBLE BEES YOU NEED
- RECIPES – in the recipe card below ( pattern batter, cake batter, cream cheese filling, small batch marshmallow fondant)
- TOOLS
- Get all the tools you need in my Amazon Shop
- Rimmed Baking Sheet – half sheet
- Parchment
- Spatula
- Mixers : Stand mixer, Hand Held Mixer
- Honeycomb Stencil
- Magnets
- Heart Cookie Cutters
- Large Round Piping Tip
- Small Tear Drop Shape Cutter or use a Small Heart Cutter – to make the wings
- Knife
MORE VALENTINE’S DAY IDEAS :
- Simple Valentine’s Day Cookies
- Peanut Butter Fudge Hearts
- Giant Chocolate Candy Bar
- 3D Chocolate Heat with a Surprise Inside

Bee Mine Cake Roll
Ingredients
Pattern Batter
- 1/4 cup all purpose flour
- 3-4 tbsp powdered sugar
- 1 tbsp room temperature butter
- 1 egg white at room temperature
- 1/8 tsp Vanilla Extract
- 1/4 to 1/2 tsp water to thin the batter if it's too thick
Cake Batter
- 1 cup all purpose flour
- 1/2 tsp baking powder
- 1/4 tsp baking soda
- 1/4 tsp salt
- 1 cup granulated sugar
- 5 room temperature eggs, separated
- 1 egg yolk (leftover egg yolk from the pattern batter)
- 5 tbsp butter, melted and cooled
- 2 tsp Vanilla Extract
- pinch of cream of tartar (optional)
Cream Cheese Filling
- 1 1/2 block cream cheese one block weights 226 grams
- 1/2 cup room temperature unsalted butter
- 1 1/4 cup powdered sugar (taste and use little more for a sweeter filling)
- 2-3 tbsp whipping cream or heavy cream
- 2 tsp Vanilla Extract
Small Batch Marshmallow Fondant
- 4 oz mini marshmallows (115 grams)
- 1/2 lb powdered sugar (2 cups, 230 grams)
- 1/2 – 1 tbsp water
- 1-2 tbsp crisco
- 1/4 tsp Vanilla, Lemon or Almond Extract
- Corn Starch as needed
Instructions
Pattern Batter
- Beat room temperature butter(1 tbsp) with powdered sugar(3-4 tbsp) until creamy, about 3 minutes. Then add egg white (1egg white) and beat until well mixed, about 1 minute. Beat in vanilla extract(1/8 tsp) and then on low speed add flour(1/4 cup). Color with yellow food coloring. If mixture is too stiff you can add 1/4 to 1/2 tsp water.
- Use prepared pattern batter to stencil honeycomb design onto the parchment. Freeze the pattern for 30 minutes. Start preparing sponge cake cake batter about 20 minutes in.
Bee Mine Cake Roll
- Spray a half sheet rimmed baking sheet with a non stick spray. Set aside. Preheat oven to 350F.
- In a medium size bowl sift flour(1cup), baking powder(1/2 tsp), baking soda(1/4tsp) and salt(1/4tsp). Set aside.
Meringue
- Prepare meringue. You can use a stand mixer or hand held mixer to make the sponge cake batter. Into a clean bowl add 5 egg whites at room temperature. Add cream of tartar (pinch of cream of tartar). With a wire beater beat egg whites on medium high speed until foamy. Then gradually add half of the granulated sugar (1/2 cup). Beat with wire beater until stiff and glossy peaks are formed. If using a stand mixer carefully scrape out the meringue into another bowl. If you are using a hand held mixer use another large bowl to prepare egg yolk-sugar mixtureTip : Don't over beat the meringue or your cake can come out dry. Meringue that is overworked appears grainy, kind of like orange skin.
Egg Yolk-Sugar Mixture
- Then into the same stand mixer bowl you used to make the meringue pour all of the egg yolks (6 egg yolks). Add remaining granulated sugar(1/2 cup). Beat egg yolks and granulated sugar with a wire attachment on medium high speed until it reaches a ribbon stage. Once ready mixture will be pale in color and doubled in volume. It will take about 5-8 minutes.Once ribbon stage is reached in a steady slow stream beat in the melted and cooled butter(5 tbsp). Scrape down the bowl and beat until well blended, 2 minutes. And then beat in Vanilla Extract(2 tsp). Color egg yolk-sugar mixture with 1 or 2 drops of orange gel color. Don't add to much orange.Tip :Ribbon stage is a baking term that refers to batter consistency. It is reached when batter lifted up with a whisk, spoon or a spatula falls back down into a bowl slowly forming a ribbon. It should hold it’s shape for a few moments, slowly disappearing, blending into the mixture.
Sponge Cake Batter
- Now we are going to combine meringue, egg yolk mixture and flour.Using fine mesh strainer sift about 1/3 of flour mixture into the egg yolk mixture and carefully fold the flour in with a spatula, then add about 1/3 of meringue and fold it in. Continue with the rest of the flour and meringue until no streaks are visible. Then make last 3 folds, making sure you go with the spatula all the way to the bottom of the bowl. Be gentle and don't over mix. You are looking for a light and airy batter.
Bake Cake Roll
- Slide frozen honeycomb pattern onto the bottom of half sheet rimmed baking sheet sprayed with a non stick spray. Then pour prepared sponge cake batter over the honeycomb pattern. Carefully spread the batter with a spatula. Bake at 350F for 12-15 minutes, don't over bake. Invert baked cake onto a flat tray lined with a wax paper dusted with powdered sugar. Carefully remove top parchment. Place a piece of wax paper on the top and place another flat tray or cookie sheet on the top. Flip the cake so the honeycomb pattern is facing your work surface.Peel the top wax paper and roll the cake while warm. Wrap in a kitchen towel and allow cake to cool before filling.
Cream Cheese Filling
- Beat cream cheese (1 block and 1/2 block (total of 340 grams)) and room temperature butter (1/2 cup) until smooth and creamy. Gradually beat in powdered sugar (1 cup and 1/4 cup) alternating with whipping cream (2-3 tbsp). Beat well, 3-4 minutes. Then beat in Vanilla Extract. (2tsp). Color filling with red food coloring as desired.
Fill the Cake Roll
- Unroll the cooled cake and fill it with cream cheese filling. Cover with plastic wrap and chill for couple of hours. Decorate with fondant bees and hearts. Store in the fridge for up to 3 days covered. Let come to room temperature before serving.
Small Batch Fondant
- Coat a wooden spoon with cricso. Measure powdered sugar(2 cups, 1/2 lb) into a medium size bowl. If sugar appears to have lots of lumps be sure to sift it. Measure mini marshmallows (4 oz, 115 grams) into a microwave safe bowl. Pour in water(1/2 to 1 tbsp). Heat marshmallows in the microwave in 15 second intervals stirring well after each time, until all of the marshmallows are melted. Try not to over heat. Once melted stir in extract (almond, vanilla or lemon – 1/4 tsp).Then scrape out melted marshmallows and pour sticky mixture over powder sugar. First stir mixture with a wooden spoon coated with crisco, stir until somewhat combined. Then coat your hands with crisco and knead the mixture until homogeneous and smooth.Coat white marshmallow fondant with a thin layer of crisco, cover tightly with a plastic wrap and refrigerate for at least an hour or so. Best to let it rest overnight. Marshmallow fondant can be prepared ahead and stored in the fridge, well covered for up to a month.
Notes
This post was originally published on January 17th, 2016. On December 29th, 2019 I updated this post with new step by step photos, written text and a video.
This post containsThis post contains Amazon affiliate links that earn me a small commission, at no cost to you. I only recommend products that I use and love. Learn more about my affiliate policy here.

![Sushi Cookies [Video]](https://www.hanielas.com/wp-content/uploads/2016/09/decorated-sushi-cookies.jpg)


What size pan did you use?did you chill the pattern before putting the cake better on top or any other preparation.
Hi Linda,
I used 17.25 x 12.25 x 1 inches baking sheet
Yes pattern was in the freezer for 15-20 minutes before I poured a cake batter on the top.