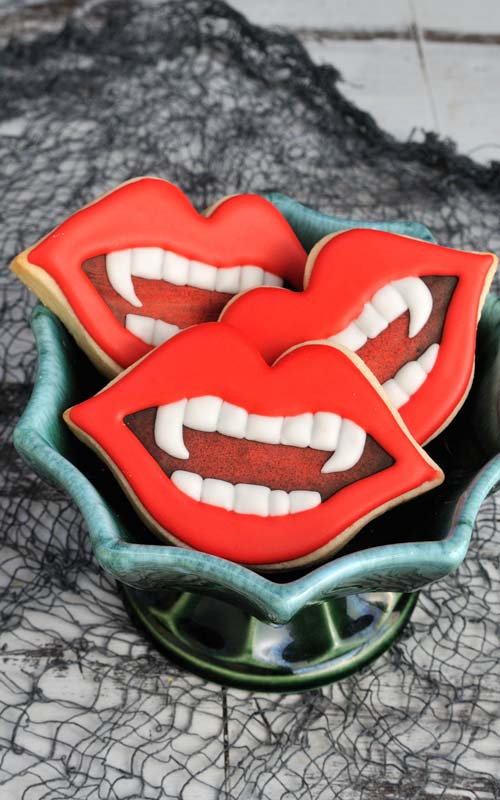
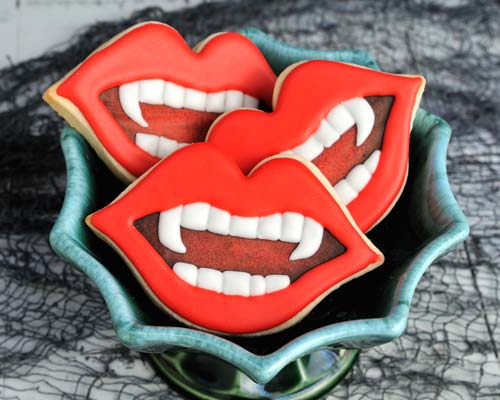
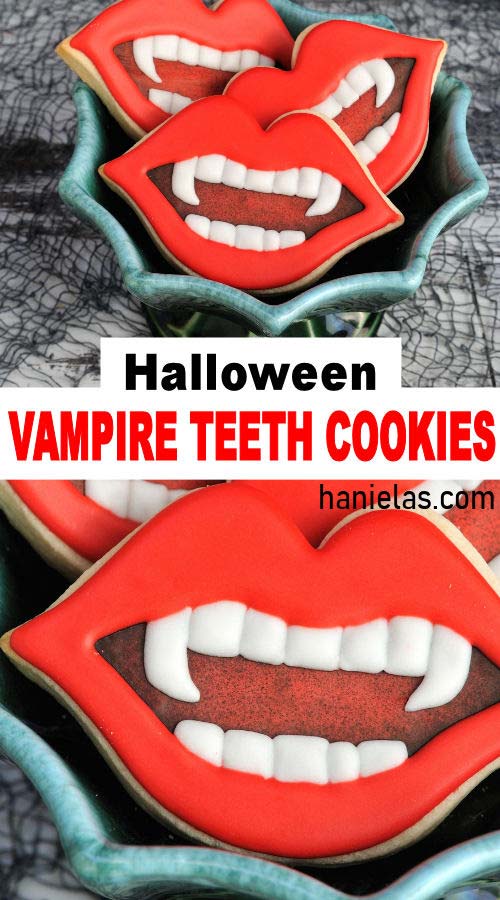
Vampire Teeth Cookies
These ghostly Vampire Teeth Cookies are perfect for Halloween. Follow my DIY cookie decorating tutorial and make them for your Halloween party.
JUMP TO VIDEO | JUMP TO RECIPES AND TEMPLATES | PIN IT for later
Updated post from 2014.
HOW TO MAKE HALLOWEEN VAMPIRE TEETH COOKIES DECORATED WITH ROYAL ICING
LIPS COOKIE CUTTER AND TEMPLATE
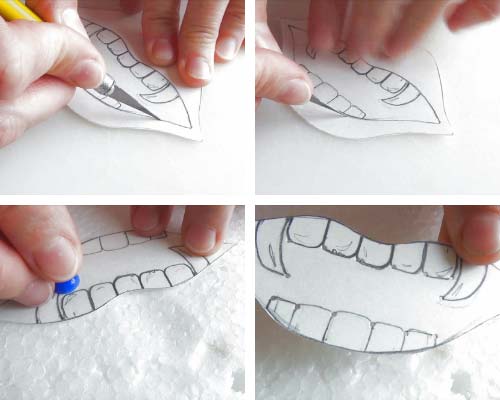
Let’s start with a cookie cutter. I used a Wilton Lips Cookie Cutter. And with this shape in mind I made a card stock template. I often use card stock to make templates. It’s cheap and readily available. However if you are looking into something more durable you can use stencil blanks (mylar material) to make templates.
I use exacto knife to cut out all my handmade stencils and templates. Be sure to cut templates on a cutting board so you don’t accidentally damage your kitchen/dining room table.
TO MAKE VAMPIRE TEETH COOKIES I USED 2 TEMPLATES :
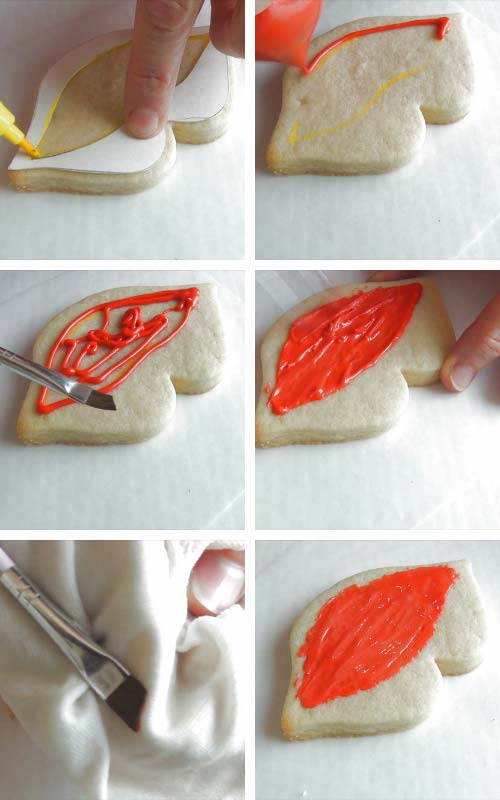
- First template is open mouth cut-out. I used it to trace the outline onto a cookie with edible marker. And I also used to airbrush red icing with black airbrush color.
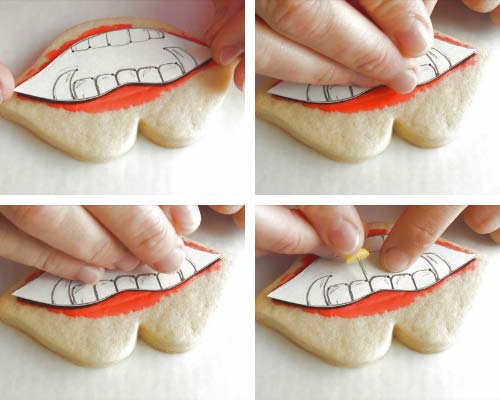
- Second template is the teeth template. To make it I used a push pin to make small holes in the corners of the teeth. I then traced these onto the icing. They appear as small dots on the icing. All you have to do then is connect the dots with icing to make the teeth. Super simple and effective. Especially if you have a hard time figuring out where to start piping details.
ROYAL ICING COLORS AND CONSISTENCY :
- Red – 4 second consistency
DECORATING STEPS :
Brush a thin layer of red icing onto the cookie. Let it dry.
AIRBRUSHING
Place mouth cut-out stencil over the red section on the cookie. Anchor stencil in place with small magnets or use a stencil holder.
Airbrush edges with black airbrush color. Let dry 10 minutes.

HOW TO MAKE TEETH AND VAMPIRE FANGS
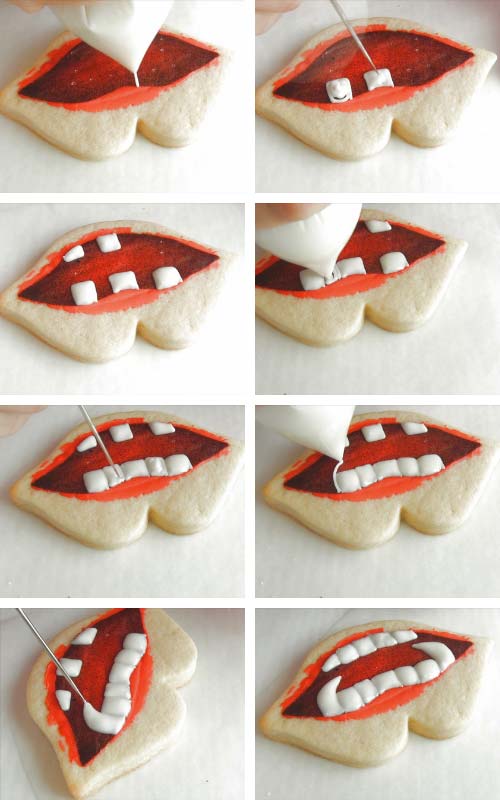
With a template and a push pin trace the teeth corners onto the cookie. Small dots represents teeth corners. Connect them with white icing to form a tooth.
ROYAL ICING COLOR AND CONSISTENCY :
- White -20 second consistency
DECORATING STEPS :
Outline and flood every other tooth with white icing (20sec). Shape teeth with a needle tool while icing is still wet. Let icing crust and only then ice the neighboring tooth. This is how you create dimension.
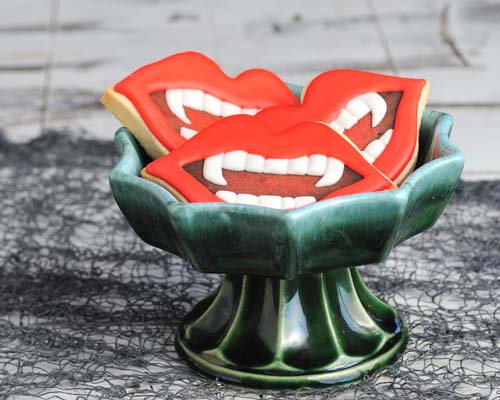
As you can see I made 5 top teeth and 1 fang on each side. I first published this tutorial in 2014 on my YouTube channel. And over the years it was brought to my attention that apparently vampires only have even number of teeth between their fangs. Who knew? I altered my original template and now it has 4 teeth between the fangs. You can find my template below in the tools section.
RED LIPS
HOW TO MAKE RED ROYAL ICING?
If starting with white royal icing add Americolor Super Red gel food color until icing turns dark red with a pink hue. Let the colored icing rest overnight and even better to let it rest for couple of days at room temperature. As the colored icing matures it deepens in color.
ROYAL ICING COLOR AND CONSISTENCY :
- Red -15 second consistency
DECORATING STEPS :
Outline and flood the lips with red royal icing(15sec). Use a needle tool to shape and distribute the icing evenly. Let dry.

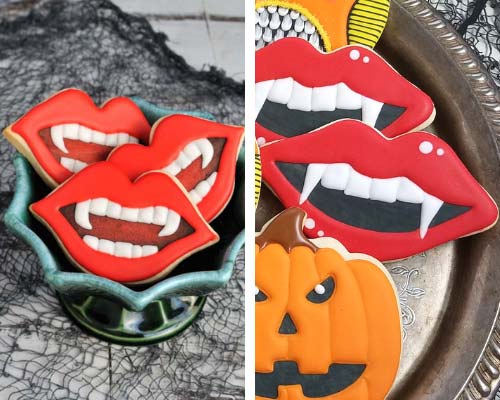
Last year I made another Vampire Teeth Cookie (right image below) using a different Lips Cookie Cutter. You can find both templates for both design below.
TO MAKE HALLOWEEN VAMPIRE TEETH COOKIES YOU NEED
- RECIPES
- Cut-Out Sugar Cookies, have you tried my Vegan Sugar Cookie or Gluten Free Sugar Cookies, they are delicious.
- Fresh Lemon Royal Icing, Vegan Royal Icing, Small Batch Royal Icing
- TOOLS
- Lips Cookie Cutters – Lips Cutter – used for original airbrush design, Wilton Comfort Grip Lips Cutter – used with a design that has only top teeth with fangs
- Templates
- Push Pin
- Edible Marker
- Needle Tool
- Stencil Blanks – to make templates
- Food Colors – black, red
- Piping Bags
- Airbrush
- Airbrush Food Color – black
- Stencil Holder
- RELATED TUTORIALS
- Ultimate Guide to Royal Icing Consistency
- How to Freeze and reuse royal icing for cookie decorating
- Royal Icing FAQ
MORE HALLOWEEN THEMED TREATS :
- Candy Corn Cupcake Cookies
- Witch Hat Cookies
- Skull Cake Roll
- Monster Eye Surprise Inside Cake
- Dracula Cupcakes
- Halloween Kawaii Owl Cookies
- Dracula Apple Teeth
PIN IT for later
This post was originally published on October 24th, 2014. I updated this post on September 1st, 2019 with new step by step photos, templates, written text and a video.
This post containsThis post contains Amazon affiliate links that earn me a small commission, at no cost to you. I only recommend products that I use and love. Learn more about my affiliate policy here.