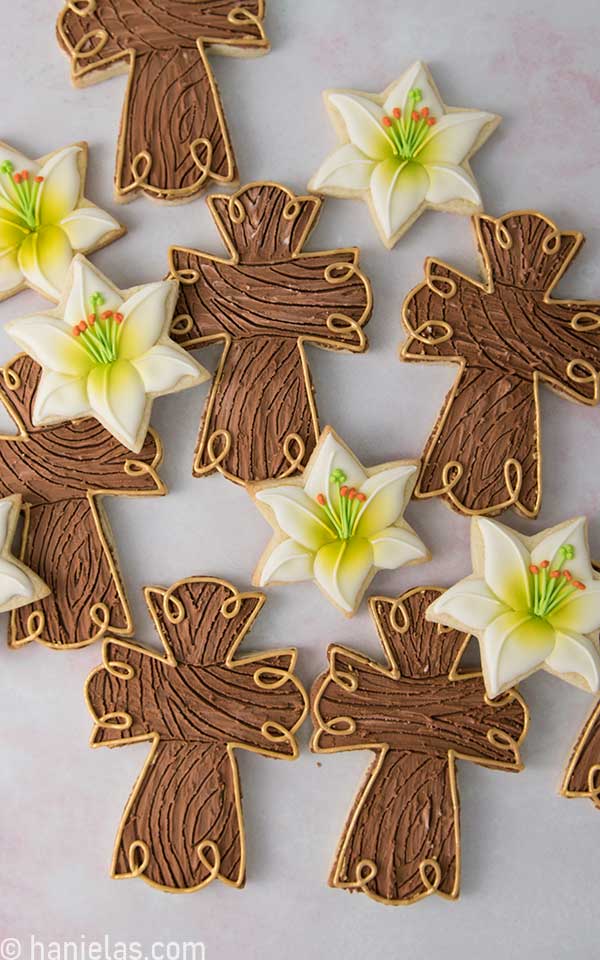
Easter Lily and Cross Cookies
Beautify your Easter tablescape with these decorated Easter Lily and Cross Cookies. Not only are they pretty to look at, but they also taste delicious too. I used my sugar cookie recipe and royal icing to decorate.
updated post from 2014
EASTER LILY AND CROSS COOKIES STEP-BY-STEP TUTORIAL
HOW TO DECORATE EASTER LILY SUGAR COOKIES WITH ROYAL ICING
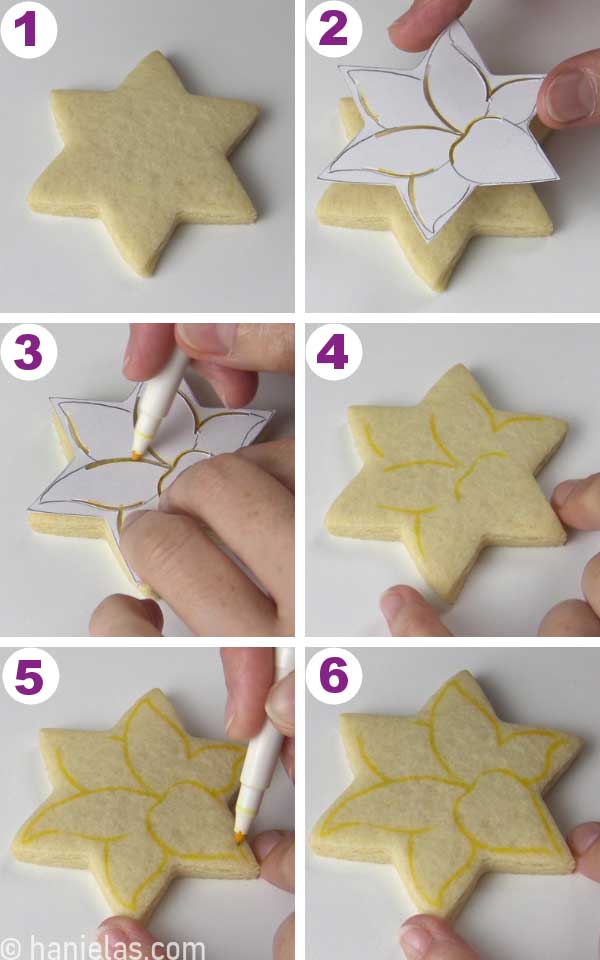
Lily Flower Cookie Cutter
If you are like me and don’t have a special lily flower cookie cutter, don’t despair. You can use a 6-point star cutter instead.
Easter Lily Cookie Decorating Template
I made a simple cookie decorating template from cardstock. Using an Exacto knife I cut out short slits in my template. And then, with a yellow edible marker, I transferred flower petal outlines onto the cookie (steps 1-6).
To decorate Easter lily flower cookies, I used 25-second consistency white royal icing. In a few words, 25-second consistency means that you added just enough water to stiff royal icing that when you pull the icing up with a spatula and let it fall back in the bowl, it blends with the remaining icing in about 25 seconds. Give a bowl a little shake to help with the healing process. To learn more about different consistencies and how to use them in cookie and cake decorating follow Ultimate Guide To Royal Icing Consistencies.
Piping and Flooding Flower Petals
Outline a flower petal with icing, fill the middle, and use a scribe tool to agitate icing and smooth it. Remember, 25-second consistency icing is not as fast healing as 15-second icing. Use a point of the scribe and sewing motion, up and down, to smooth any bumpy areas (steps 1-6).

Repeat outlining and flooding petals on each side, one petal over (steps 1-2).
Don’t flood neighboring petals at the same time. It’s important to let the first three petals crust before flooding the remaining petals (step 3).
And then again, let those petals crust before flooding the bottom and last petal (step 4). Let icing crust again for about 30 minutes before continuing with the next step. You can also let the icing dry overnight if you have time.

I used a piping tip PME #1.5 and a piping consistency icing in this next step.
Pipe curved petal veins onto the crusted or dry petal sections (steps 1-3).

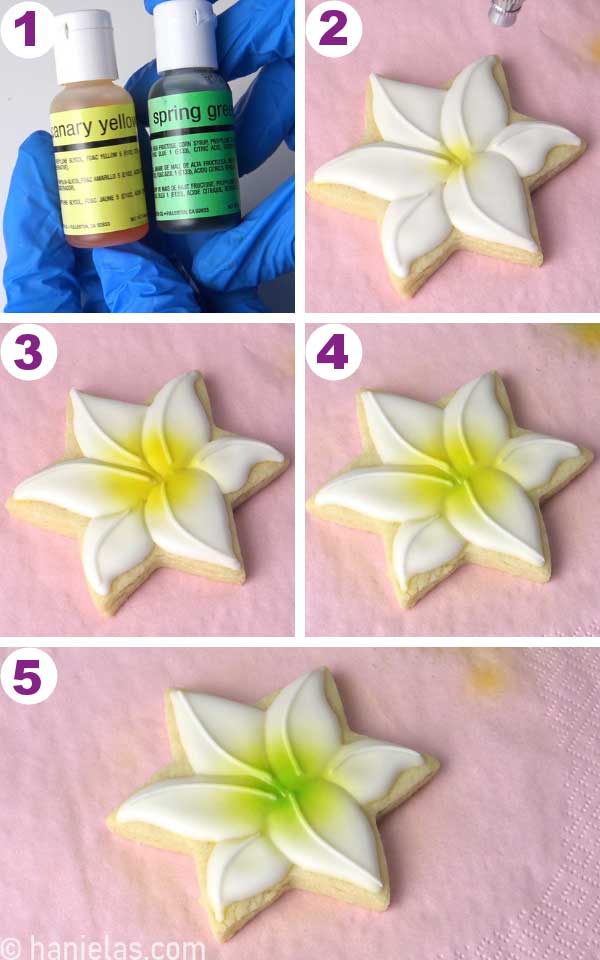
Airbrushing Lily Cookies
- I airbrushed the middle of the lily cookies with lemon and green airbrush colors (step 1).
- Aim the airbrush gun at the center of the cookie and airbrush middle using circular motion using yellow airbrush color (steps 2-3).
- Then load a few drops of green airbrush color into the airbrush. Green and yellow colors are analogous. With this particular design, it’s okay to load green into the cup that had yellow in it. without washing the cup. However, before airbrushing the cookies, spot test the green color coming out of the airbrush on a piece of paper towel. Then airbrush the middle of the lily cookie with green (steps 4-5).
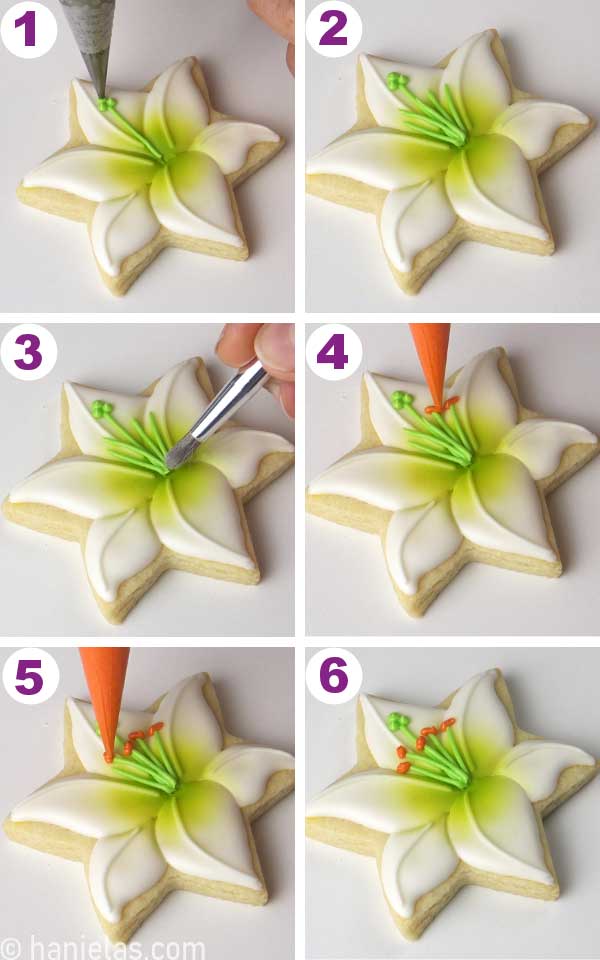
Piping Details
Lastly, with a piping consistency of bright green icing and a piping tip PME #1.5, I piped the pistil with stigma (step 1) and filaments (step 2). I used a dry food-only paintbrush to smooth the overlapping filament lines (step 3, optional). I used orange royal icing of about 25-seconds consistency to pipe orange anthers on each filament. Is that enough botanical terms for one day? I’m not sure if I’ll remember any of them tomorrow. Here you can learn more about the Lily Flower structure.
In my tutorial, I showed you how to create Easter White Lily flowers, a symbol of purity, rebirth, hope, and new beginnings. You can use this tutorial to create other Lilly flower types. After all, there are over 90 different lily flower variations.

HOW TO DECORATE CROSS COOKIES
You can use these decorated cross cookies to celebrate Easter, Holy Communion, Baptism, or Christening. Bright them up with piped royal icing Pansy Flowers, or use a different color scheme to match the occasion.
Cross Cookie Cutter
The Cross cookie cutter I used for this project comes from a set of cross cutters by Ann Clark. I have them listed in the tools section, in my Amazon Shop (Favorite Cookie Cutters Category).
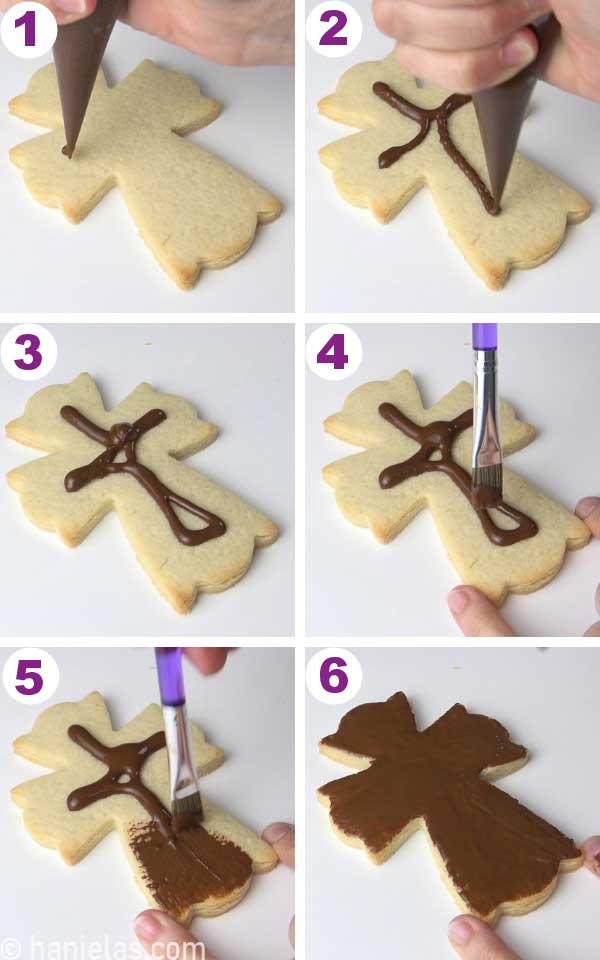
Create Wood Grain Texture
To create the wood grain look I used an easy royal icing sculpting technique.
Brush a thin layer of dark brown icing onto the cookie, using a food-only paintbrush. This icing is about 10-second consistency but can be more fluid for an easier application (steps 1-6). Let brushed icing dry, it can take up to 2-3 hours.
Years ago I used a similar texture technique to make these Icy Snowflake Cookies.
Sculpting with Royal Icing
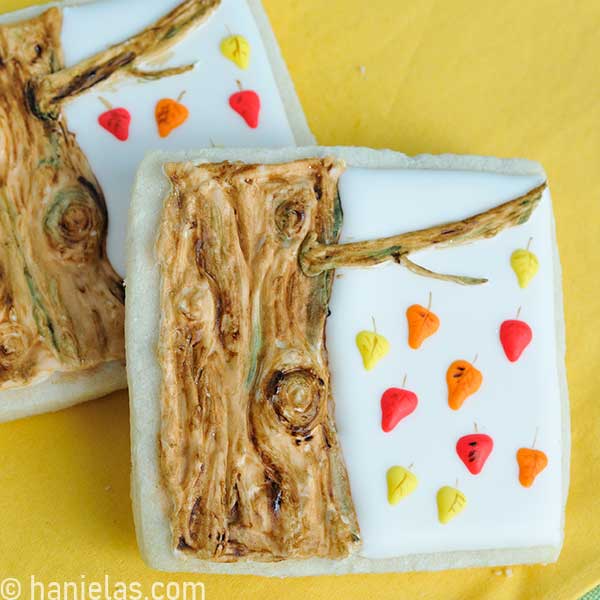
I first used the sculpting technique in 2013 to make these Fall Tree Cookies.
Spread a layer of thick royal icing of lighter shade brown onto the dry dark brown layer. Use a palette knife, spatula, or a small brush to spread the icing over the cookie. Spread icing in the vertical direction on a vertical section, and horizontally on the shoulder/horizontal section (step 1-3). If there is excess icing on the brush, wipe it off into a clean paper towel (step 4).
To create highlights use a small amount of stiff white royal icing. Use a brush to spread it over brown icing. Again keep in mind to create vertical and horizontal lines with the paintbrush. Use a small ¼ inch flat brush to create wood texture in stiff icing. It’s important that icing is stiff and holds its shape (step 5-8).
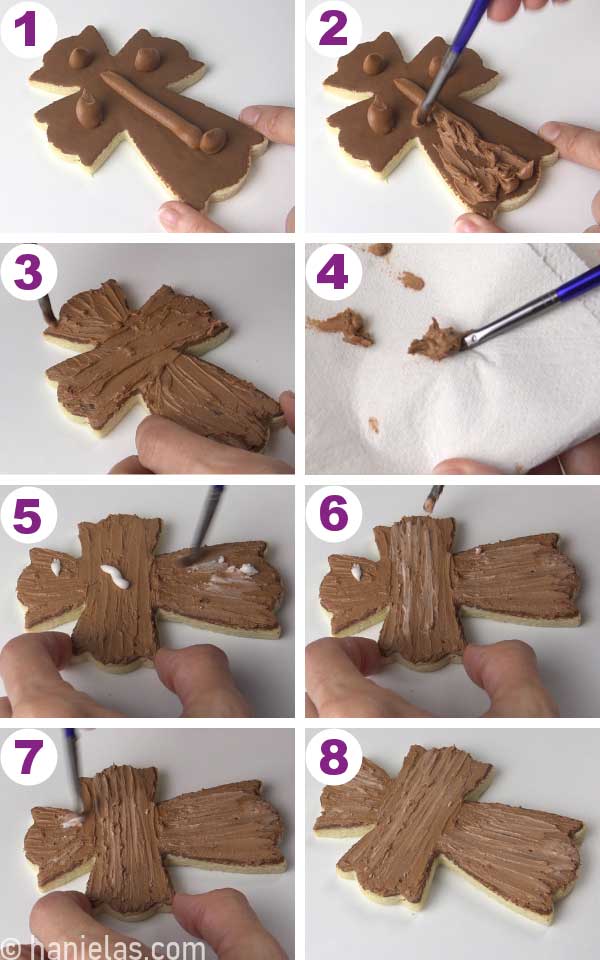
Immediately start creating wood grain lines with a toothpick or a thick scribe tool. I used a “boo-boo” stick, often referred to as a 2-in-1 tool. If you need some guidance, google some wood grain texture images for inspiration.
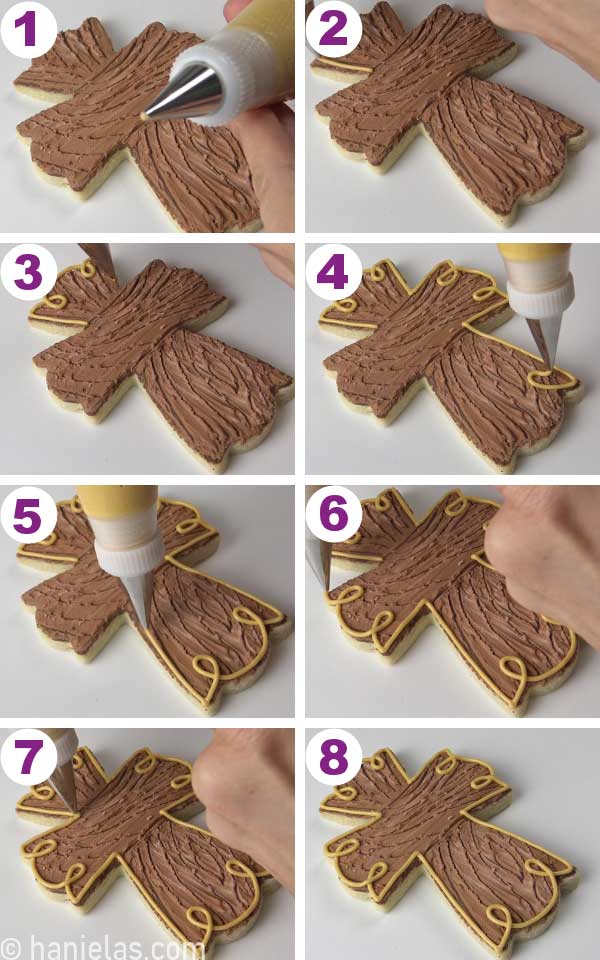
Run the tip of the scribe tool, or a toothpick thru the icing, creating wood grain texture. Create a vertical wood grain pattern and horizontal wood grain lines on the shoulder (steps 1-8).

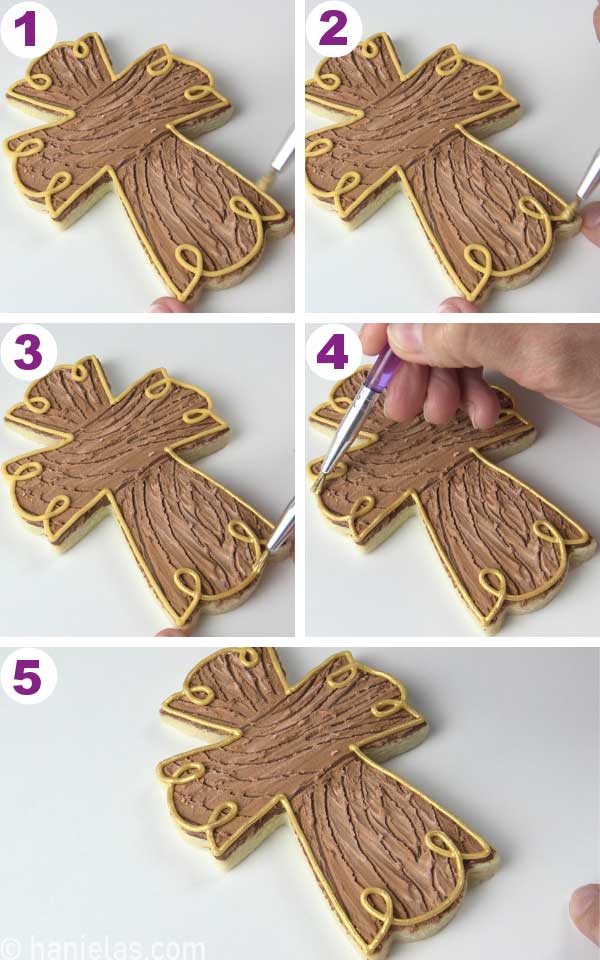
Piping Decorative Border
To complete this design, I decided to pipe a pretty border with loops, and then paint it with gold luster dust paint. When painting with gold luster dust, it’s best to tint the icing slightly with ivory or brown. This creates a good base to paint with gold. I used an ivory royal icing of medium consistency and a round piping tip #2.
TIP: It’s important that icing is not too stiff, test it on a piece of parchment first. Overlapping loop sections should sink in slightly. This ensures good adhesion on top of the sculpted layer so the border icing will not chip or become loose once dry.
Pipe a decorative border and let it dry (steps 1-8).
How to Paint with Gold Luster Dust
You can paint with ready-to-use edible gold paint or make your own gold paint by mixing dry gold luster dust with a little bit of high content alcohol (grain alcohol like Everclear, McCormick Lemon Extract, or Spirytus Vodka).
TIP: For the best results I use high content alcohol. It evaporates quickly, leaving a beautiful gold shine behind. Here are some alternatives to alcohol if you can’t use alcohol to make edible gold paint.
Sculpted royal icing adds texture and interest to your cookie designs. Get creative and use it on different cookie shapes. I often use it on gingerbread houses.
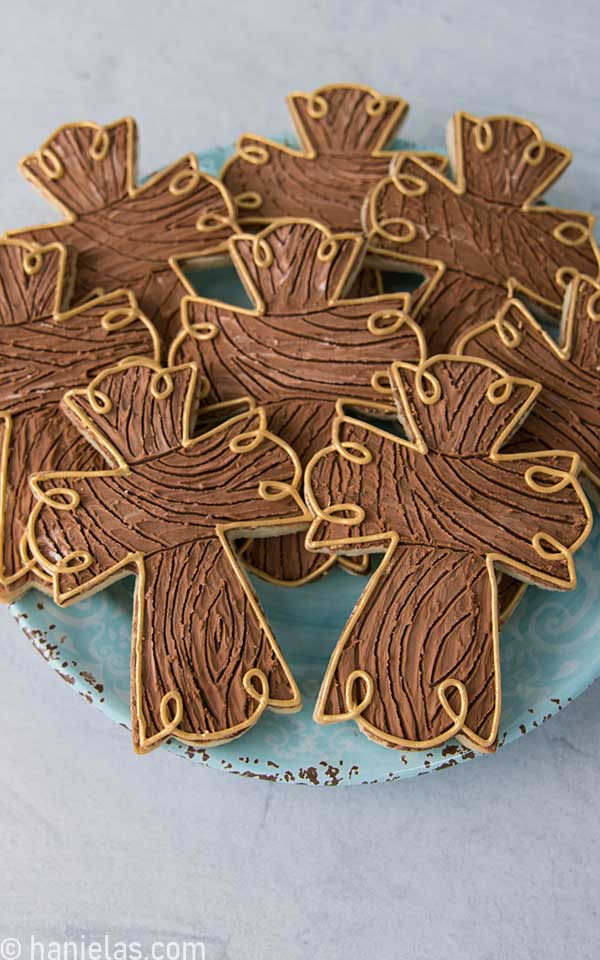
Arrange both, Easter lily and cross cookies on a pretty plate.

ROYAL ICING TIPS
- I used one tablespoon of sifted cocoa powder and/ Americolor brand Chocolate Brown to make the brown icing.
- If your brown icing has a greenish hue, try adding pink or red.
- Prepare brown icing ahead of time. Icing color deepens as icing rests.
- Use ivory or light brown colored icing if you plan on painting it with gold luster dust. You’ll get better coverage results.
Did you make these Decorated Cookies? Tag @hanielas on Instagram and hashtag it #hanielas
TO MAKE EASTER LILY AND CROSS COOKIES YOU NEED
- RECIPE
- Sugar Cookie Recipe
- Royal Icing Recipe
- TOOLS
- Shop all tools in my Amazon Shop
- 6 point star cookie cutter
- Cross Cookie Cutter
- Concentrated Gel Food Colors:
- Gold Luster Dust
- Paintbrushed for decorating from Wilton
- 2-in-1 Decorating Tool ( “boo-boo” stick)
- Airbrush
- Airbrush Colors: yellow, green
- Edible marker: yellow
- Disposable Piping Bags
- PME piping tip #1.5
- Round Piping tip #2
This post was originally published on April 18th, 2014. On March 18th, 2022 I updated this post with new step-by-step photos, written text instructions, and a video.

![Butterfly Cake [Template]](https://www.hanielas.com/wp-content/uploads/2019/04/butterfly-buttercream-cake.jpg)