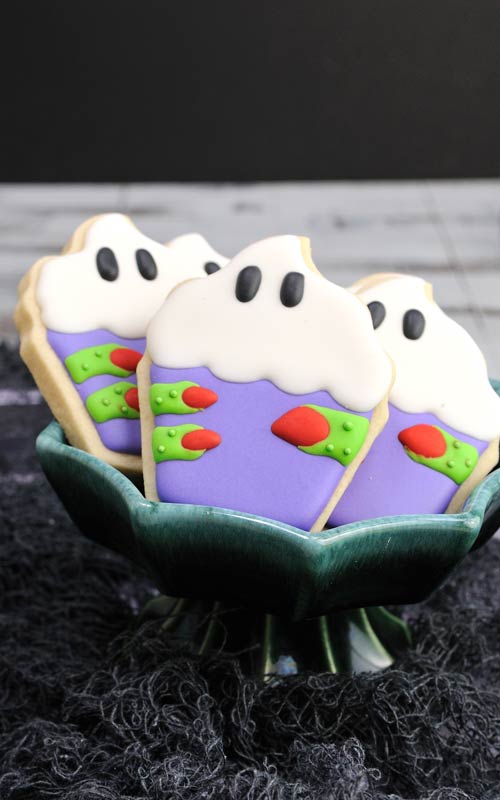
Witch Cupcake Cookies
I made adorable Witch Cupcake Cookies for Halloween. These royal icing decorated sugar cookies are wickedly easy to make. And I think you’ll love the fact that all you need is a cupcake cookie cutter to make these fun Halloween Sugar Cookies.
JUMP TO TOOLS AND RECIPES| PIN IT for later
Cupcake shape is among other several cookie cutter shapes I love using over and over. It’s really versatile and can be used for any holiday or occasion.
And here is another example of a great multipurpose cookie cutter. One I used in my project – 30 Cookie Designs Idea with 1 Cookie Cutter .
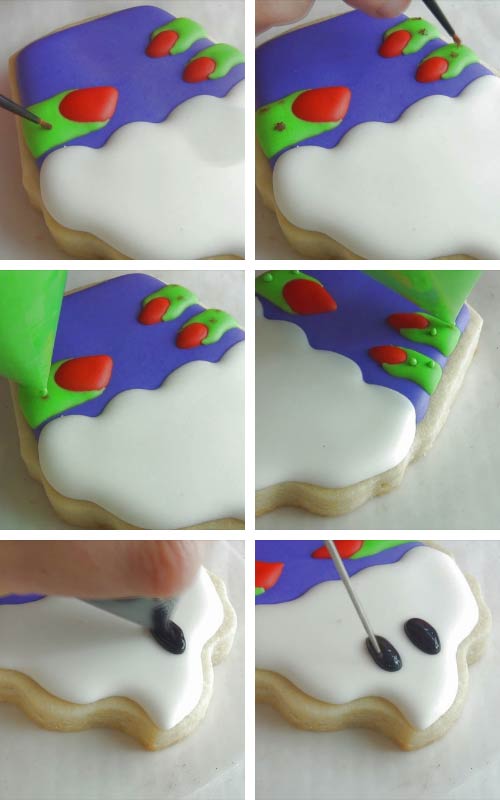
HOW TO DECORATE WITCH CUPCAKE COOKIES
ROYAL ICING COLORS AND CONSISTENCIES :
- Purple, White – 15 second consistency
- Electric Green, Red, Black – 20 second consistency
DECORATING STEPS :
Start by outlining and flooding the bottom part of the cupcake with purple royal icing (15sec). Then let it crust well. For about 1 hour. After ice the top (cupcake swirl part) with white royal icing (15sec). Use a needle tool to distribute the icing evenly. Let crust to couple of hours.
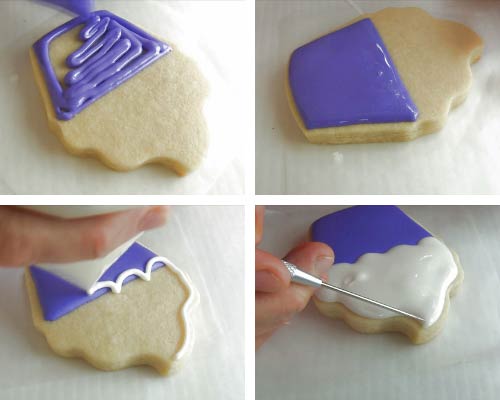
WITCH FINGERS
Next, with red royal icing (20sec) pipe tear drop shapes onto the purple section. Shape the tip with a needle tool. These are the witch’s nails. Though they look nothing like it right now. Wait till we add the fingers. Let the red icing crust well, 30 minutes.
With electric green royal icing (20sec) pipe the fingers. Immediately shape the icing with a needle tool. Move the green icing slightly up the sides of the nails. Let dry.

With edible brown petal dust color small sections on green icing. Then pipe green dots (15sec) – these are warts on witch’s hand.
Finish this cute and little spooky Halloween Cookie with black royal icing (20sed), pipe eyes onto the white icing. And that’s it. That was so easy wasn’t it. Unlike some of my more complicated cookie projects like this Harry Potter Gingerbread House.

TO MAKE WITCH CUPCAKE COOKIES FOR HALLOWEEN YOU NEED
- RECIPES
- Cut-Out Cookies : Cut-Out Sugar Cookies, Vegan Sugar Cookies, Gluten Free Sugar Cookies, more cut-out cookie recipes
- Fresh Lemon Royal Icing, Vegan Royal Icing
- TOOLS
- Favorite Decorating Tools
- Cupcake Cookie Cutter
- Food Gel Colors : electric green, red, black, purple (I use electric pink and sky blue to make purple)
- Piping Bags
- Needle Tool
- RELATED TUTORIALS
- Ultimate Guide to Royal Icing Consistency
- How to Freezer and reuse frozen royal icing
- Royal Icing FAQ
MORE HALLOWEEN TREATS :
- Candy Corn Cupcake Cookies
- Pumpkin Cookie Cutter Halloween Cookies
- Halloween Candy Bucket Cookies
- Skull Cake for Halloween
- Halloween Kawaii Owl Cookies
PIN IT for later

I updated this post with new step by step photos, written text and a video.
This post containsThis post contains Amazon affiliate links that earn me a small commission, at no cost to you. I only recommend products that I use and love. Learn more about my affiliate policy here.