Simple Decorated Valentine’s Day Heart Cookies
You can’t go wrong with these simple decorated Valentine’s Day Heart cookies. Heart cookies are perfect for birthdays, Weddings, bridal showers, and Valentine’s Day.

updated from 2014
HOW TO MAKE SIMPLE DECORATED HEART COOKIES
To make decorated heart cookies, I used my popular sugar cookie recipe and royal icing to decorate. Do you prefer vegan or gluten-free recipes for cookie decorating? You are in luck. I have all the recipes here on my blog.
To decorate my heart cookies, I used my favorite we-on-wet decorating technique, using 15-second consistency royal icing. If you are new cookie decorating refer to my Beginner Guide to Cookie Decorating.

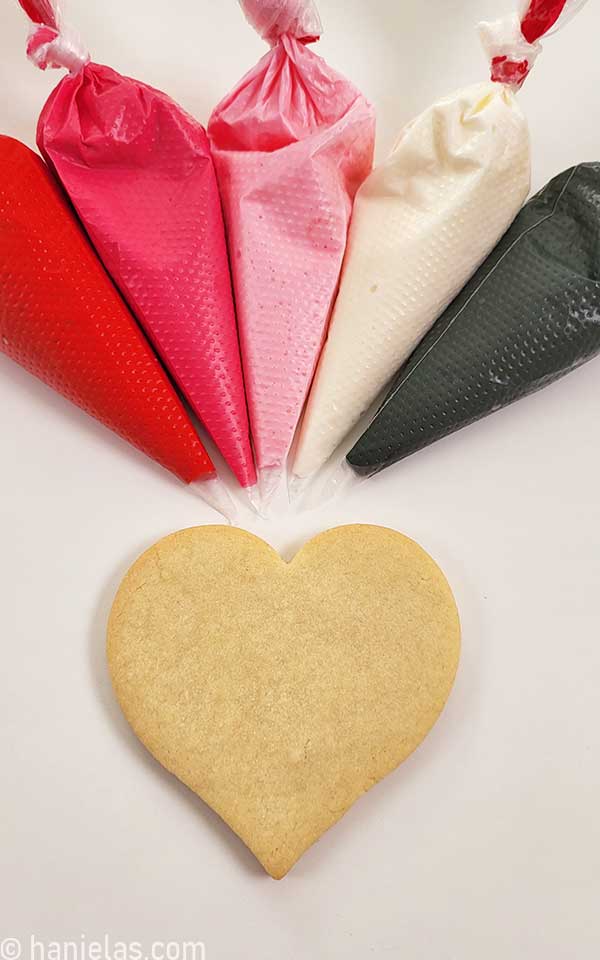
WHAT YOU NEED TO DECORATE SIMPLE HEART COOKIES FOR VALENTINE’S DAY
- Baked Cookies
- Royal Icing, thinned with little bit of room temperature water to flood consistency (15-second consistency)
- Mixing Bowls
- Concentrated Gel Food Colors
- Spatulas
- Toothpicks or a Metal Scribe
- Spray Bottle/Dropper/or Decorating Bottle – to thin icing
- Piping Bags – I used tipless piping bags
- More about different Cookie Decorating Tools
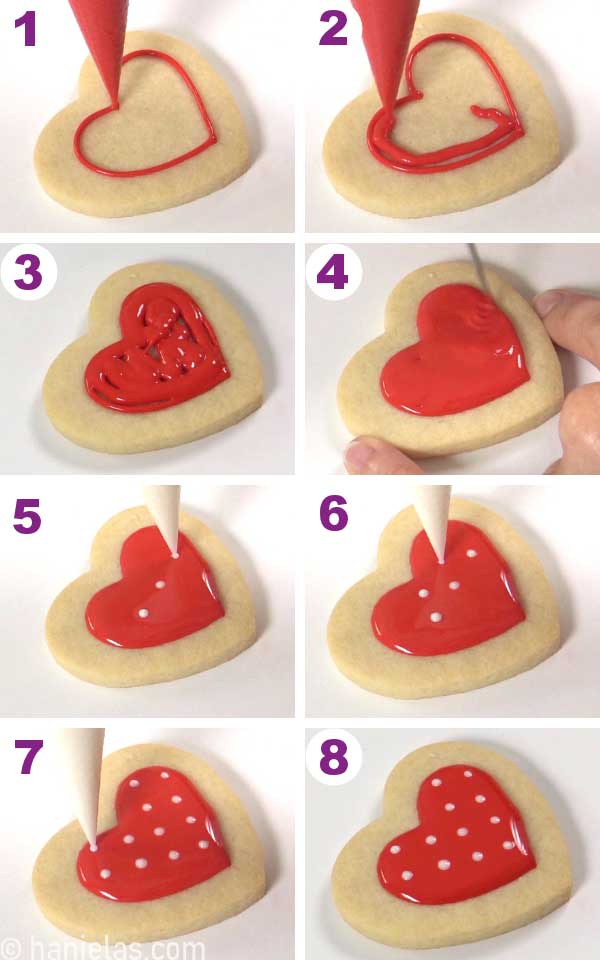
POLKA DOT HEART COOKIES
My affinity for polka dots doesn’t end with clothing. I adore polka dots on cakes and cookies, too. Royal icing polka dots are super easy to make. Do you like them, too?
Pipe a heart shape outline onto a cookie, leaving about ½ inch border. Fill the heart with icing and smooth it with a scribe. (steps 1-4). Immediately take white icing and pipe small dots onto the red icing. If possible, I like to start in the middle and pipe the first dots in a straight line, and then I stagger them (steps 2-8).
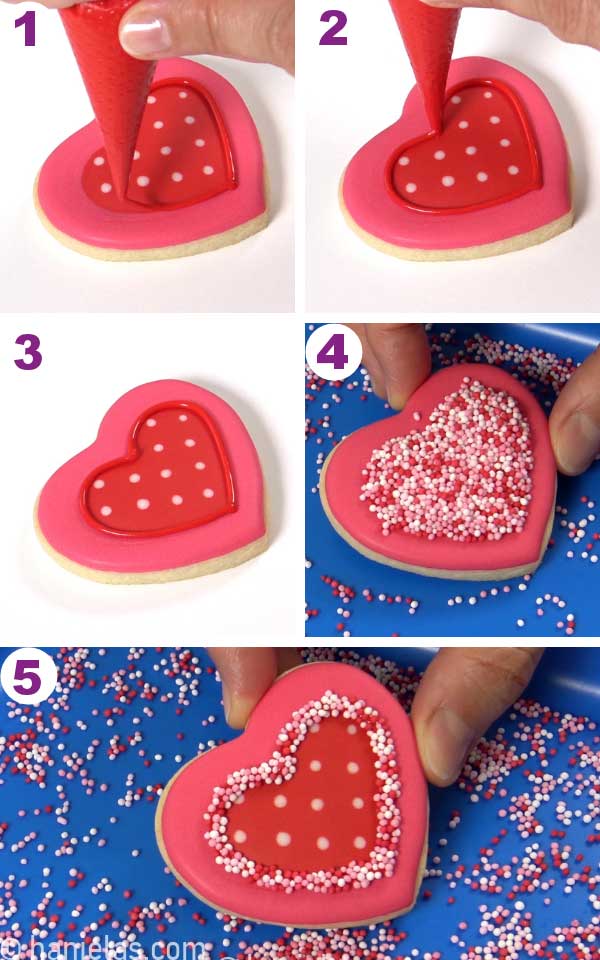
Decorate the border with pink icing, outline and fill. Let icing dry.
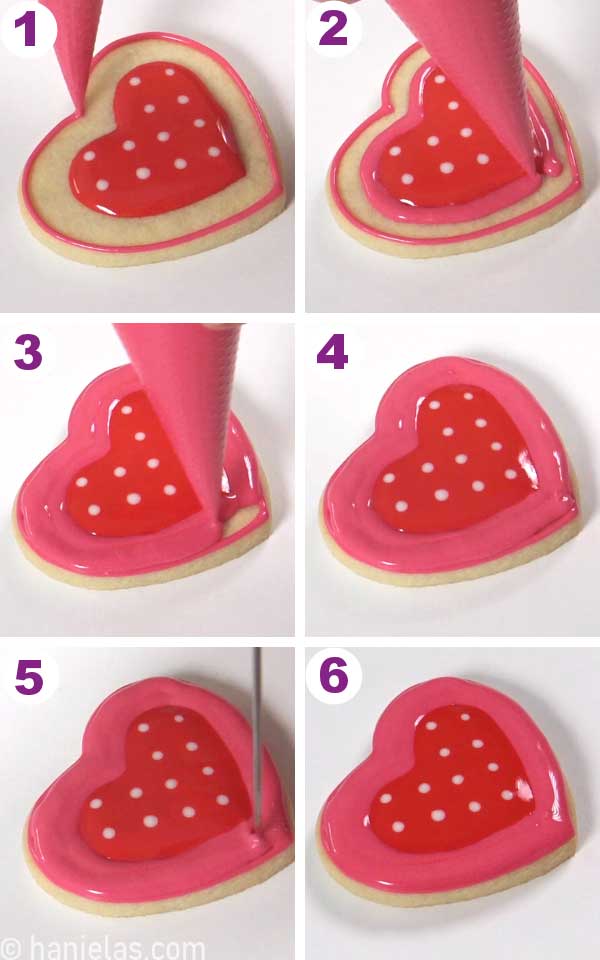
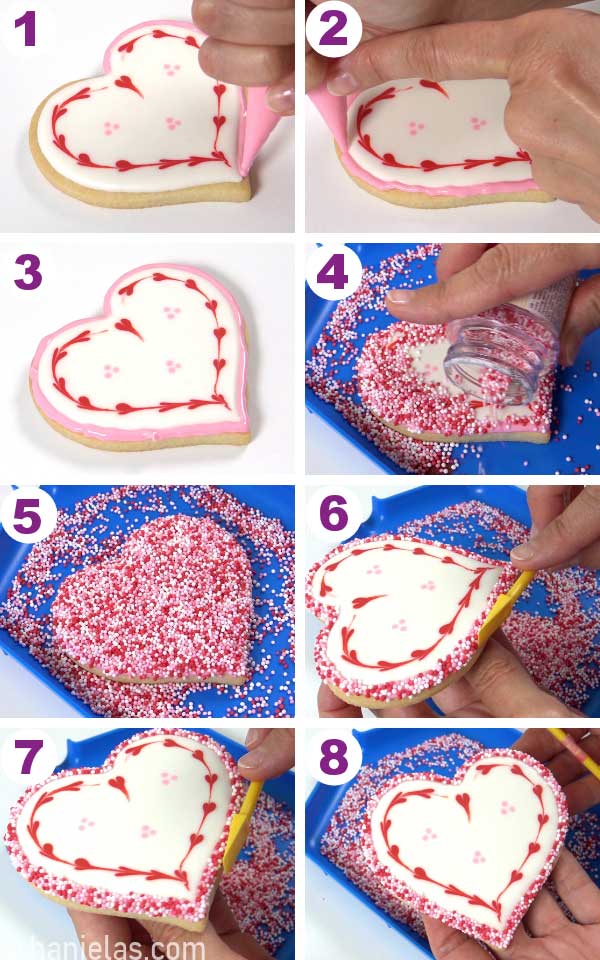
Once the icing is dry, outline the inner heart and dust it with colorful nonpareil sprinkles. Shake off the excess. Aren’t they pretty?
SIMPLE WET-ON-WET HEART COOKIES
This popular wet-on-wet technique turns dots into hearts!
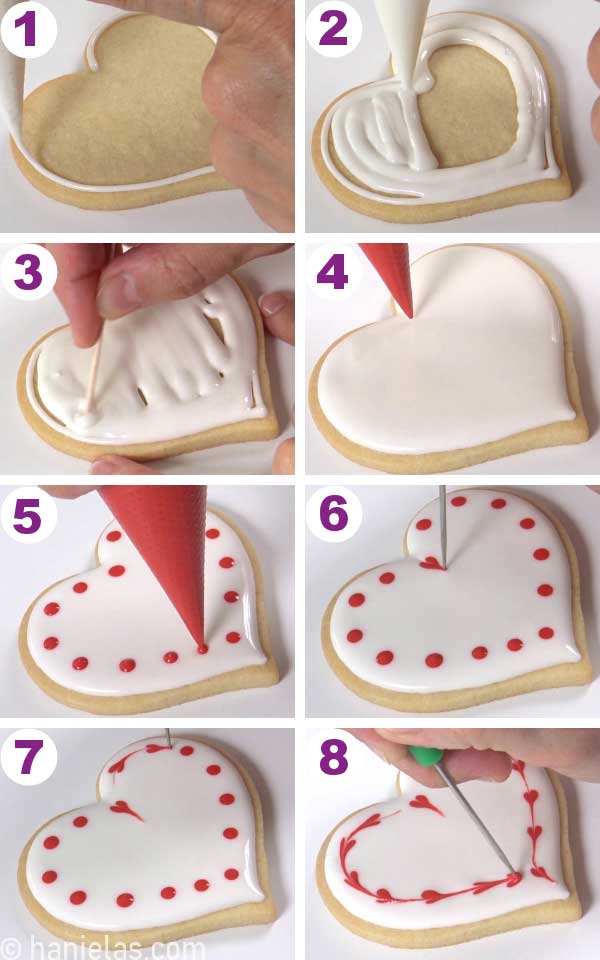
Heart Border
Outline and flood the heart cookie with white icing, and keep a ¼ inch undecorated border (steps 1-3). Immediately, take red icing and pipe large dots around the perimeter (steps 4-5). Then take the metal scribe or a toothpick and gently pull the tip of the tool thru the middle of each red dot. This movement shapes red dots into hearts (steps 6-8).
Right after, without letting the icing crust, pipe a cluster of 3 pink dots into the white icing (steps 1-2). After this, let the icing dry overnight.

Pipe pink border and immediately dust icing with nonpareils (steps 1-5). If you notice icing covered in sprinkles flowing over the edge, use a spoon, butter knife, or 2-in-1 decorating tool (boo-boo stick/cookie scrapper) to push the icing back into place gently. Let the icing dry.
Heart Pattern
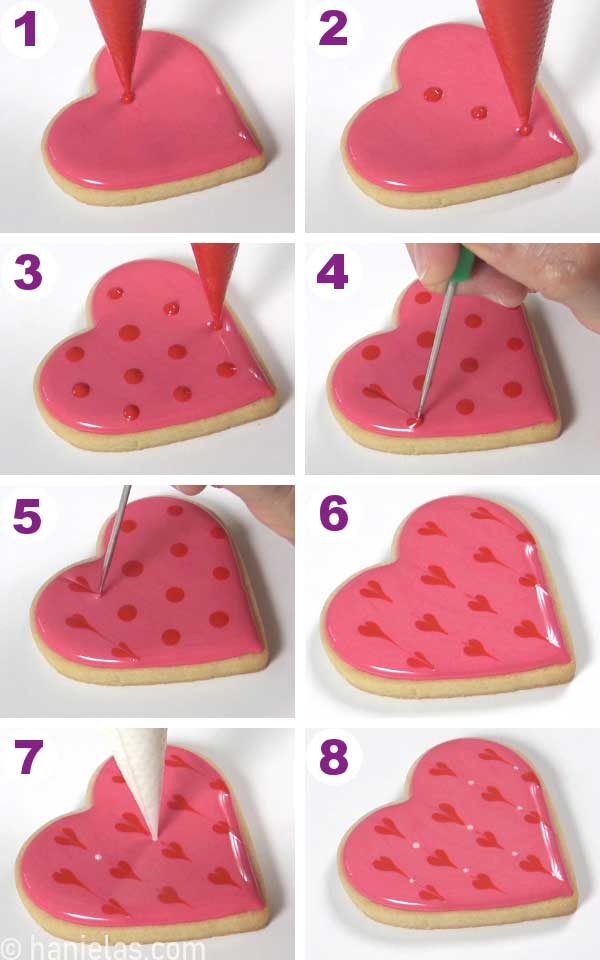
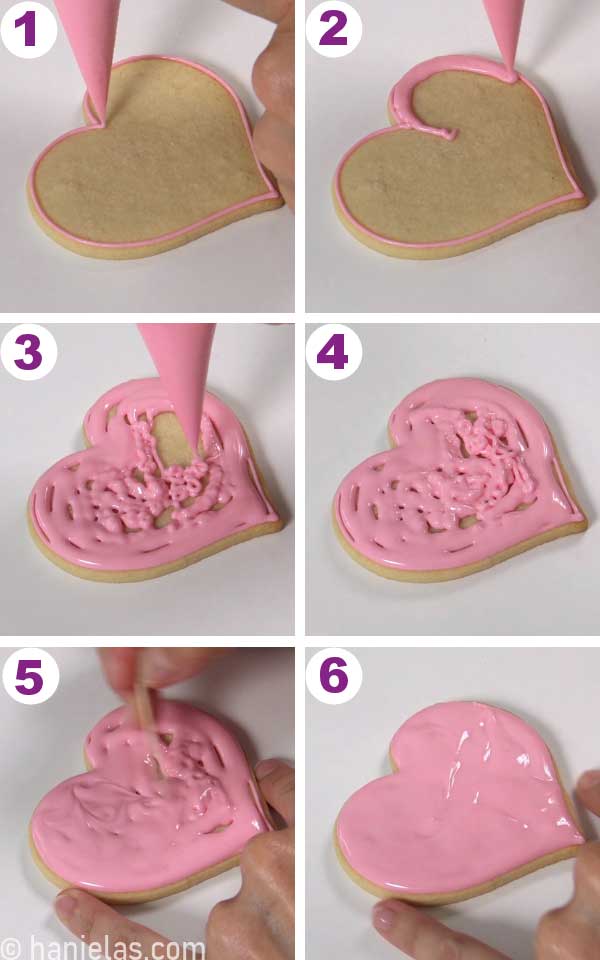
Start by outlining and flooding the heart cookie with pink icing. Don’t let the icing crust.

Immediately continue decorating with red icing. Pipe large dots onto the pink base. Notice icing sinks into the pink base. This is what you want (steps 1-3). Take the scribe and run the tip of the scribe thru the middle of each dot. Wipe the tip of the scribe after each time you run it thru the red icing (steps 4-6).
Lastly, with white icing, pipe small accent dots between the hearts (steps 7-8).
WET-ON-WET STRIPES
Simple Thin Stripes
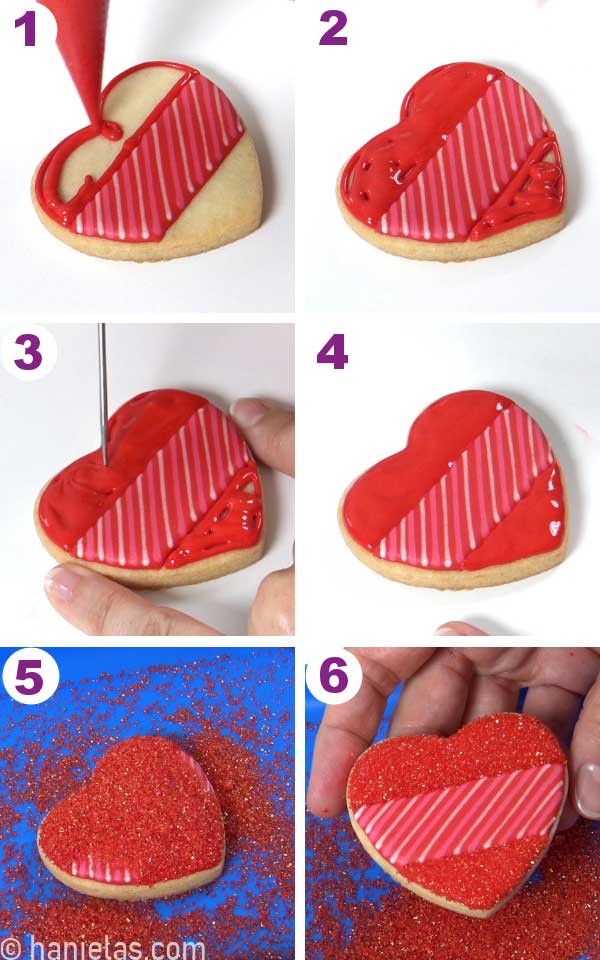
Outline and flood heart cookie with white icing, leaving a ¼ inch boarder undecorated (steps 1-4). Then pipe lines across with red and pink icing. Let the icing crust for 30 minutes.
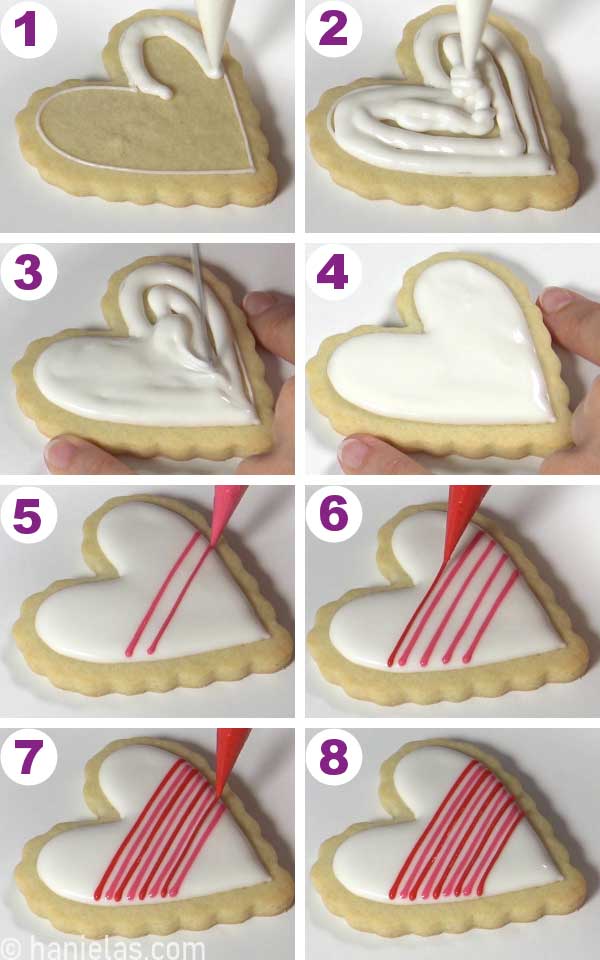
and then pipe small dots around (steps 1-3).

Wide Stripes
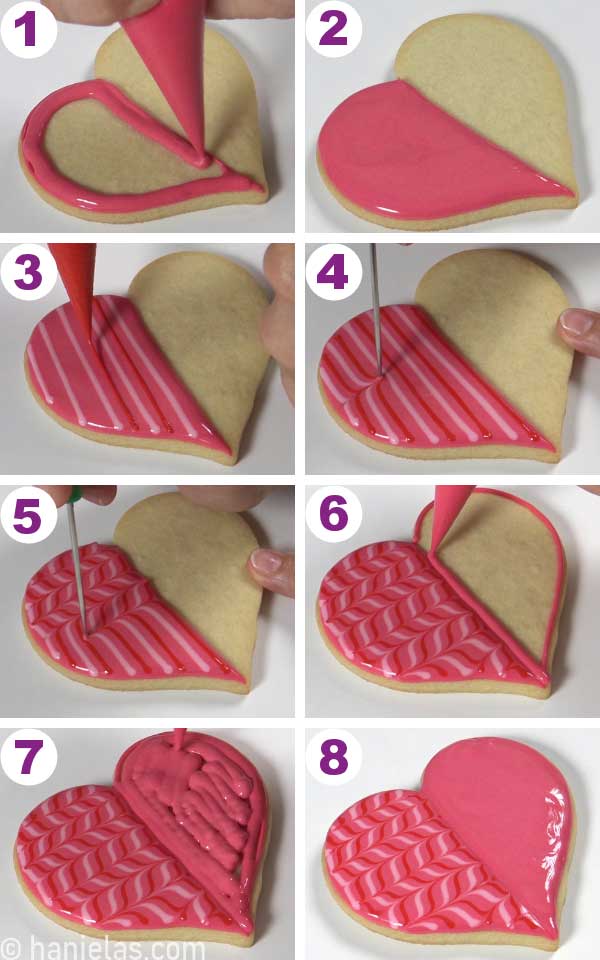
Pipe a wavy wide stripe outline and fill it with icing. Use a scribe to smooth the icing. Immediately pipe the thick stripe next to the first one (steps 1-5). Continue with the remaining stripes (steps 6-8). Let the icing dry.
ONE LINE ZIC ZAC MARBLING
Outline and flood the heart cookie with white icing. Immediately pipe a line with pink icing, following the heart outline. Take a scribe and run it back and forth thru the pink line (steps 6-8). And that’s it. So simple and pretty!

MARBLED HEART COOKIES
Royal icing marbling is the most popular technique to decorate cookies. It works virtually on any shape, producing eye-catching results in seconds. I used it to make Marbled Christmas Ornament Cookies and my 50 shades of Purple Cookies.
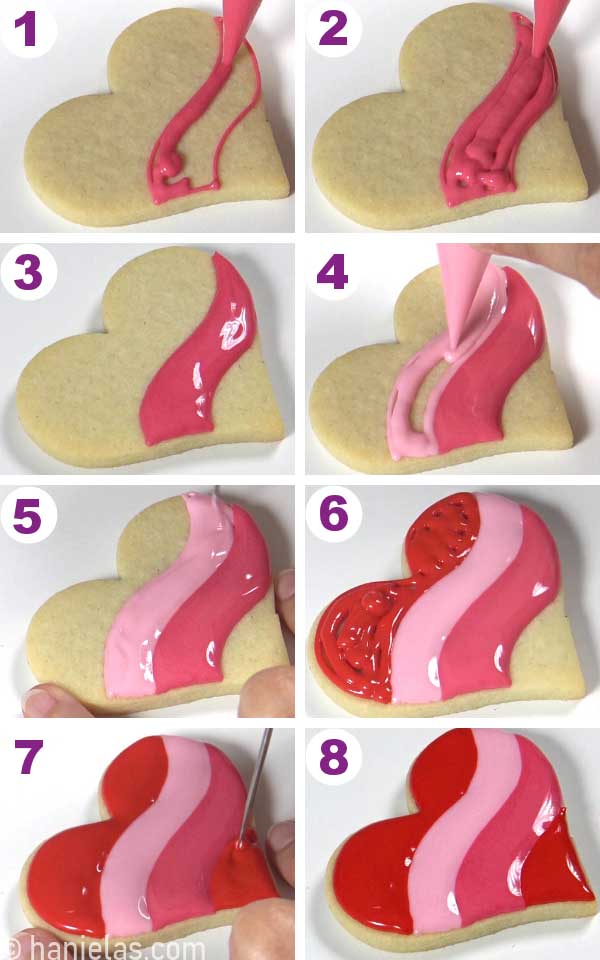
Easy marbling works like a charm on Valentine’s Day heart cookies. Start by outlining and flooding the heart cookie with 15-second consistency pink icing. Use a scribe or a toothpick to smooth the icing (steps 1-2). Take light pink and red icing and pipe the straight lines across the wet base layer. Lines will sink into the base (steps 3-4).
Don’t wait for the icing to crust. Take the scribe and run the tip through the lines, less than 3/8 inches apart (step 5). Then repeat, in the opposite direction, run the scribe tool between the first marbled lines (steps 6-8). Let the icing dry.

Here is another variation of this popular marbling technique.
Flood half of the heart with dark pink icing. Pipe lines across and then run the scribe thru back and forth. Outline and flood the other half of the cookie.
DECORATING COOKIES WITH SANDING SUGAR
Sanding Sugar is made of large polished sugar crystals and it’s perfect for cookie decorating. It adds texture, sparkle and miraculously hides any mistakes. I love it.
Simple Sanding Sugar Cookie
In this next design, flood the cookie and let the icing dry overnight.

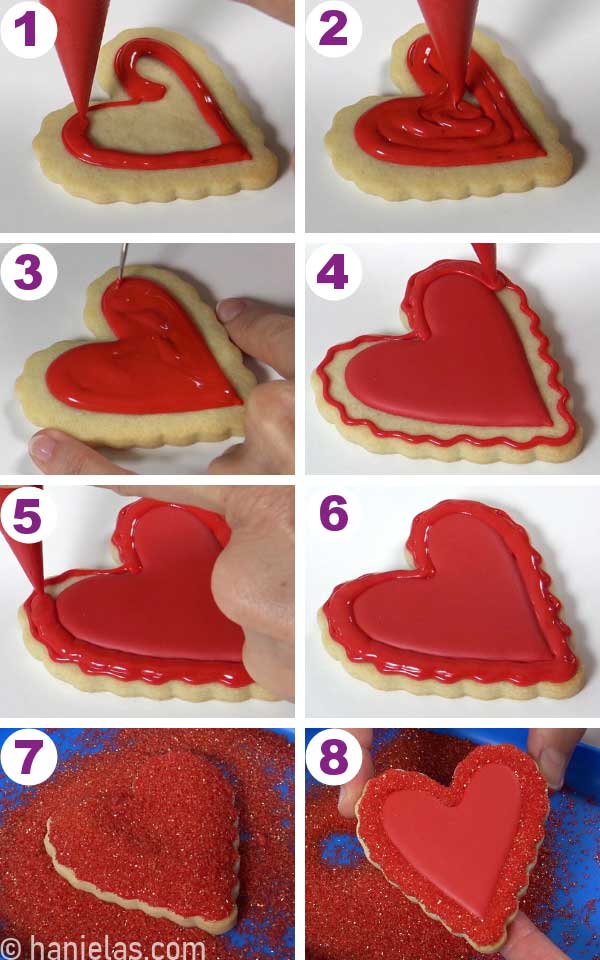
Once the base layer is dry, pipe a heart outline and fill it with red icing (steps 1-4). Place the cookie onto a bead tray or a clean coffee filter to catch any sugar. Generously dust freshly piped heart shape with sanding sugar. Gently shake off any excess and let the icing dry (steps 5-6).

SANDING SUGAR BORDER
Pipe the middle red section and immediately pipe lines across with pink and white icing. Let icing dry overnight (step 1-8).

With red icing outline and fill the areas around the middle section. Don’t overfill. Immediately dust icing with red sanding sugar (steps 1-6).
PINK SANDING SUGAR
In this design I decorated part of the cookie with marbled technique and rest is dusted with sanding sugar.
Pipe the pink heart and then pipe red and dark pink lines across the pink heart (steps 1-4). Pull the tip of the scribe thru lines back and forth (steps 5-8). Let the icing dry.

Outline and flood the section around marbled heart with pink icing (step 1-5). Immediately dust icing with pink sanding sugar (steps 6-8).

Similarly, like in the previous design I decorated inner heart with icing and I let it dry (steps 1-3). Then you can ice the border with icing and dust with red sanding sugar (steps 4-8).
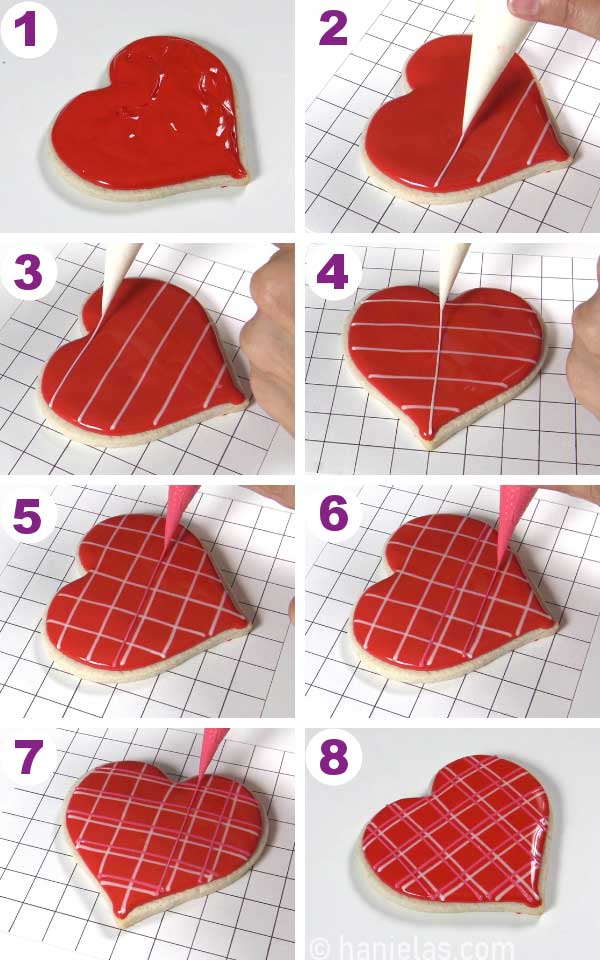
EASY PLAID HEART COOKIES
Outline and flood cookie with pink icing (steps 1-6). Don’t let the icing crust.
In cookie decorating, I often use simple tools to achieve desired results. In this instance, I used a simple grid template underneath the cookie to help me keep the plaid design uniform. It’s simple and effective. And for easy cleanup, I keep the grid template in the protector sheet.
Place the cookie on top of the grid template. Follow the grid lines and pipe the grid lines. First, I piped dark pink and black lines (steps 1-4). Then, I let the icing crust well for 2 hours or so. Now you can pipe a red heart on top of the plaid design (steps 6-8).

Here is another example of plaid design o a heart cookie.
VALENTINE’S DAY COOKIE IDEAS
- Bee Mine Honeycomb Cookies
- Heart Candy Cookie Box
- Breakfast Cookies
- Valentine Lips Sugar Cookies via Lila Loa

DECORATING SUCCESS TIPS
- Use concentrated gel colors to color Royal Icing.
- Prepare red icing the day before. Color deepens as colored icing rests
- Sanding sugar is not same as granulated sugar. Sanding sugar has larger, polished crystals. If you can’t find colored sanding sugar, get white sanding sugar.
- Add sprinkles and sanding sugar to wet icing. Once icing dries sprinkles don’t stick.
- Sanding sugar application can get tricky. Don’t overfill cookies with icing. If there is too much icing on the cookie, weight of the added sanding sugar can cause icing to overflow the cookie.
- Thin your icing to flood consistency (15-second). Learn more about royal icing consistencies (101 Guide).
- When piping thin lines using wet-on-wet technique make the opening on the piping bag small. Icing line spreads as it sinks into the icing.
- I often have 2 bags of same color when creating wet-on-wet design. One bag is filled with more icing and opening is bigger (to flood cookies) and another bag has smaller amount of icing with a small opening (small bag is easier to handle and you have more control when piping).
- Use a handy grid to help with the plaid design.
- Do you need help with the piping of the lines? Try practicing piping on a piece of wax paper first. To pipe clean lines lift the bag slightly above the surface you are piping on.

This post was originally published on January 22nd, 2014. On January 30th, 2023 I updated this post with new step-by-step photos, and written instructions.